
To fix an oil rain lamp, start by cleaning the pump and replacing the oil.
Oil rain lamps can be a beautiful and unique addition to any home decor. However, like any other mechanical device, they can sometimes experience issues that require troubleshooting and repair. If you find yourself with a malfunctioning oil rain lamp, don’t worry – we’re here to help.
In this blog post, we will guide you through the step-by-step process of fixing your oil rain lamp. From identifying common problems to providing detailed instructions on how to resolve them, we’ve got you covered.
With our professional tips and techniques, you’ll have your oil rain lamp back up and running in no time. So grab your tools and let’s get started on restoring the magic of your oil rain lamp!
Understanding An Oil Rain Lamp
An oil rain lamp can add a touch of elegance to any room, but when it starts malfunctioning, it can be frustrating. Fortunately, fixing an oil rain lamp is not as difficult as it may seem. With a few simple steps, you can get it back in working order and enjoy its soothing and mesmerizing effects once again.
What Is An Oil Rain Lamp?
An oil rain lamp is not your ordinary household decoration. It is a unique and mesmerizing piece that combines the beauty of a cascading rain effect with the enchanting glimmer of light. This lamp adds a touch of elegance and tranquility to any room, making it a popular choice among interior design enthusiasts.
How Does An Oil Rain Lamp Work?
Understanding how an oil rain lamp works can help you troubleshoot any issues that may arise. The lamp consists of several key components:
- The reservoir: This is where the oil is stored. It is typically made of glass or plastic and holds a considerable amount of oil to ensure a continuous flow.
- The pump: The pump is responsible for circulating the oil from the reservoir to the top of the lamp. It typically operates silently to maintain the calming ambiance.
- The wick: Connected to the pump, the wick absorbs the oil and transports it to the top of the lamp, where the rain-like effect is created.
- The rain tubes: These slender tubes are attached to the top of the lamp and act as a pathway for the oil to flow down. They are strategically positioned to distribute the oil evenly and create a beautiful rain-like cascade.
- The light source: To enhance the visual appeal, the lamp is equipped with a light source that illuminates the falling oil droplets, creating a mesmerizing display.
Now that you have a basic understanding of how an oil rain lamp works, we can delve deeper into troubleshooting common issues and learn how to fix them. Stay tuned!
Credit: jenniferhuber.blogspot.com
Identifying Issues With An Oil Rain Lamp
An oil rain lamp can add a mesmerizing and tranquil ambiance to any space. The enchanting waterfall of oil droplets creates a visual delight that captivates the senses. However, like any other mechanical device, oil rain lamps are prone to issues over time.
Understanding the common problems that can occur with these lamps is key to restoring their enchanting allure. In this section, we will explore the most common issues, as well as the signs that indicate your oil rain lamp is malfunctioning.
Common Problems With Oil Rain Lamps
Oil rain lamps, with their intricate design, can face a few common issues that can impede their performance. It’s essential to be familiar with these issues to diagnose and fix them effectively. The following are the most commonly encountered problems:
- Motor Issues: The motor is responsible for driving the pump and creating the movement of the oil within the lamp. Over time, the motor may wear out or become clogged, resulting in reduced or erratic flow.
- Leakage: Leakage can occur when the tubes or seals within the lamp become compromised. This can result in oil seeping out of the lamp, leading to a messy and potentially hazardous situation.
- Electrical Problems: Oil rain lamps rely on electricity to power the motor and illuminate the lamp. Electric connection issues, such as faulty wiring or a damaged power cord, can disrupt the lamp’s functionality.
- Blockages: Due to factors like dust accumulation or the use of improper oil, blockages can occur within the lamp’s tubes or nozzle, hindering the flow of oil and affecting the lamp’s performance.
Signs Of A Malfunctioning Oil Rain Lamp
Identifying the signs of a malfunctioning oil rain lamp can help you determine the specific issue and take the necessary steps to fix it. Here are some key indicators that your oil rain lamp is not working properly:
- Dim or Flickering Light: If the lamp’s light appears dim or flickers intermittently, it may indicate electrical problems or a faulty bulb.
- Irregular Oil Flow: A disruption in the smooth flow of oil droplets can suggest issues with the motor, blockages in the tubes, or pump malfunctions.
- Noise: Unusual noises, such as grinding or screeching sounds, can be a sign of motor or pump problems. A well-functioning oil rain lamp should operate quietly.
- Excessive Oil Accumulation: If you notice an excessive build-up of oil at the bottom of the lamp or around the base, it could indicate leakage or blockages.
- No Movement of Oil: In some cases, the oil rain lamp may stop producing the mesmerizing rain effect altogether. This can be a result of motor failure, electrical issues, or blockages.
How to Fix an Oil Rain Lamp? DIY Repair Guide for You
Repairing an oil rain lamp requires following a few simple steps. By disassembling the lamp, troubleshooting the issues, and replacing or repairing any faulty parts, you can easily fix a malfunctioning oil rain lamp.
Repairing an Oil Rain Lamp When it comes to fixing an oil rain lamp, it may seem like a daunting task. However, with the right tools and a little bit of patience, you can easily repair your lamp and bring it back to life.
In this article, we will guide you through the step-by-step process of repairing an oil rain lamp. From gathering the necessary tools and materials to reassembling and testing the lamp, we’ve got you covered. So, let’s dive in and get your oil rain lamp shining bright once again.
Step 1: Gathering The Necessary Tools And Materials
To begin the repair process, you will need a few tools and materials. Having these on hand will make the whole repair process smoother and more efficient. Here is a list of what you will need:
- Replacement bulb
- Screwdriver set
- Cotton swabs
- Distilled water
- Marbles or glass beads
- Electrical tape
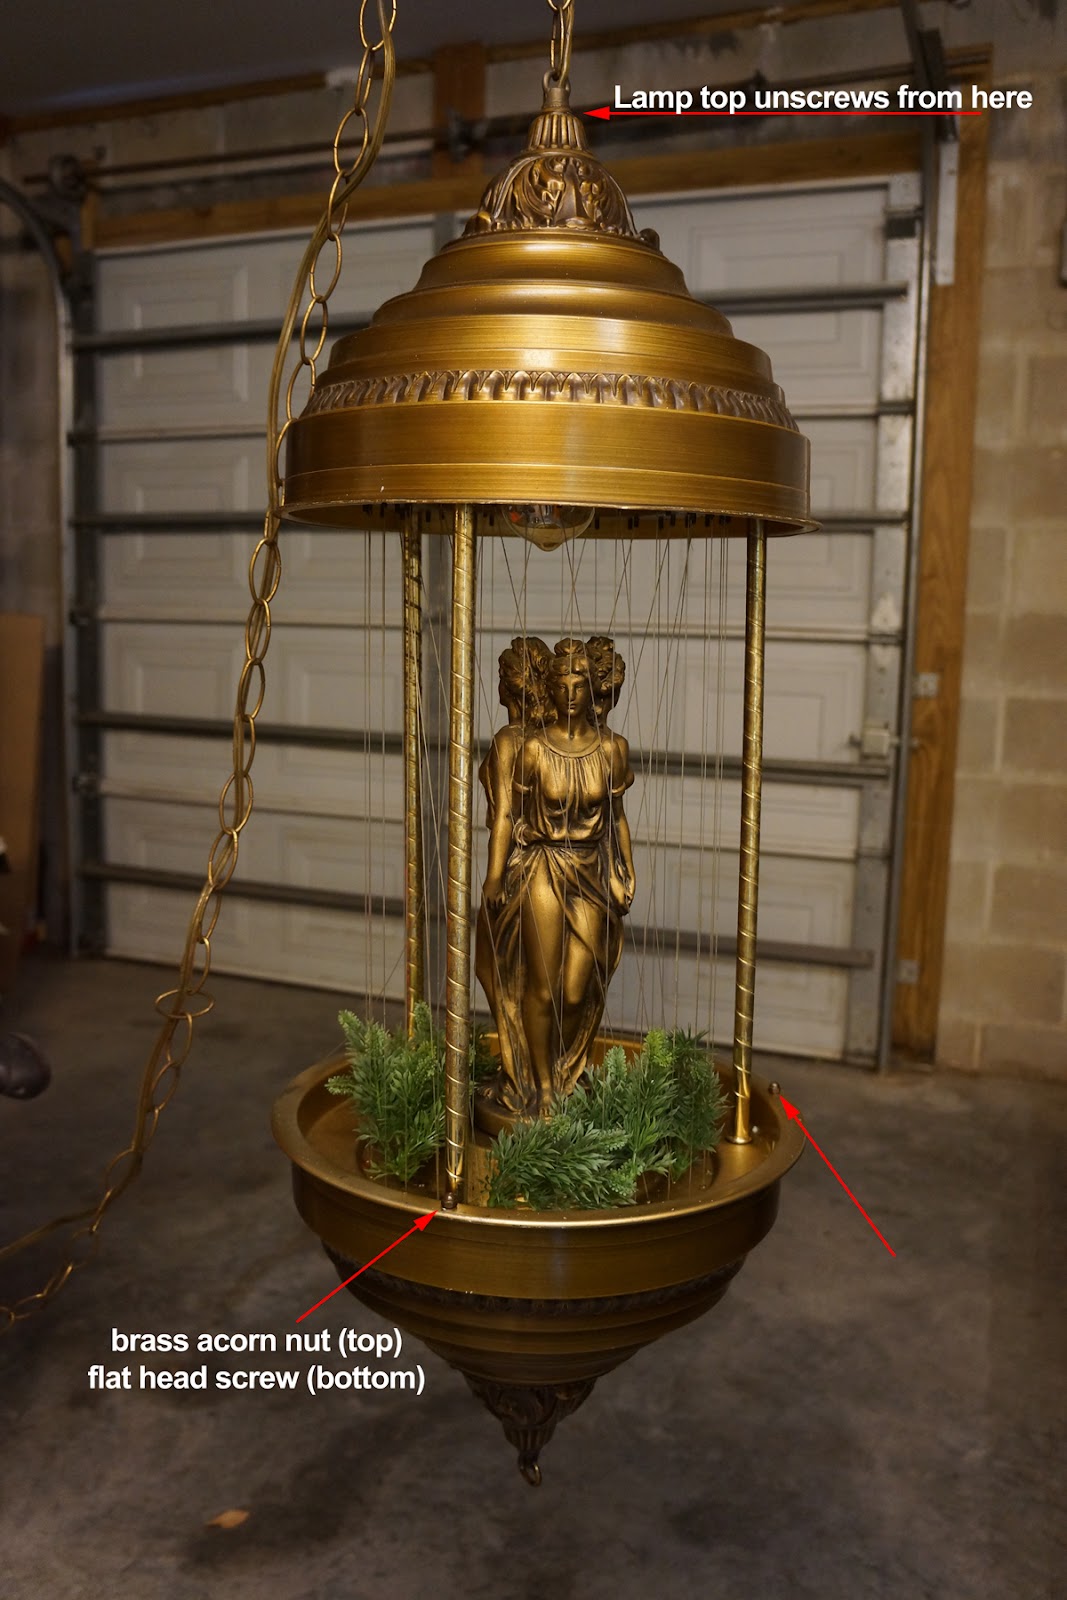
Step 2: Disassembling The Lamp
Before you can start fixing the lamp, you need to disassemble it. Begin by unplugging the lamp from the power source and allowing it to cool down completely. Then, using a screwdriver set, carefully remove the screws that hold the lamp together. Keep track of the screws to ensure you can easily reassemble the lamp later on.
Step 3: Cleaning The Components
Once you have disassembled the lamp, it’s time to clean the components. Start by wiping away any dust and dirt using a soft cloth or a cotton swab. Pay special attention to the glass reservoir, as it tends to accumulate residue over time. For more stubborn stains or build-up, you can use a mixture of mild dish soap and warm water. Avoid using harsh chemicals or abrasive cleaners as they may damage the lamp.
Step 4: Replacing Faulty Parts
If you notice any faulty parts during the cleaning process, it’s important to replace them. The most common part that needs replacing is the bulb. Unscrew the old bulb and replace it with a new one of the same wattage. Additionally, check for any damaged wires or connections. If you find any, use electrical tape to secure and repair them. This step is crucial to ensure the lamp functions properly and safely.
Step 5: Reassembling And Testing The Lamp
Now that you have cleaned and replaced any faulty parts, it’s time to reassemble the lamp. Begin by carefully placing the glass reservoir back onto the lamp base. Secure it in place with the screws you removed earlier. Once everything is securely in place, plug the lamp back into the power source. Allow it to heat up for a few minutes, and then carefully add distilled water and marbles or glass beads to the reservoir.
Finally, turn on the lamp and observe if the oil rain effect is working properly. If everything is functioning as it should, congratulations! You have successfully repaired your oil rain lamp.
Remember, maintenance is key to keeping your lamp in good working condition. Regularly clean the lamp and replace the bulb as needed. By following these steps and taking good care of your oil rain lamp, you can enjoy its mesmerizing beauty for years to come.

Credit: rainlampguy.com
Maintenance And Preventive Care
Maintaining and taking preventive care of your oil rain lamp is essential to ensure its longevity and continued functionality. By performing regular cleaning and oil replacement, as well as following some preventive measures, you can avoid potential issues and keep your oil rain lamp running smoothly.
Regular Cleaning And Oil Replacement
Regular cleaning and oil replacement are crucial to prevent any clogs or damages that may arise from debris buildup or oil deterioration. Here are some steps you can follow:
- Cleaning the Exterior: Gently wipe the lamp’s exterior using a soft microfiber cloth to remove dust and fingerprints. Avoid using harsh cleaners or abrasive materials that may damage the lamp’s surface.
- Removing the Globe: Carefully unscrew the lamp’s globe and set it aside. Be cautious not to drop or mishandle it to prevent any cracks or breaks.
- Cleaning the Globe: Fill a basin or sink with warm water and mild soap. Gently wash the globe using a soft sponge, ensuring you remove any dirt or residue. Rinse thoroughly to remove any soap remnants.
- Drying: After cleaning, use a soft, lint-free cloth to dry both the globe and the lamp’s exterior parts. Make sure they are completely dry before reassembling the lamp.
- Oil Replacement: To replace the oil, carefully remove the oil reservoir cap using a coin or appropriate tool. Drain the old oil into a container and dispose of it properly. Refill the reservoir with new oil, leaving a small gap at the top to accommodate the displacement caused by the floating wick.
- Reassembling the Lamp: Once the oil reservoir is refilled, put the globe back in place, ensuring it is securely screwed in. Wipe any excess oil on the lamp’s exterior and enjoy the renewed ambiance.
Tips For Preventing Future Issues
To prevent future issues with your oil rain lamp, consider the following tips:
- Placement: Position the lamp on a stable surface away from direct sunlight and heat sources to avoid excessive evaporation of the oil. This will help maintain the lamp’s functionality for longer periods.
- Regular Inspection: Periodically check the lamp’s components for any signs of wear or damage. Replace worn-out parts promptly to prevent further issues.
- Proper Oil Selection: Use high-quality and compatible oils recommended by the manufacturer to ensure optimal performance and reduce the likelihood of clogs or damage to the lamp. Consult the lamp’s manual or the manufacturer’s website for suitable oil options.
- Timely Oil Changes: Schedule regular oil changes based on usage to prevent oil degradation and maintain a clean and efficient oil rain lamp.
- Gentle Handling: Handle the lamp and its components with care to prevent accidental drops or impacts that may result in breakage or malfunction.

Credit: www.amazon.com
Frequently Asked Questions For How To Fix A Oil Rain Lamp
How Do Oil Rain Lamps Work?
Oil rain lamps work by heating the oil in the lamp, causing it to rise and fall, creating a rain-like effect.
What Are Common Problems With Oil Rain Lamps?
Common problems with oil rain lamps include clogged tubes, burnt-out bulbs, and leaks in the oil reservoir.
How Can I Clean My Oil Rain Lamp?
To clean your oil rain lamp, first, unplug it and remove the oil. Then, gently wipe the inside with a soft cloth and replace the oil.
Why Is My Oil Rain Lamp Not Working?
If your oil rain lamp is not working, check the power source, bulb, and wiring for any issues. Also, ensure that the oil level is sufficient.
Conclusion
Fixing an oil rain lamp doesn’t have to be a daunting task. By following the step-by-step instructions provided in this blog post, you’ll be able to troubleshoot and repair any issues that may arise.
Remember to be patient and thorough in your approach, and soon enough, you’ll have your lamp back to its fully functional, mesmerizing state.
Start tinkering and enjoy the rewarding experience of bringing your oil rain lamp back to life!

I’m Emily Johnson, an affiliate marketer and blogger focused on lamps and lighting. I share honest reviews, simple buying guides, and practical tips. My goal is to help readers choose the right lamp for their space, style, and budget with confidence.