Many might not realize that a well-maintained swing arm table lamp can not only enhance your workspace aesthetics but also boost efficiency. Imagine the number of hours saved by simply adjusting the light angle without straining to read those intricate blueprints or documents. This understated fixture, when malfunctioning, can disrupt that seamless flow, demanding immediate attention to its rewiring.
To rewire a swing arm table lamp, begin by unplugging the lamp for safety reasons. Understanding the path the wire takes through the arm is crucial; it often requires threading through tight spaces, demanding patience and precision. Since most swing arm table lamps are designed for ease of disassembly, you’ll find that removing the old wire and replacing it with a new one is straightforward if you follow the lamp’s original design carefully.
- Unplug the lamp to ensure safety from electrical currents.
- Disassemble the lamp by removing screws and carefully setting aside all parts.
- Remove the old wire using wire cutters, pulling gently to avoid damaging the lamp’s structure.
- Thread a new wire through the same path, stripping insulation off both ends for connection.
- Reconnect the stripped wire ends to the socket and base, ensuring tight connections for proper functionality.
- Reassemble the lamp, securely tightening all screws and components.
- Test the rewired lamp by plugging it in and switching it on to confirm successful reassembly.

How to Rewire a Swing Arm Table Lamp
Before you start, make sure to unplug the lamp to avoid any electrical hazards. Lay out your tools, which include a screwdriver, wire cutters, a new wire, and electrical tape. Disassemble the lamp by carefully unscrewing the base and the arm. This will give you access to the internal wiring. Keep track of the screws and small parts; you’ll need them for reassembly.
The next step is to remove the old wire. Use wire cutters to snip off the damaged wire, ensuring it’s completely detached. Gently pull it out through the path it runs inside the lamp. This may take some patience, as wires can get snagged. Dispose of the old wire responsibly.
Now, take your new wire and thread it through the same path. This might require some maneuvering, especially if the arm has tight angles. Once the wire is properly threaded, strip the insulation off the ends to prepare it for connection. Use electrical tape to secure any exposed wire.
Finally, reconnect the wire to the lamp’s socket and base, ensuring all connections are tight and secure. Use the screwdriver to reassemble the lamp. Plug it in and test to make sure everything works correctly. If the light turns on, you’ve successfully rewired your swing arm table lamp!
Step 1: Safety Preparations
Begin by unplugging the lamp to ensure there’s no electrical current. This is crucial to avoid any risk of electric shock. Make sure you are working in a well-lit environment. Gather all necessary tools and materials before you start. Keep a small container handy to store screws and small parts.
Wear safety gloves to protect your hands from sharp edges and electrical components. Safety goggles are also recommended to shield your eyes from debris. Ensure you have a clean, flat workspace where you can lay out the parts of the lamp. A clutter-free area helps prevent losing small items. It also makes the process smoother.
If children or pets are around, make sure they are kept at a safe distance. This minimizes the risk of accidental injuries. Another consideration is to ensure your tools are in good condition. Faulty tools can lead to mistakes and delays in the rewiring process. Check cords, screws, and other parts for any signs of wear and tear.
Have a fire extinguisher or a bucket of sand nearby in case something goes wrong. Make sure you know how to use them effectively. Double-check that the lamp is completely cool before handling it further. Following these safety precautions will ensure a smoother and safer rewiring process. Safety should always be your top priority.
Step 2: Disassembling the Swing Arm
Start by identifying the screws and bolts that hold the swing arm together. Use a screwdriver to carefully remove these fasteners. Keep them in a small container to ensure they don’t get lost. Begin with the base of the lamp and work your way up. This systematic approach makes reassembly easier.
Once the base is detached, pay attention to the joints of the swing arm. These joints often have additional screws or locking mechanisms. Gently unscrew or unlock these parts. Be mindful of the internal wiring as you disassemble. Tugging too hard may damage the wires even more.
Now, remove the lampshade and any other attachments. Some parts may require a bit of wiggling to come loose. If you encounter resistance, don’t force it. Check for any hidden screws or clips. This ensures you don’t break anything in the process.
After disassembly, lay out all the parts in order. This helps in visualizing how to put them back together. Have a look at the existing wire path to understand where the new wire will go. Using labels can help you keep track of components, especially if the lamp has many parts. Proper organization makes the rewiring job much simpler.
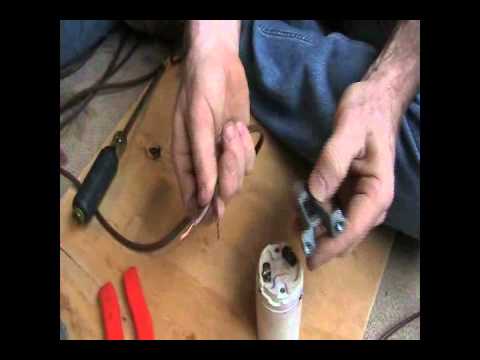
Step 3: Removing the Old Wire
First, identify where the old wire is connected inside the lamp. Note where it’s attached to the socket and the base. Use wire cutters to carefully snip the wire near these connections. Ensure that you leave enough wire exposed for easy reattachment later. This step makes threading the new wire smoother.
After cutting the wire, gently pull it through the swing arm. Be cautious to avoid damaging the lamp’s structure. If the wire resists, do not yank it; instead, check for any remaining clips or ties. Sometimes wires are secured with these for stability. Removing them can ease the process.
Next, inspect the internal pathway the wire takes. Knowing this path helps when threading the new wire. You might find it helpful to take photos. These can act as a reference for reassembly. Understanding this layout saves time and reduces errors.
If the wire is tangled or stuck, you may need to disassemble further. Look for any additional screws or attachments inside. Removing these can free the wire. Remember to store these parts safely. This ensures nothing is misplaced.
Once the wire is fully removed, dispose of it responsibly. Old wires can be recycled. Check local regulations for proper disposal methods. Now, you’re ready to thread the new wire through the lamp.
Step 4: Installing the New Wire
Start by feeding the new wire through the same path as the old one. Begin at the base of the lamp and guide it through the swing arm. This may require some maneuvering, especially around tight corners. Use patience to avoid damaging the new wire. Having someone hold the lamp steady can be helpful.
Once the wire is threaded through, strip the insulation off the ends. This exposes the copper wire for connection. Ensure both ends are clean and free of frayed edges. A wire stripper tool will make this task easier and more precise. Stripping too much insulation can cause issues, so be careful.
Next, attach the exposed wire ends to the socket and the base. Secure these with the appropriate screws or clips. Make sure the connections are tight. Loose connections can cause electrical problems. Double-check to ensure everything is stable.
After securing the connections, tidy up any excess wire inside the lamp. Use small cable ties to prevent tangles. This keeps the internal layout clean. It also makes future maintenance simpler. Properly organized wires enhance safety.
Finally, test the electrical connection before reassembling the lamp. Plug it in and turn on the switch. If the light works, the installation is successful. If not, recheck all connections. Taking these final steps ensures your lamp is functioning correctly.
Step 5: Reassembling the Swing Arm Table Lamp
Begin by aligning the swing arm back to its original position. Make sure it fits snugly into the base. Reattach the screws you had saved earlier. Tighten them securely using your screwdriver. Ensuring the arm is stable is crucial for proper functionality.
Next, focus on reattaching the joints of the swing arm. These joints often have multiple screws or locking mechanisms. Carefully screw them back in place. Test the swing arm’s movement to make sure it’s flexible yet firm. Adjust the screws if needed.
Reinstall the lampshade and any additional attachments. Ensure everything is tight and secure. Gently shake the lamp to check for any loose parts. Tighten any components that rattle. Checking all parts ensures a stable setup.
Once everything is assembled, plug the lamp in and test it again. Switch it on to make sure the light works and the arm moves correctly. Adjust the lamp to different positions to confirm its functionality. Make sure there are no unusual noises or flickers. This confirms a successful reassembly.
If any issues arise, double-check your steps. Look for any missed screws or loose connections. Correct them as needed. Your swing arm table lamp should now be fully functional and safe to use. Proper reassembly guarantees long-lasting performance.
The Importance of Properly Rewiring a Swing Arm Table Lamp
Properly rewiring a swing arm table lamp ensures your safety. Faulty wiring can lead to electric shocks or even fires. These risks amplify if the lamp is used frequently. Ensuring that all connections are secure minimizes these dangers. This attention to detail keeps your household safe.
A well-rewired lamp improves functionality and extends its lifespan. Loose or frayed wires often malfunction, causing flickering lights or complete failures. Secure and correctly installed wiring ensures steady electrical flow. This steadiness prolongs the life of the bulb and other components. You save money on frequent replacements.
Proper rewiring also maintains the aesthetic appeal of your lamp. Imagine an exposed or messy wire ruining the sleek design of your swing arm table lamp. Clean internal wiring helps preserve its look. Keeping everything tidy inside contributes to overall visual harmony. Function and beauty go hand in hand here.
Certainly, good wiring practices enhance energy efficiency as well. Bad connections can waste electricity, leading to higher bills and resource waste. Proper insulation reduces this problem significantly. The efficient use of electricity benefits both you and the environment.
Moreover, right rewiring techniques bolster peace of mind for users. Knowing that a professional job was done allows you to use the lamp without worry about malfunctions or hazards down the line enhances comfort levels significantly.
Common Challenges in Rewiring a Swing Arm Table Lamp
One common challenge is dealing with tight spaces inside the lamp arm. Maneuvering new wire through these narrow channels can be tricky. Using a wire fish tape can help, but it still requires patience. These tight spaces demand precision and care. Avoiding wire damage is crucial during this step.
Another issue is misplacing the screws and small parts during disassembly. Losing even one screw can make reassembly difficult. Storing these parts in a container helps, but accidents do happen. Labeling screws and components can make a big difference. This organization prevents lost parts and speeds up the process.
Inexperienced individuals often struggle with correctly stripping the wire insulation. This task requires just the right amount of pressure. Too much can expose too much wire, while too little leaves insulation that hinders the connection. A good wire stripper tool is essential. Practicing on scrap wire can also be beneficial.
Ensuring firm and secure connections is another challenge. Loose connections can lead to electrical issues and potential hazards. Using the appropriate tools, such as screwdrivers and pliers, helps achieve this. Double-checking all connections before reassembly enhances overall safety. Properly tightened connections ensure functionality.
Lastly, testing the lamp after rewiring can be nerve-wracking. The fear of having missed a step often looms large. If the lamp doesn’t work, rechecking each connection and component becomes necessary. Common errors often include loose wires or missed screws. Addressing these ensures the lamp functions correctly.
Success Factors in Rewiring a Swing Arm Table Lamp
One key success factor is preparation. Gather all necessary tools and materials beforehand. This includes a screwdriver, wire cutters, and replacement wire. Having everything ready reduces interruptions. It also ensures you don’t lose focus during the process.
Attention to detail plays a crucial role as well. Carefully note how the original wire is threaded. Take photos if necessary to document the setup. This visual reference can be invaluable later. Small steps like these can greatly aid in successful rewiring.
Using the right tools is another significant factor. Quality wire strippers and a reliable multi-bit screwdriver can make the task easier. These tools ensure precision. Faulty or worn-out tools can hinder progress. Investing in good tools can save time and frustration.
Practicing safe handling cannot be understated. Always unplug the lamp before starting the rewiring process. Wearing safety gear adds an extra layer of protection. This mindset enhances both safety and success. Following all safety measures helps prevent accidents.
Lastly, thorough testing ensures the process’s success. Once rewiring is complete, plug in the lamp and check its functionality. Test the swing arm’s movement and the light. Make sure everything operates smoothly. Immediate testing helps catch and address any issues right away.
Maintenance Tips for Swing Arm Table Lamp
Regular cleaning keeps your swing arm table lamp in top shape. Dust and dirt can accumulate, affecting both appearance and function. Use a soft cloth to wipe the lamp weekly. Avoid using harsh chemicals that might damage the finish. A clean lamp also emits better light.
Check the wiring periodically for any signs of wear or damage. Worn-out wires can become safety hazards. If you notice frayed or brittle wires, consider replacing them immediately. It’s better to address small issues before they become big problems. Regular inspections help keep the lamp safe.
Lubricate the joints of the swing arm every few months. This ensures smooth movement and reduces wear on the metal parts. Use a suitable lubricant recommended for metal components. Applying a small amount is usually sufficient. Make sure to wipe off any excess lubricant.
Ensure the screws and bolts are tight but not overly tight. Loose screws can make the lamp unstable. However, over-tightening can strip the threads. Periodically check and adjust the fasteners. This simple step maintains the lamp’s integrity.
Replace the light bulb when it starts to flicker or dim. A consistent light quality not only helps with visibility but also ensures less strain on the eyes. Make sure to use the appropriate wattage as specified by the manufacturer. Using the correct bulb prolongs the lamp’s life.
Store the lamp in a dry, cool place if not in use for a long time. Excessive moisture can damage electrical components and metal parts. Cover it with a cloth to keep dust away. Proper storage conditions extend the life of your lamp. Regular maintenance ensures long-lasting performance.

Frequently Asked Questions
Rewiring a swing arm table lamp can be daunting, especially if you’re new to it. Here are some common questions and their answers to help guide you through the process.
1. What tools do I need to rewire a swing arm table lamp?
You will need screwdrivers, wire cutters, wire strippers, and electrical tape for this task. A multimeter can also help check connections and ensure everything works safely.
An organized workspace enhances efficiency by keeping loose screws and other small parts secure. Having a container or magnetic tray can prevent loss of essential components during disassembly.
2. How often should I check the wiring on my swing arm table lamp?
It’s advisable to inspect the wiring every six months for signs of wear or damage. Regular checks help ensure safety and extend the lifespan of your lamp by preventing electrical mishaps.
If you notice any frayed wires or inconsistent lighting, those are indications that immediate attention is needed. Prompt maintenance can preempt more extensive repairs down the line.
3. Can I use any type of wire when rewiring my lamp?
It’s crucial to use wire rated for 120-volt fixtures like lamps, typically 18-gauge stranded copper wire works well. Using inappropriate wire types may lead to overheating or other safety issues.
Double-checking your chosen wire’s insulation quality contributes to both performance and safety. Poor insulation can cause short circuits that compromise the entire rewiring effort.
4. What should I do if my lamp still doesn’t work after rewiring?
If your lamp doesn’t work post-rewiring, first inspect all connections for tightness and proper placement. Verify each step against your initial notes or photos taken during disassembly to spot inconsistencies.
A multimeter can aid in troubleshooting by checking for continuity in wires and components. If unresolved, consulting an electrician may be necessary to identify deeper electrical issues.
5. Is it safe to rewire a vintage swing arm table lamp?
Rewiring a vintage lamp is generally safe if done correctly using modern wiring standards. However, original parts might not comply with current safety regulations; consider upgrading them.
If unsure about handling valuable antiques, professional electricians specializing in vintage devices offer tailored services preserving both functionality and historical value.
Conclusion
Rewiring a swing arm table lamp is an essential skill for maintaining both function and safety. By following the proper steps and using the right tools, you can extend the lifespan of your lamp. Regular maintenance ensures it remains a reliable part of your workspace.
Always prioritize safety and keep an organized workspace to avoid mishaps. With careful attention to detail and periodic inspections, your lamp can provide effective lighting for years to come. Investing time in rewiring yields long-term benefits, ensuring both efficiency and peace of mind.

I’m Emily Johnson, an affiliate marketer and blogger focused on lamps and lighting. I share honest reviews, simple buying guides, and practical tips. My goal is to help readers choose the right lamp for their space, style, and budget with confidence.