A table lamp switch is often a small but critical component that significantly affects the functionality of an entire room. When it stops working, it can surprisingly disrupt our usual routines and day-to-day activities. Addressing this seemingly minor issue can notably improve both convenience and ambiance in the living space.
Given that electric lighting has been around since the late 19th century, replacing a table lamp switch is an age-old task with tried and true solutions that experts have honed over time. With approximately 90% of homes in industrialized nations using electric lamps, switching out a faulty component is a common, yet essential skill. Knowing the precise steps and safety measures involved can help prolong the life of the lamp and ensure it functions reliably.
- Unplug the lamp and gather tools like a screwdriver, wire stripper, and new switch.
- Remove the lampshade and bulb; unscrew the base to access wiring.
- Detach the old switch by unscrewing connections; remove it carefully.
- Attach wires to the new switch, securing firmly with screws.
- Reassemble lamp base, replace bulb and shade; plug in and test.

How to Replace a Table Lamp Switch
Replacing a table lamp switch might sound daunting, but it’s straightforward with the right tools and steps. First, gather essential tools like a screwdriver, wire stripper, and a new switch. Unplug the lamp to ensure safety. This step prevents electric shock. Next, lay out your tools for easy access.
Prepare to dismantle the lamp carefully. Unscrew the base to access the wiring inside. Remove the old switch by detaching it from the wires. Cut the wires close to the switch. Set the old switch aside and get ready to install the new one.
Strip the insulation from the end of each wire. Attach the wires to the new switch by wrapping them around the terminals. Tighten the screws to secure the wires in place. Ensure a snug fit to prevent loose connections. Test the setup by gently tugging on the wires.
Reassemble the lamp by screwing the base back on. Plug the lamp into an outlet and test the new switch. If it works, you’ve successfully replaced it. If not, double-check the wire connections. Following these steps ensures your lamp switch functions well for years to come.
Step 1: Gathering Necessary Tools
Before you start replacing the table lamp switch, it’s crucial to gather all necessary tools. Having everything on hand makes the job quicker and easier. Here’s a list of tools you’ll need:
- Screwdriver
- Wire stripper
- Needle-nose pliers
- New switch
- Electrical tape
A screwdriver is essential for opening the lamp base. Make sure you have the correct type for your lamp screws. A wire stripper helps expose the copper wires for reconnecting the new switch. Needle-nose pliers are useful for handling small wires safely.
Purchasing a new switch designed specifically for table lamps ensures compatibility. Electrical tape is important for insulating wire connections. It’s a good idea to check you have everything before starting the project. This way, you won’t have to stop midway.
Step 2: Preparing for the Replacement
Once your tools are ready, it’s time to prepare for the replacement. First and foremost, unplug the lamp from the wall socket to ensure safety. Working with live electricity can be dangerous. Therefore, disconnecting power eliminates the risk of electric shock. This basic step is critical for personal safety.
Next, lay out all your tools and the new switch on a clean, flat surface. Organizing everything in one place helps prevent misplacing items. Ensure the lamp itself is on a stable surface to avoid accidental tipping. You might also want to place a cloth or newspaper under the lamp. This will catch any small screws or parts during disassembly.
Remove the lampshade and bulb to access the switch area. These components can get in the way and are fragile. Set them aside in a safe place to prevent damage. This step also gives you more room to work and makes the process smoother. Proper preparation saves time and hassle later on.
Before you start unscrewing anything, take a picture of the current wiring. This can serve as a reference point for reconnecting the wires later. Labeling each wire with tape and a marker is also a smart option. This minimizes the chance of mistakes. These simple actions can make the replacement process far easier.
Step 3: Dismantling the Lamp
Dismantling the lamp is the next crucial step in the replacement process. Start by flipping the lamp upside down to access the base. Using a screwdriver, unscrew the base panel to expose the internal wiring. Place the screws in a small container to avoid losing them. This step lets you see the components you need to work with.
Carefully pull apart the base to reveal the switch and its connections. You may need to gently separate the wires if they are tightly wound. Take note of how the wires are connected to the switch. Document this with another picture, helping ensure everything goes back the same way. This will prevent any confusion during reassembly.
If the switch is held by clips or additional screws, remove those as well. Handle all parts gently to avoid breaking any plastic or delicate components. Once the old switch is free, detach it from the wires by unscrewing the terminals. Make sure to label the wires if you haven’t done so already. Proper labeling helps avoid mistakes later on.
With the switch now removed, examine the wires for any signs of damage. Frayed or worn wires may need to be trimmed and re-stripped. This guarantees a good connection when attaching the new switch. Discard the old switch properly, keeping your workspace clean. At this point, you should have a clear view of the area where the new switch will be installed.
Ensure that no parts or screws are left inside the lamp base. A clean workspace helps when it comes time to reassemble everything. Double-check that all components are in good shape and ready for the new switch. This preparation sets the stage for a smooth installation of the new component. A well-organized process improves efficiency and reduces errors.
Dismantling the lamp correctly is key to a successful switch replacement. Following these steps carefully ensures a seamless transition to the next step. Keeping track of all parts and their positions will save time and trouble. This thorough approach will lead to a functioning lamp with a new, reliable switch.
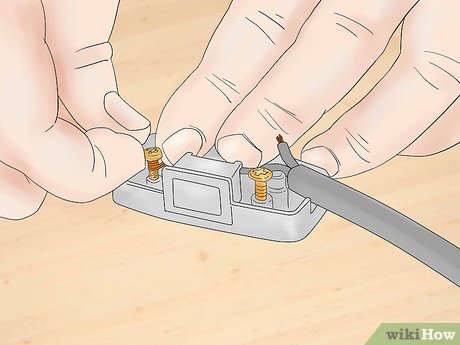
Step 4: Replacing the Switch
Now that the old switch is removed, you can proceed to install the new one. Start by taking the new switch and aligning it with the wires. Wrap the exposed copper wires around the terminals of the new switch. Use a screwdriver to tighten the terminal screws securely. Ensure the wires are firmly attached to prevent loose connections.
If the switch has more than two terminals, double-check the wiring diagram. This will guide you on which wire goes where. For a single-pole switch, each wire connects to its corresponding terminal. Tighten each screw to secure the wires. Use electrical tape to cover the terminals if needed.
After securing the wires, place the switch back into its slot in the lamp base. Ensure it fits snugly and is not loose. Fix it in place using screws or clips provided with the switch. Making sure the switch is stable will allow it to function correctly. This step is crucial for the switch’s longevity.
Once the switch is mounted, recheck all connections. Gently pull on the wires to ensure they are secure. If everything seems good, proceed to reassemble the lamp base. Before moving on, take a moment to review your work. A thorough review can help spot any missed details.
Reconnect the power and test the new switch by plugging in and turning on the lamp. Verify that the lamp lights up without any issues. If the lamp doesn’t turn on, recheck your connections. Correct wiring is essential for the switch to work properly. Following these steps ensures a successful switch replacement.
Step 5: Reassembling the Lamp
After replacing the switch, it’s time to reassemble the lamp. Start by positioning the lamp base cover back into its original place. Ensure all wires are tucked in neatly to avoid any snagging. Securely fasten the base cover with the screws you set aside earlier. Use your screwdriver to tighten each screw.
Proceed to reattach the lampshade and bulb. Gently twist the bulb into its socket until it’s firm. Place the lampshade on top, aligning it correctly. Secure it in place, ensuring it sits evenly. An uneven shade can cause the lamp to tip over.
With everything in place, plug the lamp back into the wall outlet. Flick the new switch to test if the lamp lights up. Confirm that the switch operates smoothly and consistently. If the lamp doesn’t light up, unplug it and double-check the connections. Proper reassembly is key to the lamp’s functionality.
For added safety, give the lamp a quick once-over. Look for any gaps or loose components. Tighten any screws if necessary. Ensuring everything is secure will prevent future issues. A stable and well-assembled lamp provides peace of mind.
Finally, clean up your workspace. Put away all tools and dispose of any trash. Return screws and small parts to their designated places. Keeping an organized space helps for future projects. Enjoy your newly repaired and functional lamp.
Precautions to Take While Replacing a Table Lamp Switch
Safety is paramount when working with electrical components. Always start by unplugging the lamp from any power sources. This eliminates the risk of accidental electric shock during the replacement process. Verify that no power is running through the lamp before proceeding. Double-checking ensures maximum safety.
Avoid touching the metal parts of the wires directly with your hands. Instead, use insulated tools like screwdrivers and pliers designed for electrical work. Insulated tools prevent accidental shocks and short circuits. Wearing rubber gloves can add an extra layer of protection. Proper insulation reduces potential hazards significantly.
Work in a well-lit area or use a headlamp if needed. Adequate lighting helps you see small parts clearly, reducing errors and accidents. Keep your workspace tidy by organizing screws and components in small containers or trays. A clutter-free environment minimizes the possibility of losing critical pieces.
If you encounter frayed or damaged wires, do not proceed without addressing them first. Damaged wires can cause shorts or fires; it’s essential to replace or repair them properly before installing a new switch. Use electrical tape to secure any exposed wiring temporarily until it can be fixed correctly.
Make sure to follow all manufacturer guidelines specific to the new switch you are installing. Adhering to these instructions ensures compatibility and safe operation of the lamp post-repair.
Lastly, never rush through the process; take your time to ensure each step is done correctly and safely. Patience will lead to better results and fewer mistakes, creating a safer home environment overall.
Signs Your Table Lamp Switch Needs Replacement
One of the first signs your table lamp switch needs replacement is flickering lights. If your lamp flickers on and off when you press the switch, it’s a problem. This not only annoys but also indicates a faulty connection. Inconsistent performance is a telltale sign of a failing switch. Addressing it early can prevent further issues.
Another indication is when the switch becomes difficult to operate. You might find it hard to turn the lamp on or off. This difficulty can stem from worn-out internal components. Stiff or unresponsive switches need immediate attention. Replacing these can restore ease of use and extend the lamp’s life.
Occasional sparking when you flip the switch is a significant red flag. Sparks indicate a potentially dangerous electrical fault. This could lead to short circuits or even fires. Unusual sounds like buzzing or clicking are also warning signs. Any sparking or noises require urgent attention.
If your lamp doesn’t turn on at all, the switch might be the culprit. After ruling out bulb issues or faulty wiring, inspect the switch. A completely non-functional switch is a clear sign it needs replacement. This simple diagnostic can save time and hassle.
Loose or wobbly switches also point to a problem. A secure switch should stay firmly in place and operate smoothly. If it feels loose or jiggly, it could lead to electrical failures. Tightening might not be enough; you may need a new switch. Keeping the switch secure ensures reliable operation.
Visual signs like burn marks or discoloration around the switch area are alarming. These signs indicate overheating or electrical faults. Take these indicators seriously to avoid potential hazards. Replacing the switch promptly can prevent accidents. Always prioritize safety when dealing with such issues.
Choosing the Right Switch for Your Table Lamp
Selecting the right switch for your table lamp is essential for both functionality and safety. The first step is to identify the type of switch you need. Different switches include push-button, toggle, rotary, and touch-sensitive. Each type serves a unique purpose and fits various lamp designs. Understanding your lamp’s design helps in choosing the appropriate switch.
Consider the electrical requirements of your lamp. Ensure the switch you choose matches the voltage and current ratings. Using an incorrect switch can lead to electrical hazards. Always check the specifications on the lamp and switch packaging. Compatibility ensures smooth operation without risks.
Material and durability are also crucial factors. Switches can be made from plastic, metal, or a combination of both. Opt for high-quality materials that can withstand frequent use. A durable switch prolongs the life of your lamp. This is especially important for lamps used daily.
Color and design should complement your lamp and room décor. While functionality comes first, aesthetics play a significant role too. Choose a switch that blends seamlessly with your lamp’s style. Available colors range from basic black and white to more custom options. This small detail can enhance the overall look of your lamp.
Ease of installation is another key consideration. Some switches are specifically designed for easy DIY installation. Look for switches that come with clear, user-friendly instructions. This not only saves time but also makes the process hassle-free. Ensuring ease of installation reduces the likelihood of errors.
Finally, check for additional features like dimming capabilities. Some switches come with advanced features such as dimmers or timers. These can add functionality and convenience to your lamp. Advanced features might be more costly, but they offer added benefits. Weighing these options helps you make an informed decision.
Benefits of Replacing a Faulty Table Lamp Switch
Replacing a faulty table lamp switch offers numerous benefits, starting with improved safety. A malfunctioning switch can pose electrical risks like shocks or short circuits. Addressing the issue promptly eliminates potential hazards. This proactive measure enhances the safety of your living space. Safety should always be a top priority.
Enhanced functionality is another key advantage. A new switch ensures the lamp operates smoothly every time you use it. No more struggling to turn the lamp on or off, leading to a more user-friendly experience. Consistent performance enhances convenience. Reliable operation makes everyday tasks simpler.
Replacing the switch also extends the lifespan of your lamp. A faulty switch can cause unnecessary wear and tear on other lamp components. Installing a new switch alleviates this stress, preserving the lamp’s overall integrity. This small investment adds years to your lamp’s usability. Longevity means you get more value out of your purchase.
There’s also an aesthetic benefit to consider. A new switch can give your lamp a fresh look, especially if you choose a stylish design. This upgrade can complement your décor and add a touch of modernity. Updating small elements can have a big impact on the room’s overall ambiance.
Environmental impact is an often overlooked benefit. Repairing and updating existing items reduces waste. Replacing just the switch instead of the whole lamp is an eco-friendly choice. Sustainable practices contribute to a healthier planet.
Finally, replacing a faulty switch can save you money. Fixing the switch is generally cheaper than buying a new lamp. This cost-effective solution allows you to maintain your favorite lighting without significant expense. Saving money while improving functionality is always a win.

Frequently Asked Questions
If you’re dealing with a faulty table lamp switch, you probably have some questions. These FAQs address common concerns and provide helpful answers.
1. What tools do I need to replace a table lamp switch?
To replace a table lamp switch, you’ll need several essential tools. Make sure you have a screwdriver, wire stripper, and needle-nose pliers on hand. Additionally, you’ll need electrical tape and the new switch itself. Preparing these tools beforehand makes the task more efficient and straightforward.
Before starting, lay out all your tools on a flat surface for easy access. This helps you avoid interrupting the process by having to look for something later on. The right tools ensure that you can complete the replacement safely and correctly.
2. How long does it take to replace a table lamp switch?
The time required to replace a table lamp switch can vary depending on experience and complexity. On average, it takes about 30 minutes to an hour to complete the task from start to finish. Gathering your tools in advance can speed up the process considerably.
Breaking down each step also helps in managing time efficiently. If you’re well-prepared, even those with minimal experience can manage within an hour. Allow yourself ample time so that you don’t rush through any steps.
3. Why is my table lamp flickering after replacing the switch?
If your table lamp flickers after replacing the switch, there might be an issue with wiring connections or bulb compatibility. First, double-check all wire connections are tight and secure at both ends—switch terminals and plug prongs.
If connections seem fine but flickering continues, try changing the bulb or using another type recommended by the manufacturer. Poor quality bulbs also lead to flickering despite proper installation of switches.
4.What safety precautions should I take when replacing a table lamp switch?
Safety is crucial when working with electrical components like table lamps switches Unplugging lamps eliminates risks associated electric shock which easily avoided if disconnects from power sources starts crucial step wise implementation
Using insulated screwdrivers gloves adds extra layer protection handling these tasks making safer Wear rubber gloves throughout entire repairing operation evades minor shocks Ensure great measures focus key factors require utmost care!
Conclusion
Replacing a table lamp switch is a practical skill that enhances both safety and functionality in your home. With the right tools and a clear understanding of each step, this task becomes straightforward. Addressing issues like flickering lights or difficult switches promptly can prevent potential hazards and extend your lamp’s life.
Taking necessary precautions, such as unplugging the lamp and using insulated tools, ensures a safe working environment. By following a methodical approach, even beginners can confidently tackle this repair. Ultimately, a well-functioning lamp contributes to a more comfortable and efficient living space.

I’m Emily Johnson, an affiliate marketer and blogger focused on lamps and lighting. I share honest reviews, simple buying guides, and practical tips. My goal is to help readers choose the right lamp for their space, style, and budget with confidence.