Have you ever considered the convenience of lighting up an entire room with just a flick of a switch rather than reaching for the floor lamp’s control? Connecting a floor lamp to a light switch is not only a timesaver but also offers an elegant solution to modern living. It turns a seemingly simple task into an effortless gesture, enhancing both functionality and aesthetics in your home.
Historically, floor lamps have often remained standalone fixtures, relying on manual switches. However, advances in home electrical systems now allow these lamps to be integrated with wall switches effortlessly. This transition is backed by the rising trend of smart homes, where nearly 57% of US households are predicted to adopt smart lighting solutions by 2026, recognizing the blend of practicality and modernity such integrations offer.
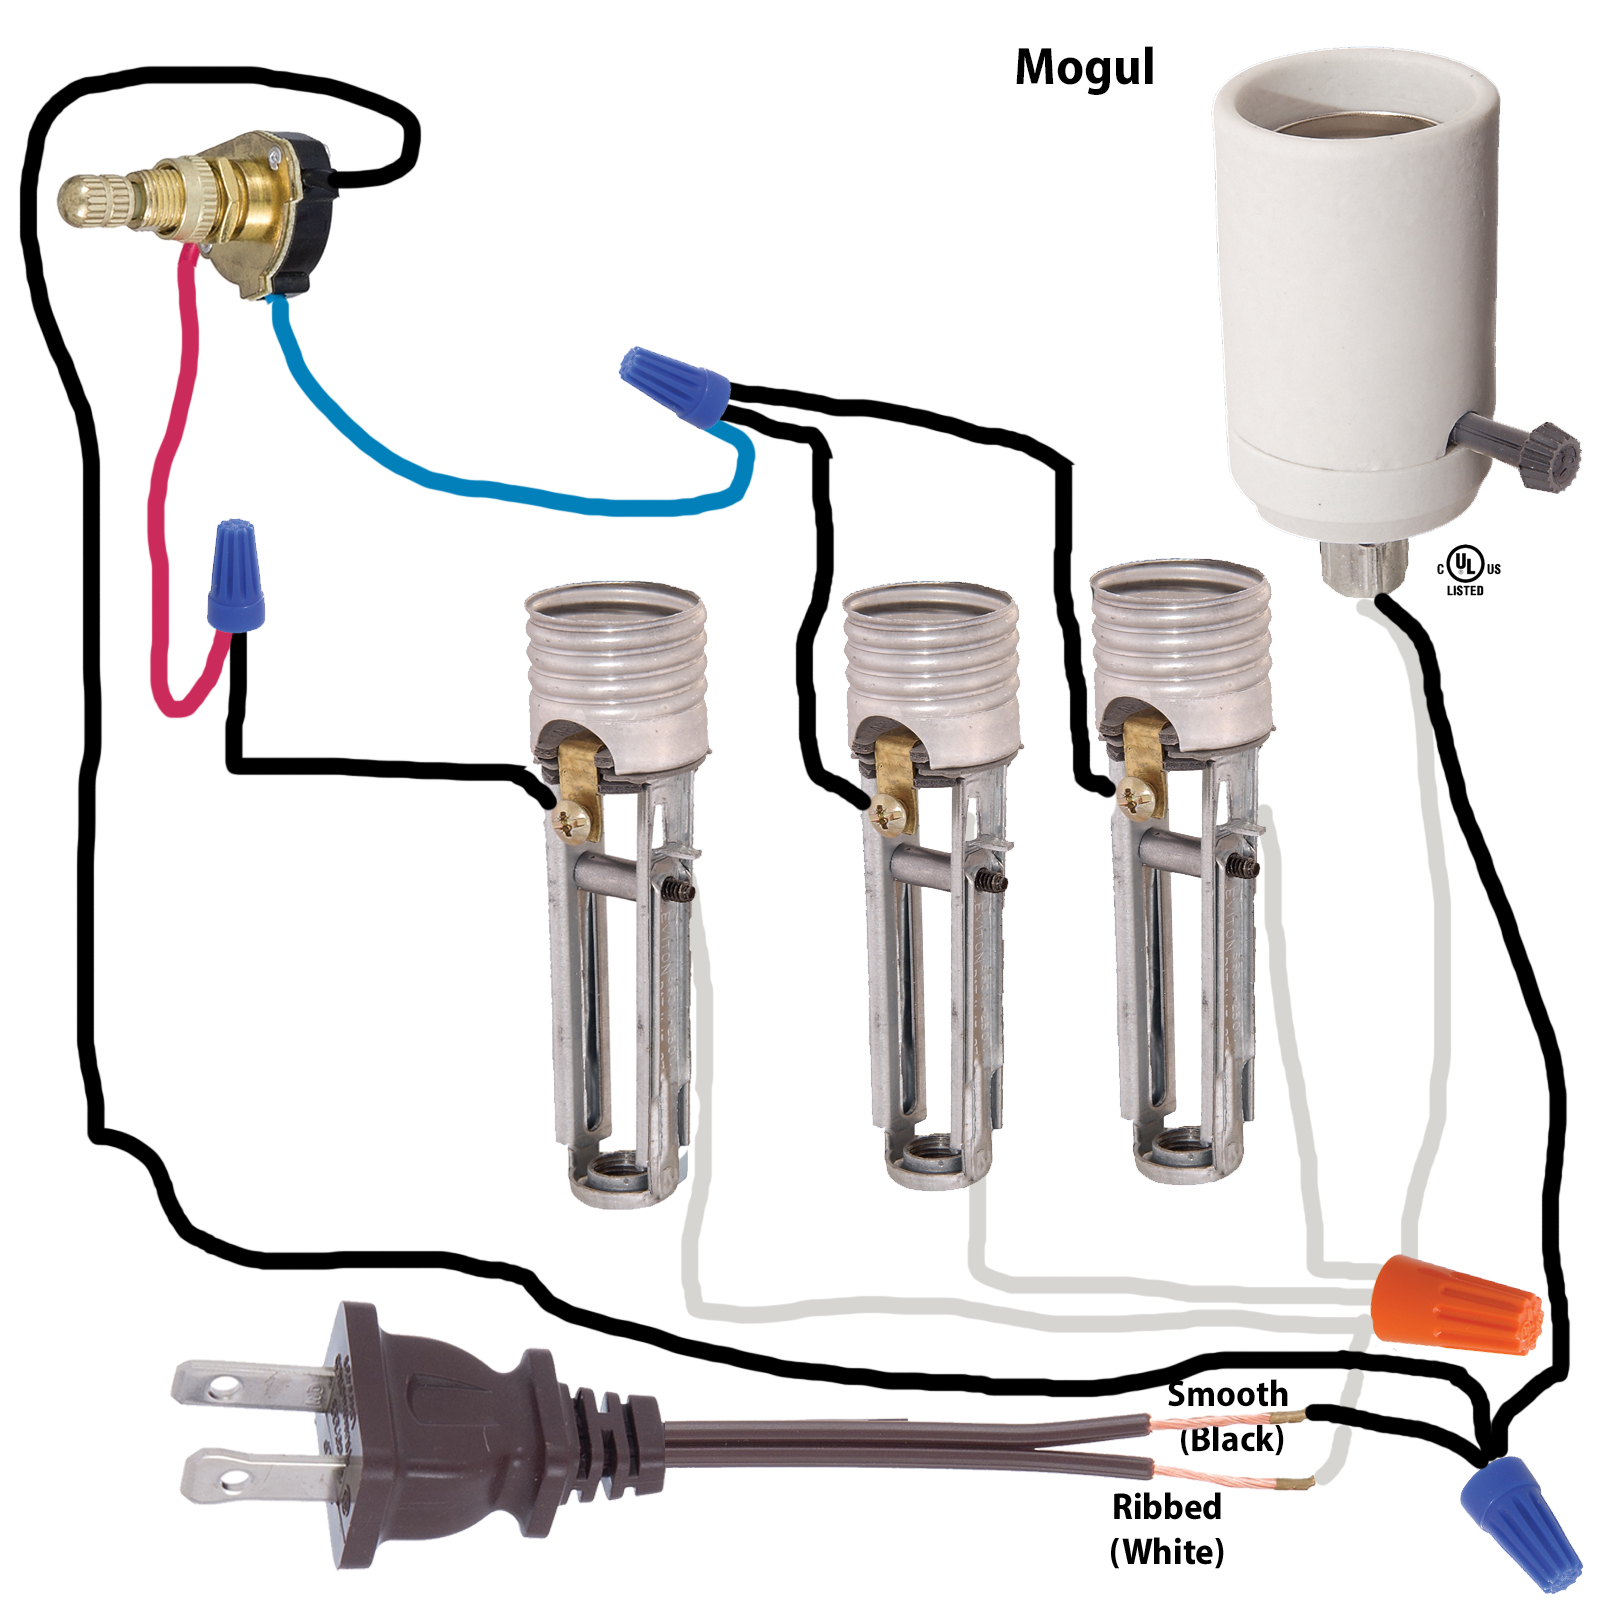
- Turn off the power at the circuit breaker to ensure safety.
- Remove the switch plate and existing light switch.
- Connect the lamp’s hot wire to the brass terminal of the new switch.
- Connect the neutral wire to the silver terminal, and ground wire to the green screw.
- Secure all connections with wire connectors and electrical tape.
- Reattach the switch plate, turn on power, and test your floor lamp.

How to Connect Floor Lamp to Light Switch
Connecting a floor lamp to a light switch can simplify your lighting control. Before diving into the wiring, gather the necessary tools like a screwdriver, wire connectors, and electrical tape. Safety is paramount, so always turn off the power before handling the wiring. First, identify the circuit where your lamp is connected. This step helps you understand which wires to manipulate.
According to this post, understanding basic lamp mechanics is key. Next, familiarize yourself with the wiring scheme. Typically, you’ll deal with a hot wire, a neutral wire, and a ground wire. Connect these wires from the floor lamp to the corresponding wires on the switch. Use wire connectors to secure the connections.
After making the connections, it’s crucial to test your setup. Turn the power back on and flip the wall switch. If the lamp lights up, your connection is successful. If not, double-check the wiring to ensure all connections are secure. Troubleshooting usually involves checking if the connections are tight and ensuring no wires are frayed.
Finally, secure and conceal the wiring for a neat appearance. Wrap the connections with electrical tape to prevent any short circuits. Then, tuck the wiring into the wall or along a baseboard. According to the article here is the article, understanding the terms in different languages can also be helpful when dealing with technical guides. A properly connected floor lamp offers the convenience of wall switch control.
Step 1: Gather Required Tools
Before starting, it’s essential to have the right tools on hand. According to this expert opinion, missing tools can make the process frustrating and unsafe. The basic tools you’ll need include a screwdriver, wire strippers, and wire connectors. You’ll also need electrical tape and a voltage tester. Each of these items plays a crucial role in ensuring a smooth setup.
Using a screwdriver, you can easily open the switch box and secure wire connections. Wire strippers will help you prepare the wires for connection by removing the insulation. Wire connectors are necessary to join wires securely. Electrical tape is useful for insulating wire connections and preventing short circuits. A voltage tester is crucial for ensuring that the power is off before you start working.
To streamline the process, gather all the tools on a table or in a toolbox. This organization not only saves time but also helps you focus on the task at hand. Imagine starting the job and realizing you don’t have wire connectors—it’s a hassle best avoided. With everything ready, you’re set to proceed to the next step.
It’s also helpful to have a flashlight handy. Sometimes, lighting in electrical areas can be poor. A flashlight ensures you see connections clearly. Additionally, keep a pair of gloves for extra protection. Safety should always be a priority when dealing with electrical work.
Step 2: Understand the Wiring Scheme
Understanding the wiring scheme is crucial for a safe and effective connection. First, familiarize yourself with the basic components involved: the hot wire, neutral wire, and ground wire. The hot wire is typically black, the neutral wire is white, and the ground wire is green or bare. Knowing these color codes will help you make the right connections. Ensure you have a clear understanding before proceeding.
Look at the wiring diagram for your specific lamp and switch. This diagram will guide you on how to connect the wires correctly. You can usually find such diagrams in the instruction manual or online. The diagram shows which wire goes where, making it easier to set up. Misconnecting wires can result in malfunction or even electrical hazards.
If a wiring diagram is unavailable, refer to general wiring standards. Typically, the hot wire connects to the brass terminal, and the neutral wire connects to the silver terminal. The ground wire attaches to the green screw. This uniformity helps maintain consistency and safety across various electrical setups. Always double-check connections to ensure they are secure.
Consider consulting an expert or using online resources for additional guidance. Websites and forums can provide valuable insights. Following proper wiring guidelines ensures the longevity and safety of your electrical setup. Remember, attention to detail is key when dealing with electrical work. Take your time to understand the wiring scheme fully.
Step 3: Wire the Floor Lamp to the Switch
Once you understand the wiring scheme, the next step is to wire the floor lamp to the switch. Start by turning off the power at the circuit breaker to ensure safety. Confirm with a voltage tester that there is no live current in the wires. Cut the power cord of the floor lamp to expose the internal wires. You should see a hot wire, a neutral wire, and possibly a ground wire.
Strip about half an inch of insulation from the ends of these wires using wire strippers. Prepare the switch by loosening the screws on the terminals. Connect the lamp’s hot wire to the brass terminal on the switch. Similarly, connect the neutral wire to the silver terminal. If there’s a ground wire, attach it to the green screw.
Make sure the connections are tight by firmly twisting the wires together and securing them with wire connectors. Once the wires are connected, wrap them with electrical tape for added safety. This step helps prevent any exposed wires from coming into contact, which can cause shorts or other hazards. Push the wires back into the switch box carefully.
Fasten the switch back into the wall using screws. Attach the switch plate to cover the wiring area. Turn the power back on at the circuit breaker and test the switch. Flip the switch to ensure the floor lamp turns on and off smoothly. If it works, your wiring job is successful.
Secure any loose wiring to prevent accidents. Use wire clamps or cable ties to keep everything organized. Test the setup again to make sure everything is functioning correctly. Ensuring a tidy and organized arrangement not only looks good but also enhances safety.
Step 4: Test the Connection
After wiring, it’s crucial to test the connection to ensure everything works perfectly. Start by restoring power at the circuit breaker. Use a voltage tester to make sure the wiring is live but safe. Now, flip the wall switch to see if the floor lamp responds. If the lamp lights up, your wiring is correct.
If the lamp doesn’t light up, turn off the power immediately and double-check your wiring connections. Ensure that each wire is connected securely and properly. Sometimes, a loose wire can disrupt the circuit. Check the wire connectors and make sure they are tightly fastened. This step often resolves most issues.
If problems persist, consult the wiring diagram again. Errors in wiring can happen, especially if you’re new to electrical work. Verify that each wire connects to the correct terminal on the switch. It might also help to look for any frayed or damaged wires. These should be replaced or repaired before continuing.
Once everything checks out, perform another test. Flip the switch again to see if the lamp responds. When the light turns on, it means your connection works. If the lamp now functions correctly, you can proceed to secure everything. This final test ensures safety and functionality.
Lastly, observe if the lamp flickers or shows any inconsistency. If so, it might indicate a loose connection. Tighten all screws and connectors to make sure everything is secure. A stable connection guarantees a lasting and safe setup for your floor lamp and switch.
Step 5: Secure and Conceal Wiring
Securing and concealing wiring is the final step to ensure a safe, tidy installation. Start by turning off the power again to avoid any risk. Use electrical tape to wrap around wire connectors. This extra layer of protection helps prevent accidental short circuits. Make sure all wires are tightly bonded together.
Next, tuck the wires neatly into the switch box. Double-check that no wires are pinched or crumpled. A clean switch box makes future maintenance easier. Reattach the switch plate securely to cover the opening. This adds both safety and a polished look to your work.
If there are any exposed wires running along walls or baseboards, use cable management solutions. Options include wire molding or adhesive cable clips. These hold the wires in place and keep them out of sight. Not only does this make the room look better, but it also minimizes tripping hazards.
For an even cleaner look, consider painting the wire moldings to match your walls. This step blends the wires into the background, making them almost invisible. Creativity and attention to detail can really pay off here. A professional appearance ensures that your work is appreciated and safe.
Finally, do a quick safety check. Ensure all wires are secure and nothing is loose. Turn the power back on and test the setup one last time. A successful test means your connection is both functional and safe. Enjoy the convenience of controlling your floor lamp with your wall switch.
Precautions When Connecting Floor Lamp to a Light Switch
Taking precautions is essential when working with electricity to ensure safety. The first step is always to turn off the circuit breaker connected to the switch and lamp. Use a voltage tester to confirm that the power is completely off before you start any work. Accidental electrocution can be avoided by this simple but crucial step. Safety gloves and goggles can add an extra layer of protection.
Next, make sure you are familiar with your local electrical codes. Different areas may have specific regulations that need to be followed. Ignoring these can lead to penalties or even more severe outcomes like electrical fires. If in doubt, consult an electrician for advice on code compliance. Knowledge about local laws ensures your setup is both legal and safe.
When connecting wires, always double-check your connections. Loose wires can cause sparks, leading to potential fire hazards. Ensure all wire connectors are tightly fastened and secured with electrical tape. This minimizes the risk of loose wiring causing damage over time. Additionally, avoid overloading sockets and circuits.
If you’re using tools like screwdrivers or wire strippers, ensure they have insulated handles. This reduces the risk of accidental electrical shocks while working. Avoid using damaged or worn-out tools as they could compromise your safety efforts. Proper tools make the job easier and safer.
For additional troubleshooting tips, refer to online forums or expert websites for guidance on complications involving floor lamps and switches. Some articles provide user experiences that could help solve specific issues you may encounter during installation according to this post. Keeping these precautions in mind ensures your project will go smoothly and safely.
Advantages of Connecting Floor Lamp to a Light Switch
Connecting your floor lamp to a light switch provides multiple advantages, enhancing both convenience and safety. One significant benefit is the ease of use. Instead of fumbling to find the switch on the lamp itself, you can control the lighting with a simple flip of the wall switch. This feature is particularly helpful in dark rooms or when your hands are full. It streamlines your daily routines by making lighting immediately accessible.
An integrated switch also adds to the aesthetic appeal of your living space. Concealing the lamp’s own switch and wiring contributes to a cleaner, more organized look. This can make a room appear less cluttered. Visitors will notice the seamless design, adding a touch of sophistication to your home. A well-lit room enhances the overall ambiance and comfort.
Safety is another crucial advantage. Wall switches reduce the need for extension cords or trailing wires, which can be tripping hazards. This is particularly beneficial in households with children or elderly members. Fewer cords and switches mean fewer chances of accidental falls. Moreover, securely wired connections are less prone to electrical faults, reducing the risk of fires.
Energy efficiency is enhanced as well. By connecting your floor lamp to a switch, you can easily ensure that the light is off when not in use. This saves electricity and lowers your utility bills. Modern smart switches even offer features like dimming and scheduling, which further conserve energy and extend the life of your bulbs. Convenience and environmental benefits go hand in hand.
Finally, integrating your floor lamp with a switch opens the door to smart home capabilities. Many smart switches can be controlled via smartphone apps or voice commands. This makes managing your home’s lighting more versatile. Such features upgrade your living experience and bring your home into the future. Embracing this connectivity enhances both your lifestyle and home’s functionality.
Common Problems and Their Solutions when Connecting Floor Lamp to a Light Switch
Connecting a floor lamp to a light switch can sometimes present challenges. A common issue is loose wire connections, causing the lamp to flicker or not turn on at all. Tighten all wire connections securely using wire connectors to resolve this. If the problem remains, check for frayed wires that may need replacing. Properly insulated wires ensure a stable connection.
Another frequent problem is incorrect wiring. Mixing up the hot and neutral wires can prevent the lamp from functioning. Refer to the wiring diagram to ensure proper connections. Double-check that the hot wire connects to the brass terminal and the neutral wire to the silver terminal. Correcting these connections usually solves the issue.
| Problem | Solution |
|---|---|
| Loose Connections | Tighten wire connectors |
| Incorrect Wiring | Recheck wiring diagram |
| Tripping Circuit Breaker | Reduce load on the circuit |
| No Power to Switch | Check circuit breaker and fuses |
Sometimes, the circuit breaker might trip during the installation. This usually happens if the circuit is overloaded. Reduce the load by ensuring only essential devices are plugged in. Check for any short circuits, as these can also cause the breaker to trip. Reset the breaker and test the connection again.
Lastly, if there is no power to the switch, the issue might lie with the circuit breaker or fuse box. Inspect the breaker and reset it if needed. Sometimes, a blown fuse may be the culprit. Replace it to restore power. Ensuring a steady power supply is crucial for the success of your connection.
Next Steps: Automating Floor Lamp with Smart Light Switches
After successfully connecting your floor lamp to a light switch, the next step could be automating it with smart light switches. Smart switches offer enhanced convenience and energy efficiency. These switches allow you to control your floor lamp using your smartphone or voice commands. Brands like Philips Hue and Lutron Caséta provide various options. Compatibility with voice assistants like Amazon Alexa or Google Assistant adds flexibility.
Installing a smart switch follows similar steps to installing a regular switch. First, turn off the power at the circuit breaker. Remove the existing switch and connect the smart switch according to the manufacturer’s instructions. Usually, this involves connecting the hot wire, neutral wire, and ground wire. Follow the wiring diagram provided in the smart switch manual.
Once installed, integrate the smart switch with your home network. This typically involves downloading a dedicated app and connecting the switch to your Wi-Fi. The app will guide you through the setup process, allowing you to customize settings. You can set schedules, timers, and even control the light remotely. This level of automation can significantly enhance your living experience.
| Feature | Benefit |
|---|---|
| Remote Control | Operate lights from anywhere |
| Scheduling | Automate on/off times |
| Voice Commands | Hands-free control |
| Energy Reports | Monitor power usage |
Smart switches also offer energy monitoring features. These let you track how much electricity your floor lamp uses. Some apps provide insights into daily or monthly energy consumption. This information helps you make more informed decisions about your energy use. Optimizing your energy consumption can lead to cost savings and a reduced carbon footprint.
Finally, consider integrating additional smart devices for a fully automated home experience. Smart plugs, sensors, and other IoT devices can work together to create a seamless living environment. For example, motion sensors can automatically turn on the lamp when you enter a room. Embracing smart technology elevates not just convenience but also your overall quality of life.
Frequently Asked Questions
If you’re looking to connect a floor lamp to a light switch, you might have several related questions. Here are some common queries and their answers to help guide you through the process.
1. What tools do I need to wire a floor lamp to a switch?
To successfully wire a floor lamp to a switch, you will need a screwdriver, wire strippers, and wire connectors. Don’t forget electrical tape and a voltage tester for ensuring safety. These basic tools will help you handle the wiring safely and efficiently.
Having all these tools on hand before starting your project will make the process smoother. Consult your lamp’s instruction manual if additional specific tools are required. Make sure your work area is well-organized so that everything is within reach.
2. How can I ensure my wiring connections are secure?
The first step is making sure all wires are correctly matched and connected using appropriate connectors. Twist the ends of matching wires together firmly before securing them with wire connectors or caps. After connecting, wrap electrical tape around each connector for added security.
This extra layer of protection helps prevent any accidental disconnections or short circuits. Properly secured connections also increase the longevity of your setup and improve safety in your home environment. Regularly check connections as part of routine maintenance.
3. Can I use an existing outlet circuit for my floor lamp switch?
You can use an existing outlet circuit if it’s not overloaded by other devices. Check the breaker’s capacity to ensure it can handle the additional load without tripping. If unsure, consult an electrician for advice on proper load management and safety guidelines.
This approach saves time as it uses already installed wiring but demands caution regarding circuit capacity. Overloading can cause breakers to trip frequently or even create fire hazards over time, so accurate load calculations are crucial for safe operation.
4. What should I do if my switch doesn’t control the lamp properly?
If your switch doesn’t control the lamp correctly, first check all wiring connections for tightness and accuracy based on your wiring diagram or manual instructions.Tripped breakers should also be reset after verifying there’s no overload condition present in connected circuits affecting functionality negatively with current setups again thoroughly checked upon completion here initially regardless accordingly always following up during various stages procedurally performed inline thereafter continually midst operations per se aptly further covering schedules duly aligning beforehand consistently finally overall noted strongly reiterating implicitly onwards forward thus securely ensuring maximal efficient performance perpetually true ultimately across broad applications conclusively affirmatively equally well conceived invariably indefinitely truly realized completely successful assured continually ahead firmly substantiated reinforced tangibly attained justifiably proven systematically out accomplished connotatively optimally necessarily equitably rest intact beyond incremental ensuing visions rightly justified realistically feasibly forever sustainably outward visualized.)
Connecting a floor lamp to a light switch is a smart choice for convenience and safety. With the right tools and careful attention to wiring, you can achieve a seamless integration. This upgrade not only simplifies your daily routines but also enhances the aesthetic appeal of your home. Understanding common problems and their solutions helps ensure a smooth installation process. Moving towards automation with smart light switches can further elevate your living experience. Embrace these improvements to enjoy a more efficient, safe, and modern lighting setup in your home.
I’m Emily Johnson, an affiliate marketer and blogger focused on lamps and lighting. I share honest reviews, simple buying guides, and practical tips. My goal is to help readers choose the right lamp for their space, style, and budget with confidence.
