
Ever noticed that fluorescent lamps are ubiquitous in both commercial and residential spaces, yet not many people know how to connect them? The proficiency in setting up these lamps might seem straightforward to experts but mastering the nuances can make a significant difference in efficiency and longevity. Knowing the precise steps and correct components involved ensures optimal functionality and longevity.
Fluorescent lamps have been used for over eight decades, becoming a staple in lighting history for their energy efficiency and long life. Connecting these lamps involves understanding the role of ballasts, starters, and proper wiring techniques. Statistics show that correctly installed fluorescent lighting can save up to 25% more energy compared to incandescent options, reflecting both environmental and economic benefits.
- Turn off the power supply to ensure safety.
- Gather necessary tools: wire cutters, electrical tape, ballast, and fluorescent lamp.
- Identify the live (hot) and neutral wires from the power source.
- Connect the live wire to one end of the ballast and the neutral wire to the lamp holders.
- Secure the ballast’s wires to the corresponding terminals on the lamp holders.
- Double-check all connections for tightness and security.
- Turn on the power supply and test the lamp for proper operation.
How to Connect Fluorescent Lamp
Connecting a fluorescent lamp can be easier if you have the right tools and materials. First, gather essentials like the lamp, a ballast, wire cutters, and electrical tape. Begin by identifying the parts, such as the bulb holders and the ballast. These components work together to ensure the proper functioning of your lamp. When all tools are ready, you can start the wiring process.
To connect a fluorescent lamp, you need to comprehend the function of a ballast. Ballasts regulate the current to the lamp, allowing it to light up correctly. Cut the wiring to appropriate lengths, then strip the ends using wire cutters. According to the article, it’s crucial to ensure wires are securely tightened to avoid loose connections. This step is paramount for safety and optimal performance.
Next, proceed to wire the fluorescent lamp. Connect the live (hot) wire from the power source to one end of the ballast. Attach the ballast’s other end to the lamp holders. Ensure the neutral and ground wires are securely connected. You can use electrical tape to isolate and secure the connections. Testing the setup is crucial to make sure everything is working perfectly before sealing it.
Finally, test the lamp to confirm it’s working correctly. When you turn on the switch, the fluorescent lamp should illuminate brightly and evenly. If it doesn’t, check all connections to ensure they’re secure. Sometimes, troubleshooting might involve checking the ballast or replacing the lamp tube. For more tips on lighting, see here is the post to light a room efficiently using floor lamps.
Step 1: Gather Necessary Tools and Materials
Before diving into connecting your fluorescent lamp, it’s essential to gather all the necessary tools and materials. This preparation ensures a smooth and efficient process. You’ll need a few basic items such as wire cutters, electrical tape, a ballast, and the fluorescent lamp itself. Additionally, a screwdriver might come in handy for fastening parts. Having these tools at your disposal makes the job easier.
Organizing your workspace is crucial as well. Select a clean and well-lit area to work in to avoid misplacing any small components. Also, wearing safety gloves can protect your hands from any potential electrical hazards. Place every tool within easy reach. This way, you don’t have to interrupt your work to search for something.
Another important aspect is understanding the materials you’ll be working with. Fluorescent lamps consist of tubes, ballasts, and sometimes starters. Each part has a specific role in lighting up the lamp effectively. According to this expert opinion, ensuring that all connections are secure and components are in good condition is vital. This helps avoid any potential malfunctions.
In addition to the basic tools, you might also consider having a multimeter. A multimeter can help you test the electrical connections and ensure everything is wired correctly. Some other handy items include wire strippers and connectors. Keep in mind that being well-prepared can save you time and make the process more efficient.
Step 2: Identify the Parts of a Fluorescent Lamp
Knowing the parts of a fluorescent lamp is crucial before you start connecting it. This not only helps in understanding how the lamp works but also in troubleshooting any issues that might arise. The main parts include the fluorescent tube, the ballast, and the lamp holders. Each of these components has a specific function that contributes to the overall performance of the lamp. Recognizing them will make the installation process smoother.
The fluorescent tube is the most visible part of the lamp. It’s filled with a gas that lights up when electricity passes through it. The light is produced through a process called fluorescence, hence the name of the lamp. Ballasts are another vital component. They regulate the current to the fluorescent tube, ensuring it doesn’t receive too much power and burn out.
Next, lamp holders or sockets hold the fluorescent tube in place. They are located at either end of the tube and connect it to the power source. These holders usually have metal contacts that establish an electrical connection with the pins on the ends of the fluorescent tube. Identifying these holders correctly ensures you place the tube securely and effectively.
Some fluorescent lamps also include a starter. The starter helps to ignite the lamp by providing a temporary path for the electrical current. This is necessary for lamps that use older magnetic ballasts. Understanding these parts can help in addressing issues quickly and maintaining the lamp for a long time. Recognizing each element sets the foundation for a successful connection.
Step 3: Understand the Role of a Ballast in a Fluorescent Lamp
A ballast is a critical component in a fluorescent lamp. Its main job is to regulate the electrical current flowing to the lamp. Without a ballast, the fluorescent tube might receive too much current and be damaged. Ballasts help start the lamp and then control the current to ensure steady lighting. This regulation prevents flickering and prolongs the lifespan of the tube.
There are two main types of ballasts: magnetic and electronic. Magnetic ballasts are older and often cause the light to flicker when starting. They also tend to be bulkier and less efficient. On the other hand, electronic ballasts are more modern, providing instant start without flickering and being more energy-efficient. Understanding the differences can help you choose the right one for your needs.
Ballasts connect to both the power source and the fluorescent tube. They are typically wired in series, meaning the current passes through the ballast before reaching the tube. This arrangement ensures that the ballast can regulate the electricity effectively. A proper connection is essential for the ballast to do its job. Ensuring correct wiring can help avoid outages and malfunctions.
The role of a ballast doesn’t stop at just regulating current. They also provide the initial surge of high voltage needed to start the lamp. Once the lamp is lit, the ballast reduces the voltage and maintains it at a steady level. This dual role is crucial for the reliable operation of fluorescent lamps. Disconnected or malfunctioning ballasts can lead to lighting issues.
In addition to these functions, newer ballasts often come with features like dimming and better energy management. Some advanced ballasts are designed to adjust the light level based on ambient conditions. Such features can make your lighting system more versatile and efficient. Considering these options can enhance the functionality of your lighting setup.
Understanding the role of the ballast is key to effectively connecting and maintaining a fluorescent lamp. It’s one of the most important components in ensuring that your lamp works correctly and lasts a long time. Proper knowledge about ballasts can also aid in troubleshooting any issues that may arise. This makes the entire process of installing and maintaining fluorescent lamps much easier.
Step 4: Wire the Fluorescent Lamp
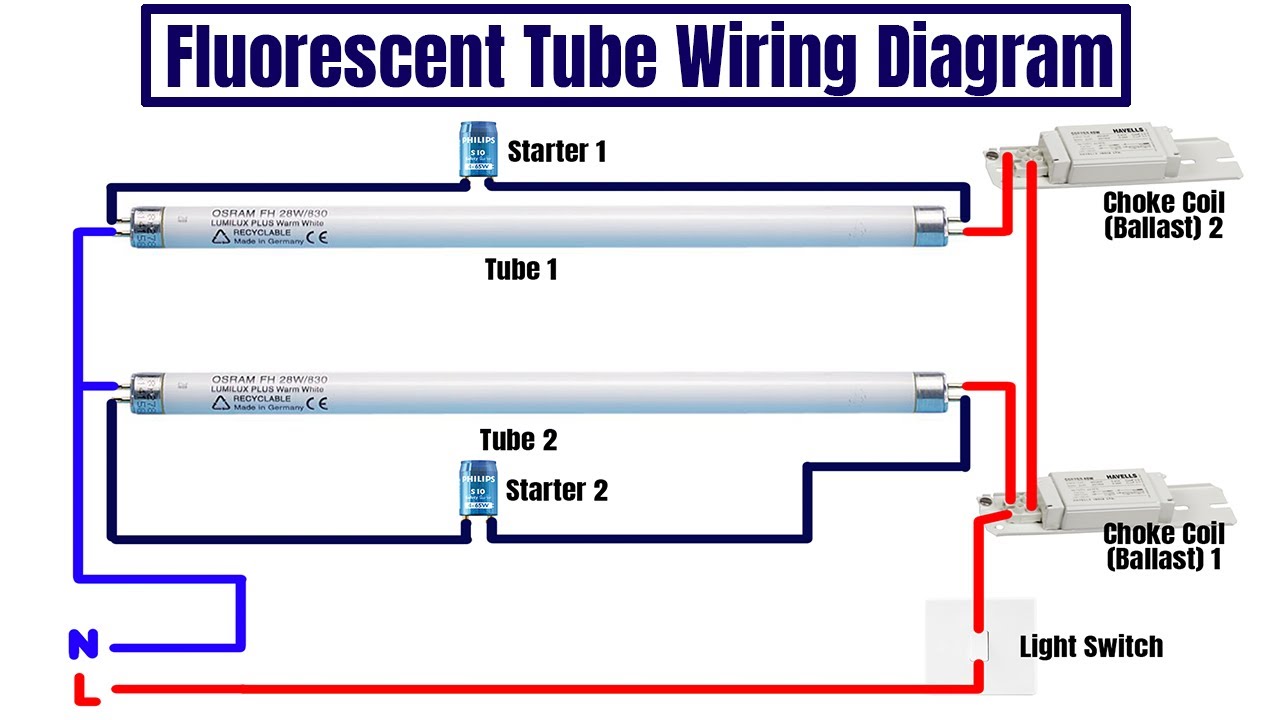
Wiring the fluorescent lamp is a crucial step in ensuring it functions correctly. Start by ensuring all power sources are turned off to avoid any electrical hazards. Identify the live (hot) and neutral wires coming from your power supply. Connect the live wire to one end of the ballast and the neutral wire to the lamp holders. This forms the basic circuit for your fluorescent lamp.
Once the initial connections are made, you need to wire the ballast to the lamp tube. The ballast usually has multiple wires, typically marked for easy identification. Secure these wires to the corresponding terminals on the lamp holders. This ensures that the electrical current flows properly through the lamp tube. Double-check all connections for secure fit.
According to the configuration of your ballast and lamp, you may have one or more wire connections left. For a single-lamp setup, connect the wires from the opposite end of the ballast to the second lamp holder. In setups with multiple lamps, the wiring can get a bit more complicated. You will need to ensure all lamps are properly connected to the ballast and each other. This step ensures consistent lighting across all lamps.
- Connect Live (Hot) Wire to Ballast
- Attach Neutral Wire to Lamp Holders
- Secure Ballast to Lamp Tube
- Ensure Proper Wire Connections for Multiple Lamps
- Double-Check All Connections
After completing the wiring, it’s time to test your connections. Turn on the power and flip the lamp switch. The fluorescent tube should light up if everything is wired correctly. If it doesn’t, turn off the power and recheck the wiring. Correct any loose or improper connections to ensure reliable operation of your fluorescent lamp.
Step 5: Test the Connection
Testing the connection of your fluorescent lamp is an essential step to ensure everything is working properly. Begin by turning the power back on. Locate the switch that controls the lamp and turn it on. If the lamp lights up immediately and maintains steady illumination, your wiring is likely correct. If not, you’ll need to troubleshoot.
If the lamp doesn’t light up, there could be several issues. Check the connections again to make sure nothing is loose or improperly attached. A common problem could be a malfunctioning ballast. Sometimes simply reseating the fluorescent tube can solve the issue. Ensure the tube is properly seated in its holders.
Another way to test the connection is by using a multimeter. Set the multimeter to measure voltage and check the electrical flow at various points in the circuit. This will help identify any inconsistencies or breaks in the connection. Using a multimeter can be particularly helpful for diagnosing more complex issues. Ensuring a continuous electrical path is key for the lamp to function.
- Turn Power Back On
- Flip the Lamp Switch
- Check for Immediate and Steady Illumination
- Troubleshoot by Checking Connections
- Use a Multimeter for Detailed Testing
If your lamp lights up but flickers, this could indicate a problem with the ballast or fluorescent tube. Flickering is often a sign of inconsistent current flow. Recheck the ballast connections, and if flickering persists, you might need to replace the ballast. A stable light indicates a properly functioning lamp and correct wiring.
Safety Precautions When Connecting a Fluorescent Lamp
When connecting a fluorescent lamp, safety should be your top priority. Always start by turning off the main power supply to avoid electrical shocks. Use a voltage tester to confirm that there’s no active current in the wiring you’re working with. Wearing insulating gloves can provide an extra layer of protection against accidental electrical contact. This minimizes the risk of injury.
It’s essential to work in a well-lit and clutter-free environment. This helps you stay focused and reduces the chances of mishandling components. Have all your tools and materials organized before you start the connection process. Using appropriate tools ensures you make secure and accurate connections. Mishandling tools or parts can lead to serious accidents.
- Turn Off Main Power Supply
- Use Voltage Tester
- Wear Insulating Gloves
- Work in a Well-Lit Area
- Organize Tools and Materials
Avoid wet conditions when working with electrical wiring as water conducts electricity, increasing the risk of electric shock. If you’re unsure about any step, consult a professional or refer to trusted resources for guidance. Double-check all connections for tightness and security before powering up the lamp again. Loose connections can lead to short circuits or unintended discharges.
Additionally, ensure that children or pets are kept away from your workspace while you’re handling electrical components. Even after installation, regularly check to ensure everything remains securely connected and functional over time. Safety guidelines exist not just for compliance but to keep everyone safe while using electrical equipment effectively.
Troubleshooting Issues in Fluorescent Lamp Connections
If your fluorescent lamp isn’t working correctly, there’s a good chance it’s due to a wiring issue. Start by turning off the power and inspecting all the connections. Loose or improperly connected wires can often cause the lamp to malfunction. Re-check each wire for a firm connection to the terminals. Taking this step can resolve many common problems.
Sometimes, the issue might be with the ballast. If the lamp flickers or doesn’t light up at all, it’s worth testing the ballast. Use a multimeter to check if the ballast is working properly. If the readings are off, consider replacing the ballast. This is a common fix for many lighting issues.
- Inspect all Connections
- Check for Loose Wires
- Test the Ballast with a Multimeter
- Replace Faulty Ballast
Another potential issue could be the fluorescent tube itself. Tubes have a certain lifespan and can wear out over time. If the tube appears darkened at the ends, it might need replacing. Switching to a new tube can often fix the problem. This is a quick and easy solution.
In some cases, the problem might be more complex, involving the starters in older setups. Starters help initiate the lighting process in fluorescent lamps. If the starter is faulty, the lamp won’t light up. Replacing the starter with a new one can resolve this issue. This step is especially important if you’re using older, magnetic ballasts.
Regular maintenance can prevent some of these issues from arising. Cleaning the lamp and ensuring all parts are in good condition can contribute to its longevity. Keep an eye on the components and replace any that seem worn out. This proactive approach can save you time and trouble in the long run.
Benefits of Fluorescent Lamps
Fluorescent lamps offer a range of benefits, making them a popular choice for both residential and commercial settings. One of the most significant advantages is their energy efficiency. Fluorescent lamps use about 25-35% less energy than traditional incandescent bulbs. This can result in substantial savings on your electricity bill over time. Reduced energy consumption also means a smaller carbon footprint.
Another benefit is the long lifespan of these lamps. Fluorescent tubes can last up to 20,000 hours, depending on the usage and maintenance. This longevity reduces the frequency of replacements, cutting down on maintenance costs. It also means fewer bulbs ending up in landfills, which is better for the environment. The durability of fluorescent lamps is undeniably a major advantage.
Fluorescent lamps also provide excellent light quality. They are available in various color temperatures, from warm to cool white, allowing for versatile lighting options. The light produced is diffuse and widespread, making it ideal for illuminating large areas like offices and classrooms. Consistent and even lighting helps reduce eye strain and create a comfortable environment.
- Energy Efficiency
- Long Lifespan
- Excellent Light Quality
- Versatile Lighting Options
- Environmental Benefits
Additionally, fluorescent lamps contribute to lower greenhouse gas emissions. By using less energy, power plants need to burn fewer fossil fuels, which in turn lowers the amount of carbon dioxide released into the atmosphere. This is a significant environmental benefit. With growing concerns about climate change, every bit of energy savings helps.
The cost-effectiveness of fluorescent lamps makes them a valuable choice for budget-conscious users. Although they may have a higher initial cost compared to incandescent bulbs, the long-term savings more than make up for this. Given their numerous benefits, it’s easy to see why fluorescent lamps continue to be a go-to option for many lighting needs.
Future of Fluorescent Lamps in an LED-Dominated Market
The rise of LED lighting has significantly impacted the demand for fluorescent lamps. LEDs are known for their exceptional energy efficiency and long lifespan, making them a popular choice among consumers. This shift has led many to wonder about the future of fluorescent lamps. While LEDs are rapidly gaining market share, fluorescent lamps still have unique advantages. These include lower initial costs and widespread availability.
One factor that keeps fluorescent lamps relevant is their cost-effectiveness for specific applications. In large commercial or industrial spaces, the initial investment required for LEDs can be prohibitive. Fluorescent lamps offer a more affordable alternative, especially when budget constraints are a priority. Additionally, existing fluorescent fixtures can be maintained without the need for expensive upgrades. This makes them a viable option in many scenarios.
- Lower Initial Costs
- Compatibility with Existing Fixtures
- Cost-Effective for Commercial Use
- Widespread Availability
- Reliable Performance
Energy regulations and environmental concerns also play a role in shaping the future of fluorescent lamps. Many regions have implemented stricter energy efficiency standards, pushing manufacturers to innovate. As a result, some new-generation fluorescent tubes are designed to be more energy-efficient and environmentally friendly. These improvements can help retain a segment of the market for fluorescent lighting solutions.
Moreover, fluorescent technology continues to evolve. Advances in ballast design and improved phosphor coatings contribute to better performance and efficiency. Such innovations ensure that fluorescent lamps are not entirely left behind. Although they may not dominate the market, these advancements keep them competitive.
In summary, while the LED surge presents significant competition, fluorescent lamps are likely to maintain their presence in specific niches. Factors such as cost-effectiveness and compatibility with existing infrastructure give them a unique edge. Continued technological enhancements further support their relevance. The future may see a balanced coexistence of both lighting technologies based on their distinct advantages.
Frequently Asked Questions
This section addresses common questions related to connecting and maintaining fluorescent lamps. Get clear answers to help with your lighting needs.
1. What is the purpose of a starter in a fluorescent lamp?
A starter helps initiate the lighting process in older fluorescent lamps. It provides a temporary path for current flow, which warms up the gas inside the tube. Once the gas reaches the required temperature, it ionizes and starts conducting electricity, making the lamp light up.
In newer fluorescent lamps with electronic ballasts, starters are typically not needed. The ballast itself can manage and regulate the initial current flow. Understanding if your lamp requires a starter can help you troubleshoot any startup issues efficiently.
2. Can I use an LED tube to replace my fluorescent lamp tube?
Yes, you can replace a fluorescent lamp tube with an LED tube; however, it’s essential to match the size and type. Some LED tubes are designed as direct replacements without needing any modification to existing fixtures. Others might require re-wiring or bypassing the ballast altogether.
It’s crucial to follow manufacturer instructions carefully during this replacement process. Switching to LED tubes often results in enhanced energy efficiency and longer life spans compared to traditional fluorescent tubes.
3. Why does my fluorescent lamp flicker when turned on?
A flickering fluorescent lamp usually indicates an issue with either the ballast or the bulb itself. If you have an older magnetic ballast, it could be malfunctioning or nearing its end of life. Replacing it with a new electronic ballast might resolve this issue.
The problem could also be with loose wiring connections or an old bulb that needs replacing. Ensuring all components are secure and functioning properly will help minimize flickering and improve light quality overall.
4. How often should I replace my fluorescent lamp?
The lifespan of a fluorescent lamp varies depending on usage and maintenance but generally lasts between 7,500 and 20,000 hours. Factors such as frequent switching on and off can shorten its lifespan considerably.
To maintain optimal performance, consider replacing your lamps every few years or when you notice decreased brightness or increased flickering. Newer models tend to be more efficient and provide better light quality as well.
5. What safety precautions should I take when handling fluorescent lamps?
Always turn off the power supply before working on your fluorescent lamp setup to avoid electrical shocks or accidents. Use insulated gloves for added safety while handling electrical components like wiring or bulbs.
Avoid working under wet conditions as water conducts electricity increasing your risk of electric shock significantly . Make sure children are kept away from your workspace during installation activities . Proper safety precautions ensure both effective operation n minimized hazards whilst setting up maintaining these lighting fixtures .
Conclusion
Fluorescent lamps offer numerous benefits, including energy efficiency and long lifespans, making them viable options for various settings. However, understanding their components and the correct wiring process is essential for optimal performance. Proper safety measures can prevent accidents and ensure the lamp functions effectively. Regular maintenance extends the lamp’s lifespan and efficiency.
Despite the growing dominance of LED lighting, fluorescent lamps maintain relevance due to their cost-effectiveness and compatibility with existing infrastructure. Technological improvements continue to make fluorescent lamps more efficient and environmentally friendly. With the right knowledge and precautions, users can maximize the benefits of fluorescent lighting solutions. The future sees a balanced coexistence of both technologies.

I’m Emily Johnson, an affiliate marketer and blogger focused on lamps and lighting. I share honest reviews, simple buying guides, and practical tips. My goal is to help readers choose the right lamp for their space, style, and budget with confidence.