
Turning a discarded wine bottle into a stunning table lamp can be both an elegant and sustainable design decision. Have you ever considered that one wine bottle could be transformed into an alluring centerpiece for your living space? Repurposing simple items like wine bottles can not only bring a unique aesthetic appeal but also contribute significantly to environmental sustainability.
Originally popularized in the mid-20th century, the trend of converting ordinary objects into functional decor has seen a resurgence. Crafting a table lamp from a wine bottle can cut down on waste—consider that Americans consume nearly one billion gallons of wine annually. This simple yet stylish solution serves as both an eco-friendly practice and a testament to innovative home decor techniques.
- Gather materials: clean wine bottle, lamp kit, drill, safety goggles.
- Remove labels from the bottle and clean it thoroughly.
- Drill a hole near the bottom for the cord, using a glass-cutting bit.
- Insert the electrical cord through the hole and assemble the lamp parts.
- Attach lampshade and bulb; test to ensure functionality.
How to Make a Table Lamp from a Wine Bottle
Making a table lamp from a wine bottle is a creative and eco-friendly project. First, gather the necessary materials: a clean wine bottle, lamp kit, drill, and safety goggles. You can find lamp kits at most hardware stores. It’s important to have the right size drill bit to avoid breaking the glass. Working on a sturdy surface will help keep you safe.
Once you have everything, start by preparing the wine bottle. Ensure the bottle is thoroughly cleaned and free from any labels. Using the drill, create a hole near the bottom of the bottle for the electrical cord. Be gentle and patient to avoid shattering the glass. Wearing safety goggles is crucial to protect your eyes.
Next, assemble the lamp parts. Insert the electrical cord through the hole and connect it to the lamp kit as per the instructions. Secure the socket firmly on the bottle’s neck. Attach the light bulb and lampshade to complete the basic assembly. Double-check all connections for safety.
Finally, test your new lamp by plugging it in and turning it on. If the light doesn’t work, recheck the electrical connections. This DIY project not only gives you a unique decor piece but also promotes sustainability by reusing materials. Display your lamp proudly and perhaps even create more as gifts for friends and family.
Step 1: Gather Your Materials
To start making your wine bottle lamp, first gather all necessary materials. You will need a clean wine bottle, which can be any color or design. Next, obtain a lamp kit that includes a socket, cord, and plug. Most hardware stores carry these kits. It’s essential to get a kit that fits your bottle’s size.
Safety is crucial, so gather protective gear like safety goggles and gloves. You will also need a drill with a glass-cutting bit. Make sure the bit size matches your lamp kit instructions. Having a drill with variable speed control helps manage the delicate drilling process. Keep all these tools close at hand.
A work surface that is stable and secure is important. Ensure you have a towel or cloth to cushion the bottle during the drilling phase. This will prevent the bottle from slipping or rolling. Additionally, you might need some adhesive to secure pieces in place. All these items are easy to find and affordable.
Lastly, have a lightbulb and lampshade ready. The shade should fit the style of your bottle. Including a block of wood or a clamp can also help stabilize the bottle while you’re working. With everything prepared, you’re ready to move on to the next step. Starting with the right materials ensures a smooth process.
Step 2: Prepare the Wine Bottle
Preparing the wine bottle is a crucial step in creating your lamp. Start by removing any labels or stickers from the bottle. Soak the bottle in warm, soapy water for about 20 minutes to loosen the adhesive. Gently scrub off the labels with a sponge or cloth. Ensuring the bottle is clean will give it a polished look.
Once the bottle is clean, dry it thoroughly. Take your drill with a glass-cutting bit and mark the spot where you want the hole. This hole is where the cord will go through. It’s best to position it near the bottom of the bottle. Use a marker to make a visible dot.
Drilling the glass requires patience and precision. Place the bottle on a cushioned surface to keep it steady. Start drilling at a low speed to avoid cracking the glass. Apply gentle, consistent pressure. Make sure to wear your safety goggles to protect your eyes from glass shards.
After drilling the hole, clean the bottle again to remove any glass dust. If there are rough edges around the hole, use sandpaper to smooth them out. A smooth hole will protect the electrical cord from damage. Your wine bottle is now ready for the next step in the lamp-making process.
Step 3: Create the Lamp Base
Creating the lamp base involves securing the wine bottle so the lamp stands steadily. First, ensure that the bottom of the wine bottle is level. If it isn’t, you can use rubber feet or cork pads to balance it. This will keep the lamp stable and prevent it from tipping over. It’s a small touch that makes a big difference.
Next, insert the lamp rod through the bottle’s neck. The rod serves as both a support and conduit for the electrical cord. Ensure it fits tightly and securely. If the rod is loose, use adhesive or tape to secure it. A tight fit ensures the lamp remains straight and stable.
Now, thread the electrical cord through the lamp rod and out the hole you drilled earlier. Remember to leave enough cord length to connect to the socket at the top. This step requires some patience as you guide the cord through the tight space. It’s helpful to have a second pair of hands for this.
With the cord in place, attach the base of the lamp socket to the bottle’s neck. Follow the instructions that came with your lamp kit for this step. Usually, this involves screwing the base onto the top of the rod. Ensuring a secure connection is important for the lamp’s durability.
If the wine bottle is transparent, consider filling it with decorative elements like marbles or fairy lights. This adds weight to the base and enhances the aesthetic appeal. Just make sure these elements don’t interfere with the lamp rod or cord. You can get creative with this part to match your home decor.
Finally, check the stability of your assembled base. Give it a gentle shake to see if it wobbles. If it does, adjust the feet or pad placements as needed. A stable base is essential for the safety and functionality of your wine bottle lamp.
Step 4: Assemble the Lamp Parts
Assembling the lamp parts starts with connecting the electrical cord to the socket. Follow the directions provided in your lamp kit to ensure a proper connection. Typically, this involves attaching the wires to the designated screws on the socket. Tighten all connections securely to avoid any loose ends. This step is crucial for the lamp to function safely.
Once the electrical cord is attached to the socket, insert the cord through the lamp rod. Pull gently to ensure there is no excess slack. The socket should sit comfortably on the top of the lamp rod. Secure the socket in place by tightening the screws or fasteners included in your kit. A tight fit ensures the socket doesn’t wobble.
Next, attach the lampshade holder to the socket. Most lamp kits include a ring or clips to hold the lampshade in place. Ensure the holder is level and secure. This is important because an uneven holder can cause the lampshade to tilt, affecting the lamp’s appearance. Adjust the holder if necessary.
With the holder in place, it’s time to attach the lampshade. Carefully place the shade onto the holder and secure it. Ensure the lampshade is centered and level. A well-fitted lampshade not only looks good but also distributes light evenly. Double-check all parts to make sure they are firmly secured.
Double-check all parts to ensure they are firmly secured. Connect the lamp to a power source and turn it on to test its functionality. If it doesn’t light up, recheck the wiring connections inside the socket. Any loose wire can prevent the lamp from working correctly. Ensure everything is connected properly.
Lastly, place the assembled lamp on a stable surface. Test the stability by giving it a slight nudge. If it wobbles, adjust the base or the wine bottle’s position. Your lamp is now complete and ready to light up your space.
Step 5: Finalize Your Wine Bottle Lamp
Finalizing your wine bottle lamp is the last step in this creative process. Start by rechecking all the connections and making sure the lampshade is properly attached. It’s a good idea to give everything one last look. Secure any loose components and ensure the lamp stands steadily. A well-assembled lamp should feel solid and stable.
After confirming the structure, plug your lamp into an outlet. Test its functionality by switching it on. If the lamp doesn’t light up, double-check the connections inside the socket. Make sure all wires are tight and correctly connected. Addressing these small issues will ensure your lamp works perfectly.
If you notice any irregularities in the light output, such as flickering, consider using a different bulb. Sometimes, an incompatible bulb can cause issues. Select a bulb that matches the socket specifications. This not only provides consistent lighting but also prolongs the life of your lamp. Having a few spare bulbs on hand is also a good idea.
Next, add final decorative touches to make the lamp your own. This could involve adding a decorative pull chain or bead accents. Consider placing the lamp on a decorated or matching base. This will enhance the overall aesthetic. Customizing your lamp adds a unique, personal touch.
Your wine bottle lamp is now ready to be proudly displayed. Choose a spot where it can be both functional and admired. Whether it’s a bedside table, a living room corner, or a study desk, this lamp will surely catch some eyes. Enjoy your new, eco-friendly lighting solution. Share your creation with friends or family and inspire them to make their own.
Benefits of DIY Wine Bottle Table Lamp
Creating a DIY wine bottle table lamp offers several advantages. One major benefit is the eco-friendly aspect. By repurposing wine bottles, you are reducing waste and supporting environmental sustainability. This project gives new life to used items that would otherwise end up in landfills. It’s a simple way to make an impact on the planet.
Another advantage is the cost-effectiveness of making your own lamp. Instead of buying expensive store-bought lamps, you can create one for a fraction of the price. The materials needed are inexpensive and often readily available at home or local stores. A little creativity can turn something old into a beautiful new decor piece. This not only saves money but also adds personal value.
Flexibility in design is another significant benefit. When you make your own lamp, you have full control over how it looks. You can choose different shapes and sizes of bottles as well as various styles of lampshades and decorations. This customization allows your lamp to fit perfectly with your home’s aesthetic.
The process also provides an opportunity for creative expression and relaxation. Working on a hands-on project can be very fulfilling and therapeutic. It encourages problem-solving skills and artistic talent while offering a productive way to spend time. Sharing this activity with family or friends can enhance its enjoyment.
A DIY wine bottle lamp makes for an excellent gift, too. Handmade gifts are often seen as more thoughtful because they show effort, creativity, and care. You can personalize each lamp to suit the recipient’s taste, making it a meaningful present that stands out from store-bought options.
Choosing the Right Wine Bottle for Lamp Conversion
Picking the perfect wine bottle is key to making an attractive lamp. The first thing to consider is the bottle’s size. Larger bottles offer more stability and space for decorative elements. Smaller bottles can be used, but they may require additional support. Choose a size that fits well with your intended use and display space.
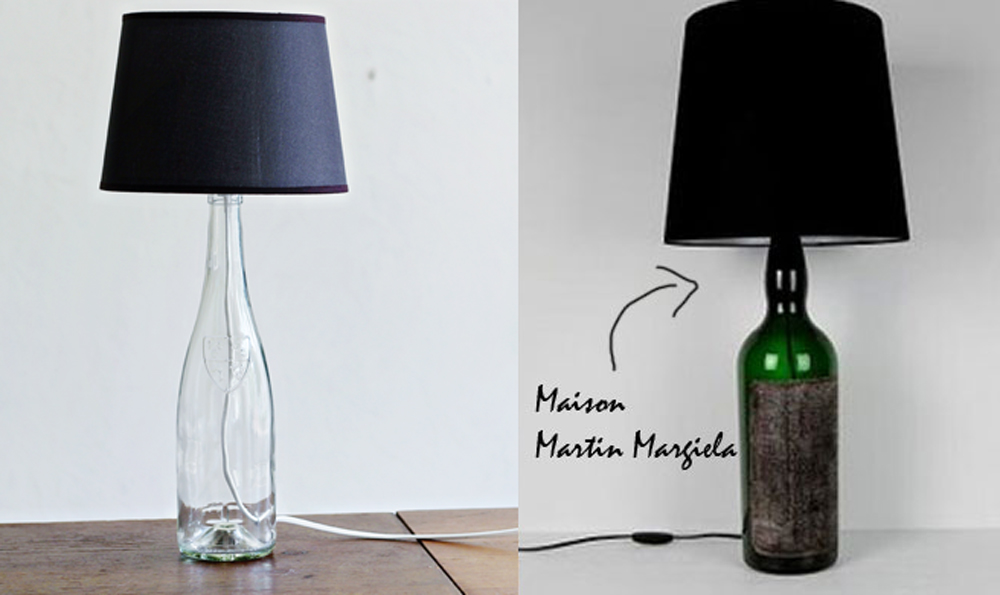
The color and design of the bottle also play a crucial role. Clear bottles allow light to pass through, creating a bright and open feel. Green or amber bottles offer a warmer, more muted glow. Keep the room’s decor and lighting needs in mind when selecting a color. Decorative patterns or unique shapes can add an extra touch of charm.
Inspect the bottle for any cracks or chips. Even small imperfections can affect the lamp’s safety and durability. A solid, intact bottle is essential for both appearance and function. Check the bottle’s surface and base carefully. Using a flawed bottle can lead to issues during assembly.
The bottle’s neck should comfortably fit the lamp kit components. Measure the neck opening to ensure it matches the size of your lamp rod and socket. Most standard wine bottles will work, but some might have too wide or too narrow openings. Proper fitment ensures a secure and stable lamp.
Consider the overall theme you aim to achieve with your DIY lamp. An elegant, minimalistic bottle can suit a modern decor style, while a rustic, textured bottle fits a vintage theme. Matching the bottle to your room’s aesthetic makes the lamp a seamless addition. Your choice of bottle sets the tone for the entire project.
Safety Measures When Making a Wine Bottle Table Lamp
Safety is paramount when working with glass and electrical components. Always wear safety goggles to protect your eyes from glass shards. Gloves will also protect your hands during the drilling process. Make sure you work in a well-ventilated area. This reduces the risk of inhaling glass dust and fumes from adhesives.
Using the correct tools is essential for a safe project. When drilling the glass bottle, use a drill with a glass-cutting bit. Ensure the drill bit matches the size needed for the electrical cord. This minimizes the risk of cracks or breaks. Low-speed drilling helps maintain control and precision.
Secure the bottle on a stable, cushioned surface before you start drilling. A wobbly bottle can easily slip and break. Using rubber grips or a clamp can keep the bottle in place. Take your time and apply even pressure. Rushing can lead to accidents and uneven holes.
Once you start assembling the lamp, follow the lamp kit instructions closely. Double-check all electrical connections to ensure they are tight and secure. Loose wires can cause short circuits or electrical shocks. It’s better to spend extra time verifying each connection than to risk safety issues later. An improperly wired lamp can be a fire hazard.
After final assembly, test the lamp in a controlled setting. Plug it in and turn it on while monitoring for any irregularities. If the lamp flickers or doesn’t light up, unplug it immediately and recheck all connections. Keeping a fire extinguisher nearby is a good precaution. Safety should always be your top priority.
Creative Variations for Wine Bottle Lamps
Exploring creative variations for wine bottle lamps can add a unique touch to any space. One interesting idea is to fill the bottle with decorative items. You can use items like colored marbles, fairy lights, or sand to give the lamp an eye-catching look. These additions not only add weight to the base but also enhance its aesthetic appeal. Experimenting with different fillers can yield spectacular results.
Another option is to paint or etch the wine bottle before converting it into a lamp. Glass paints come in various colors and can be used to create intricate designs or simple block colors. Etching cream allows you to create frosted patterns on the glass. These techniques can transform a plain bottle into a piece of art. Personalized designs make each lamp one-of-a-kind.
If you prefer a rustic look, consider wrapping the bottle in natural materials like jute or twine. This gives the lamp a cozy, handmade feel. You can also add beads or small charms to the wrap for extra flair. This style is perfect for rustic or farmhouse decor. It’s an easy way to add texture and character.
A lampshade swap can also dramatically change the look of your lamp. Try using a patterned or colored lampshade to match the room’s decor. You can even use fabric remnants to create a custom shade. The possibilities are endless. Combining different materials can result in a striking, cohesive design.
For those who love technology, integrating smart bulbs into your wine bottle lamp can be a fun twist. Smart bulbs allow you to control the lamp’s brightness and color via an app or voice command. This modern touch makes your handmade lamp even more functional. It merges creativity with convenience.

Frequently Asked Questions
Creating a table lamp from a wine bottle is a popular DIY project. Here are some common questions and detailed answers to help you get started.
1. What types of wine bottles work best for making lamps?
Both clear and colored wine bottles can be used for making lamps. Clear bottles allow more light to pass through, creating a brighter effect. Colored bottles offer a diffused light, ideal for mood lighting. Size also matters; larger bottles often provide better stability.
The thickness of the glass is another factor to consider. Thicker glass adds durability, reducing the risk of breakage during drilling. Choosing the right bottle depends on your aesthetic preferences and functional needs.
2. Can I use LED bulbs in my wine bottle table lamp?
Yes, LED bulbs are suitable for wine bottle table lamps. They produce less heat compared to incandescent bulbs, making them safer for enclosed spaces like a wine bottle. Additionally, LED bulbs are energy-efficient and have a longer lifespan.
When selecting an LED bulb, make sure it fits your lamp socket size. Consider using dimmable LEDs if you want adjustable lighting options. Their versatility makes them an excellent choice for custom DIY projects.
3. How do I drill a hole in a glass wine bottle safely?
Drilling a hole in glass requires patience and the right tools. Use a drill with a diamond-tipped or carbide bit designed specifically for glass cutting. Start by marking the spot where you want to drill and place the bottle on a cushioned surface to prevent slipping.
Drill at low speed while applying gentle pressure to avoid cracking the glass. It’s crucial to wear safety goggles and gloves during this process for added protection against flying shards and dust.
4. What kind of paint works best on wine bottles?
Acrylic paints are commonly used for painting on glass due to their versatility and ease of use. You can find specialized acrylic paints formulated explicitly for glass, ensuring better adhesion and longevity of the design.
You may also use spray paints that offer even coverage but ensure they are suitable for glass surfaces first. Seal your artwork with clear varnish or sealant to protect it from scratches and fading over time.
5. Are there any special electrical considerations when making a DIY lamp?
Proper wiring is critical when assembling any lamp to ensure safety and functionality. Follow detailed instructions provided in your lamp kit closely, particularly regarding wire connections inside the socket and plug parts.
If you’re uncertain about handling electrical components yourself, consider consulting with someone experienced or professional electrician assistance before proceeding further into such activities which involves electricity directly . This extra level caution helps avoiding accidents ensures safe operating final product end day .
Conclusion
Creating a table lamp from a wine bottle is not only a rewarding DIY project but also an environmentally friendly endeavor. By repurposing wine bottles, you add a unique touch to your decor while reducing waste. Each step in the process, from gathering materials to the final assembly, offers a chance to learn and be creative.
Whether using clear or colored bottles, LEDs, or customized designs, the possibilities are endless. Safety should always be a top priority, especially when handling glass and electrical components. Ultimately, your wine bottle lamp will be a beautiful, functional piece that reflects your personal style and craftsmanship. Enjoy the process and the stunning result!

I’m Emily Johnson, an affiliate marketer and blogger focused on lamps and lighting. I share honest reviews, simple buying guides, and practical tips. My goal is to help readers choose the right lamp for their space, style, and budget with confidence.