
Ever noticed how a meticulously polished brass lamp can transform the ambiance of a room, exuding both warmth and elegance? Yet, the process of achieving that perfect shine often feels like an art form in itself. A carefully cleaned brass lamp doesn’t just illuminate your space; it reflects a dedication to preserving the beauty of every detail.
The essential steps to maintaining that pristine look include using a gentle cleaning solution and soft cloth, avoiding any harsh chemicals that could damage the brass over time. Historically, brass has been prized for its blend of durability and aesthetic appeal, making the care of such items an endeavor worth investing in. Notably, a well-maintained brass lamp can remain a treasured part of home decor for generations, adding a timeless touch to any setting.
- Gather your cleaning materials: soft cloths, mild soap, warm water, brass polish.
- Dust the lamp with a soft cloth to remove loose dirt.
- Clean with a soapy water solution and wipe gently.
- Apply vinegar-salt paste to remove tarnish; rinse thoroughly.
- Polish with brass polish for shine; buff in circular motions.
- Rinse again and dry immediately to prevent water spots.
How to Clean a Brass Lamp
Cleaning a brass lamp starts with gathering the right materials. You’ll need a soft cloth, mild soap, warm water, and a polishing cloth. It’s important to avoid using abrasive sponges or harsh chemicals. Begin by gently dusting the lamp with a soft cloth to remove any loose dirt. This initial step ensures you don’t scratch the brass during the cleaning process.
Next, mix warm water with a few drops of mild soap. Dip the soft cloth into the soapy water and wring it out until it’s damp. Wipe the entire surface of the brass lamp, focusing on areas with visible grime. By working in small sections, you can ensure an even and thorough clean. Rinse the cloth frequently to avoid spreading dirt.
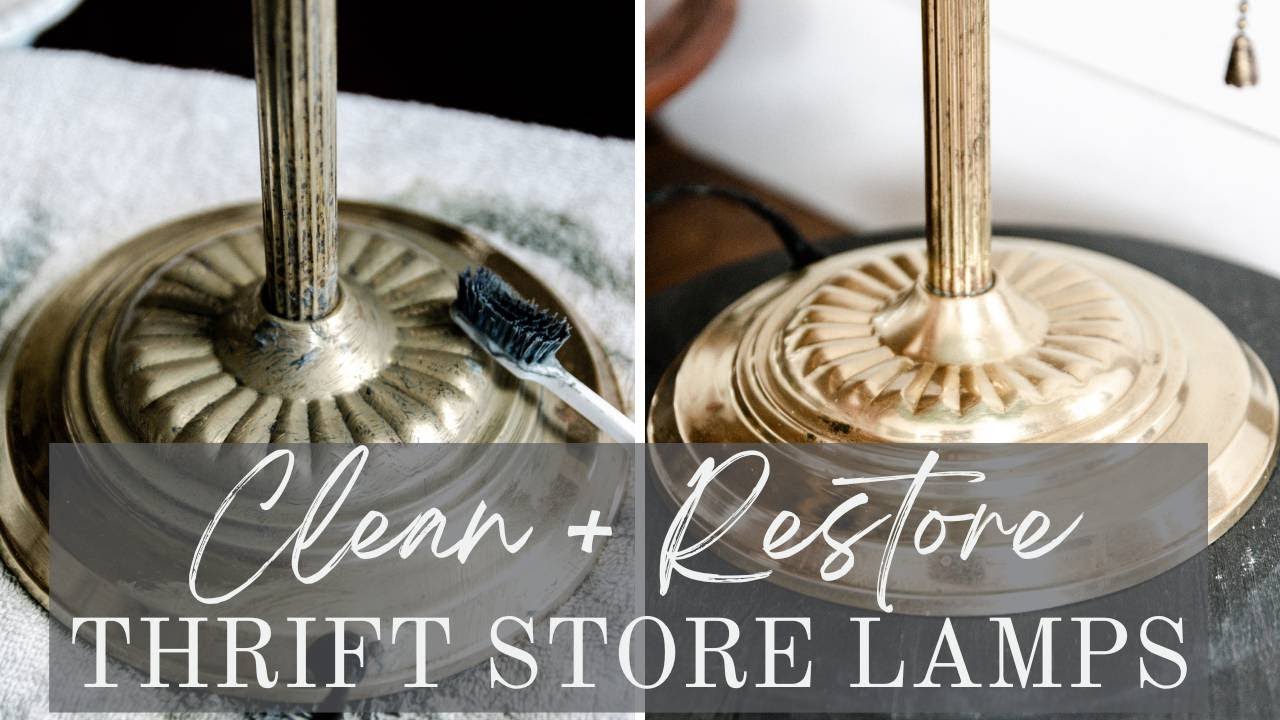
After wiping the lamp, prepare a cleaning solution for a deeper clean. Create a mixture of vinegar and salt, applying it to the brass using a clean cloth. Rub gently in circular motions, which helps to lift any built-up tarnish. For stubborn spots, a soft-bristled toothbrush can be useful. According to this post, these steps help preserve the authenticity of your brass lamp.
Once the tarnish is removed, rinse the lamp with lukewarm water. Dry immediately with a soft towel to prevent water spots. For added shine, use a brass polish and a polishing cloth. Buff the lamp in circular motions until it gleams. If you’re wondering what kind of lamp fits best in your home, check out this article for some great suggestions.
Step 1: Gather Your Cleaning Materials
To begin, you need to collect essential cleaning materials to ensure the brass lamp shines without damage. You’ll need a soft cloth to dust off any surface dirt. This prevents scratches during the cleaning process. Make sure to have mild soap, warm water, and a separate cloth for washing. These materials will clean the lamp without tarnishing the brass.
Another crucial item is a brass polish. This helps in restoring the original shine after cleaning. You should also have vinegar and salt on hand, which can act as a homemade cleaning solution. According to this expert opinion, these ingredients are effective yet gentle on brass. It’s always wise to have a polishing cloth to finish the job.
A toothbrush can be surprisingly useful. It helps to reach tight corners and intricate designs on the lamp. Soft-bristled options work best to avoid scratching. Make sure everything is easily accessible before starting the cleaning process. This ensures a smooth and efficient cleaning session.
Finally, a bucket of lukewarm water will be needed for rinsing. It’s essential for removing any residual soap or cleaning solution from the lamp. Towel drying immediately after rinsing prevents water spots. A well-organized setup saves time and ensures the brass lamp gets the thorough clean it deserves. Gathering all these materials beforehand makes the task much easier.
Step 2: Initial Dusting and Wiping
Begin with a thorough dusting of your brass lamp to remove loose dirt and debris. Use a soft, lint-free cloth to gently wipe the surface. This step helps prevent any scratching when applying cleaning solutions. Be sure to dust all the nooks and crannies, including intricate designs. Pay extra attention to areas that are harder to reach.
Once you’ve completed dusting, prepare a bowl of lukewarm water mixed with a few drops of mild soap. Dip another soft cloth into the soapy water, wringing out the excess. Start wiping the lamp gently, ensuring not to miss any spots. Work in small sections, making sure each part is thoroughly cleaned. This will ensure that you don’t spread dirt around.
Additionally, be cautious not to use excessive water, as it can get trapped in crevices. If you encounter stubborn dirt, re-dip the cloth into the soapy water and reapply. For more detailed areas, a soft toothbrush can help remove grime. Always rub gently to avoid damaging the brass surface. Rinse the cloth frequently to keep it clean.
After you’ve wiped the entire lamp with soapy water, take another damp, clean cloth to remove any soap residue. It’s crucial to do this step to prevent soap spots. Ensure that every part of the lamp is free from soap. Dry the lamp immediately with a soft towel to avoid watermarks. This step prepares the lamp for deeper cleaning in the next stages.
Step 3: Applying the Cleaning Solution
With initial dusting and wiping complete, it’s time to apply a cleaning solution for deeper cleaning. Create a mixture using vinegar and salt, two common household items that effectively clean brass. Mix one part vinegar with one part salt until it forms a paste. This combination helps to dissolve tarnish and restore the brass’s original shine. Be careful not to use too much, as a small amount goes a long way.
Using a clean, soft cloth, apply the vinegar-salt paste to the brass lamp. Rub it in gently, making small circular motions. This technique helps to lift off any remaining grime and oxidation. If your lamp has intricate details, consider using a soft-bristled toothbrush. This will help you reach areas that are difficult to clean with a cloth.
Let the cleaning solution sit on the brass for a few minutes. This allows it to break down the tarnish effectively. Avoid letting it dry completely, as it can become harder to remove. After a few minutes, use a damp cloth to wipe away the paste. Ensure you remove all traces of the cleaning solution from the lamp’s surface.
If you notice stubborn tarnish that remains, reapply the cleaning solution as needed. Sometimes, heavily tarnished areas require a second application. Patience is key during this step. Always follow up with a damp cloth to remove any leftover paste. You want the brass to be free from any residues.
Finally, give the lamp a thorough rinse with lukewarm water. This step ensures all cleaning solution is washed off. Dry the lamp immediately with a soft towel to prevent water spots from forming. Your brass lamp should now have a noticeable shine. This comprehensive cleaning prepares it for the final polishing step.
Step 4: Polishing the Brass Lamp
After cleaning, it’s time to polish your brass lamp to bring out its shine. Use a high-quality brass polish and a soft polishing cloth. Apply a small amount of polish onto the cloth. Gently rub the polish onto the brass surface using circular motions. This helps to evenly distribute the polish and enhance the lamp’s luster.
Focus on small sections at a time to ensure an even polish. Let the polish sit for a few minutes to allow it to work its magic. This resting period helps the polish bond with the brass. Avoid letting it sit too long, as it can become difficult to buff out. Once the polish has set, use a clean part of your cloth to buff the brass.
Buffing should be done in circular motions to achieve a nice, even shine. Don’t forget the intricate areas and designs. A gentle touch is key to preventing scratches. For very detailed parts, use a soft-bristled toothbrush. This can help polish areas that are hard to reach with a cloth.
After buffing, examine the lamp to ensure all the polish has been removed. If any residue remains, wipe it off with a clean, dry cloth. Consistent polishing helps maintain the brass’s natural sheen. For long-lasting results, repeat this process periodically. This keeps your brass lamp looking new and beautiful.
Finally, consider applying a protective brass lacquer. This can help maintain the polished appearance longer. Ensure your lamp is completely dry before applying any protective coat. Following these steps will help your brass lamp stay shiny and add elegance to your space. Consistent care can greatly extend its lifespan.
Step 5: Final Rinse and Drying
After polishing, it’s essential to give your brass lamp a final rinse. Use lukewarm water to gently wash off any remaining cleaning solution or polish residue. This step prevents any dulling of the shine. Make sure to handle the lamp carefully during this process. Rinsing thoroughly helps maintain the lamp’s natural gleam.
Once rinsed, immediately dry the lamp with a soft, absorbent towel. It’s crucial to dry every nook and cranny to avoid water spots. Work swiftly but gently to absorb all moisture from the surface. Pay extra attention to any intricate details or designs. Moisture left behind can lead to dull spots or tarnish over time.
For a finishing touch, you can use a hairdryer on a cool setting to ensure no moisture remains. This tool is particularly useful for reaching small, intricate areas. Keep the dryer at a safe distance to avoid heating the brass. Circulate the air evenly around the lamp. This step guarantees a complete and thorough drying process.
Inspect the lamp one last time to ensure it’s completely dry. If you notice any remaining dampness, use a clean, dry cloth to remove it. A fully dried lamp will maintain its polished appearance longer. Regular care and maintenance can help preserve the shine. Your brass lamp is now beautifully clean and ready to enhance your space.
The Right Cleaning Solutions for Brass
Choosing the right cleaning solutions for brass is crucial to maintaining its shine and durability. Household items like vinegar, salt, and lemon juice are effective yet gentle options. Vinegar mixed with salt forms a paste that can be applied to tarnished areas. This mixture breaks down oxidation without harming the surface. Lemon juice works similarly, providing a natural acid to lift grime.
For commercial options, brass-specific cleaners are available in most stores. These products are formulated to clean and polish without scratching. Read labels carefully to ensure they’re suitable for brass items. Always follow the manufacturer’s instructions for the best results. Using the wrong cleaner can damage your brass lamp.
Homemade solutions offer the advantage of being both cost-effective and easy to prepare. Here are some simple combinations:
- Vinegar and Salt: Mix one part vinegar with one part salt.
- Lemon Juice and Baking Soda: Create a paste using equal parts lemon juice and baking soda.
- Toothpaste: Use non-gel toothpaste as an alternative cleaner.
If you prefer eco-friendly options, look for green cleaning products that are safe for brass. These products often use natural ingredients like plant-based oils and extracts. They provide effective cleaning action while being kind to the environment. Make sure these products specify their suitability for brass surfaces.
Spot testing is always recommended when using any new cleaner on your brass lamp. Apply a small amount of solution on an inconspicuous area first. This will help you avoid potential damage or discoloration. By taking these precautions, you ensure that your cleaning process keeps your lamp looking its best.
Maintaining Your Brass Lamp’s Shine
Keeping your brass lamp shining brightly requires consistent maintenance. Regular dusting is the first step. Use a soft cloth to dust the lamp at least once a week. This prevents dirt from settling and causing tarnish. Dusting regularly can dramatically reduce the need for deep cleaning sessions.
Monthly polishing is another effective way to maintain shine. Use a brass polish or a homemade solution to gently buff the surface. Focus on small areas and work in circular motions. This technique ensures an even shine and avoids streaks. Remember to wipe off any excess polish to prevent buildup.
Consider placing your brass lamp in areas with stable humidity levels. Excessive moisture can cause tarnish, while overly dry conditions can make the brass appear dull. If necessary, use a dehumidifier or air conditioner to control humidity. Small silica gel packets can also be used to absorb excess moisture. Proper placement can greatly extend the lamp’s lifespan.
Abrasive materials should be avoided at all costs. Do not use steel wool or rough sponges, as these can scratch the surface. Always opt for soft cloths and gentle cleaning tools. If you need to clean intricate areas, a soft-bristled toothbrush is a safe choice. Gentle cleaning preserves the brass’s natural beauty.
Applying a protective coating can help retain the brass’s shine. Brass lacquer or wax can provide a barrier against oxidation. Make sure the lamp is thoroughly clean before applying any protective layer. Follow the instructions on the product for the best results. This step is particularly useful if you live in a humid climate.
Finally, periodically check your brass lamp for signs of tarnish or damage. Early intervention can prevent more severe issues. Clean and polish as soon as you notice any changes. Consistent care and attention will keep your brass lamp looking beautiful for years to come. Happy cleaning!
Avoiding Common Mistakes when Cleaning Brass
Cleaning brass might seem simple, but there are common mistakes you should avoid. One major error is using abrasive materials. Steel wool or rough sponges can scratch the brass surface, leaving unsightly marks. Instead, always use soft cloths and gentle tools. This approach keeps your brass lamp looking flawless.
Another frequent mistake is applying too much pressure while cleaning. Heavy scrubbing can damage the brass and remove its protective coating. Use light, controlled movements for the best results. Patience is your friend when dealing with delicate brass items. It’s better to spend a little more time cleaning than to risk damage.
Using harsh chemicals is also a big no-no. Avoid cleaners that contain ammonia or bleach, as these can corrode the brass. Opt for milder solutions like vinegar and salt, or specialized brass cleaners. Always check the product label to make sure it’s safe for brass. This ensures your lamp remains in excellent condition.
Failing to rinse and dry the brass thoroughly is another common mistake. Residue from cleaning solutions can tarnish the brass if not properly removed. After cleaning, rinse with lukewarm water and dry immediately with a soft towel. Pay special attention to intricately designed areas where residue can hide. Proper drying prevents water spots and keeps the brass shining.
Lastly, neglecting regular maintenance can lead to more significant issues over time. Skipping routine dusting and polishing makes your brass more prone to tarnish. Set a regular schedule for cleaning and polishing to maintain its appearance. Consistent care ensures the longevity of your brass lamp. By avoiding these common mistakes, you can keep your brass items looking stunning.
Frequently Asked Questions
Cleaning brass lamps can seem daunting, but it becomes more manageable with insightful guidance. Here are some commonly asked questions to help you maintain your brass lamp’s elegance.
1. What materials should I avoid when cleaning brass?
Avoid using steel wool or abrasive sponges, as they can scratch the brass surface. Harsh chemicals like ammonia or bleach should also be avoided because they may corrode the material. Instead, stick to mild soaps and soft cloths for a safer clean.
If you’re unsure about a cleaning product, do a spot test first on a hidden area. Using unsuitable materials can significantly damage your brass lamp, making gentle cleaners and tools essential.
2. How often should I polish my brass lamp?
Polish your brass lamp monthly to maintain its shine and prevent tarnish buildup. Regular polishing keeps the lamp looking new and reduces the effort required for long-term maintenance. Dusting weekly also helps in keeping it cleaner longer.
Use high-quality brass polish and follow the instructions carefully for best results. Consistent care not only enhances appearance but extends your brass lamp’s lifespan.
3. Can homemade solutions effectively clean brass?
Yes, homemade solutions like vinegar and salt paste or lemon juice mixed with baking soda work well on tarnished brass. These natural ingredients break down oxidation without damaging the material itself.
Create a mixture, apply it gently with a soft cloth, then rinse thoroughly after cleaning. Homemade solutions are both cost-effective and eco-friendly alternatives for maintaining your brass items.
4. Is it safe to use commercial cleaners on antique brass lamps?
Commercial cleaners designed specifically for brass are generally safe but always read labels to ensure compatibility with antique pieces. Spot-test any new product first on an inconspicuous area before applying it entirely.
Avoid products that contain harsh chemicals which might damage delicate antiques over time; opt for milder options instead.
5. What should I do if my polished brass looks dull again quickly?
Your environment may play a role in how quickly polished surfaces dull; high humidity can accelerate tarnishing.Use protective lacquers post-polishing or store them in controlled environments to extend their polished look.
Additionally make sure all residues of cleaning agents are completely removed as leftover particles could potentially cause quicker dulling.
Conclusion
Maintaining a brass lamp’s shine requires the right materials, gentle techniques, and a consistent care routine. Avoiding common cleaning mistakes and using effective solutions can keep your lamp looking elegant. Regular polishing and attentiveness to environmental factors also play a key role.
By following these guidelines, experts can ensure their brass lamps remain stunning and functional for years. Consistent care not only preserves the lamp’s beauty but also extends its lifespan. Your dedication to maintaining these lamps will be well worth the effort.

I’m Emily Johnson, an affiliate marketer and blogger focused on lamps and lighting. I share honest reviews, simple buying guides, and practical tips. My goal is to help readers choose the right lamp for their space, style, and budget with confidence.