
Ever wondered how that sleek, elegant floor lamp in your living room holds together? The process to disassemble it can be rather straightforward, yet surprisingly fascinating. For professionals, knowing the nuts and bolts of any object is second nature.
To disassemble a floor lamp, it is essential to understand its construction. Typically, these lamps are a blend of various materials, often held together by screws and bolts. Knowing the history of floor lamps, which dates back to the mid-19th century, shines a light on how their designs have evolved, making modern disassembly both easier and more complex.
- Unplug the floor lamp to ensure safety.
- Remove the lampshade by unscrewing or unclipping it.
- Gently unscrew and remove the bulb.
- Loosen screws or bolts to detach the socket from its housing.
- Disassemble the lamp pole if it’s in segments, then separate the base from the pole by removing any fasteners.
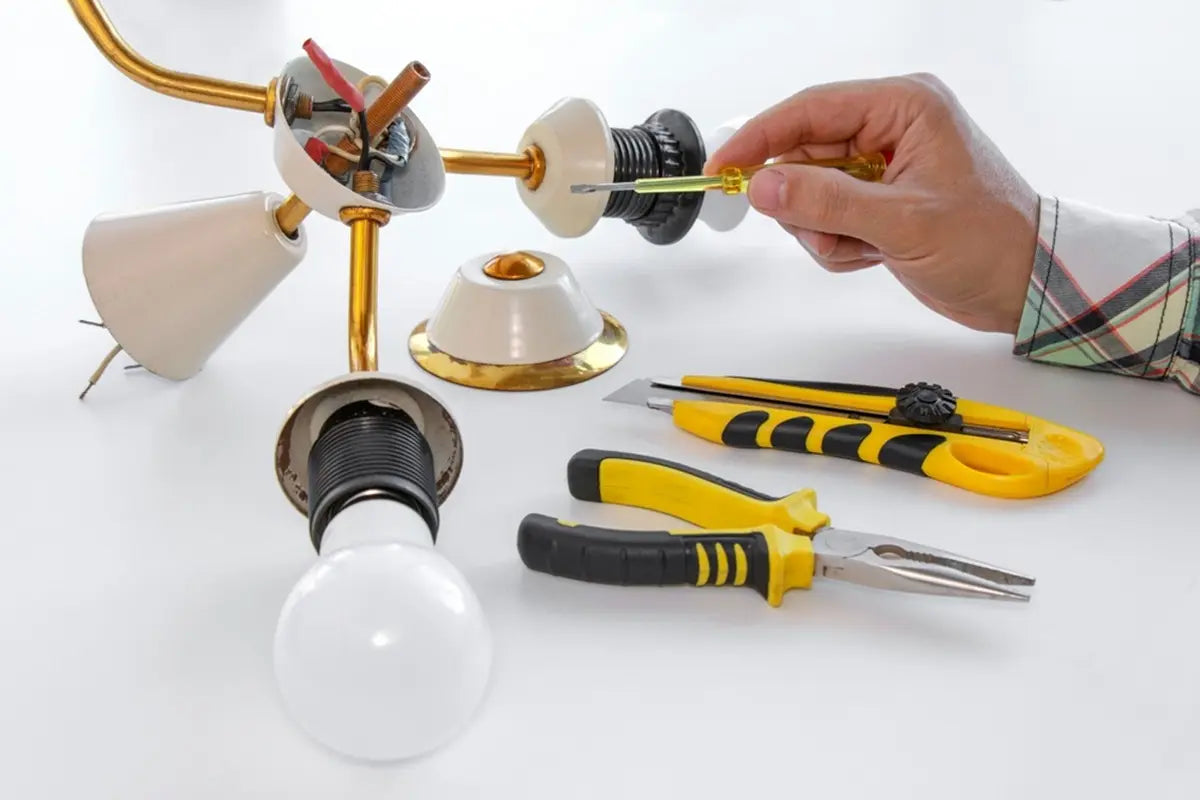
How to Disassemble a Floor Lamp
Disassembling a floor lamp starts with identifying its type and construction. Most modern floor lamps have a simple structure. First, ensure the lamp is unplugged for safety. Next, remove the lampshade by unscrewing or unclipping it. If you have a unique model, refer to the manufacturer’s manual for specific instructions.
After removing the lampshade, it’s time to detach the bulb. Gently unscrew the bulb and set it aside. Refer to this post if you need advice on safely packing the bulb. Then, locate the screws or bolts holding the socket in place. Use a screwdriver to loosen them and carefully remove the socket.
Now, tackle the main body of the lamp. The pole or stand might be in segments. If so, unscrew each segment one by one. Check for any hidden screws near the base. These might require a little extra care to ensure all parts remain intact.
Finally, disassemble the base of the lamp. This part can be trickier as it often houses the cord and other electrical components. Separate the wires if needed, using wire cutters or pliers. According to the article, ensuring all elements are separated correctly will make reassembly smoother later on.
Step 1: Identify the Type of Floor Lamp
The first step in disassembling a floor lamp is identifying its type. Floor lamps come in several styles like task lamps, torchiere lamps, and arc lamps. Each type has a unique structure and disassembly process. Look for any labels or tags that provide model information. This can help you find the right manual or guide for your lamp.
Torchieres are straightforward, often featuring a simple pole and base design. However, arc lamps might have more complex connections where the arm meets the base. Knowing these details can save time and prevent damage. If you can’t identify your lamp, check for similar images online. Many tutorials and forums can offer guidance.
Refer to manufacturer’s instructions when available. These manuals can provide step-by-step directions specific to your model. According to this post, using these resources can simplify tricky sections. If you lost the manual, look for a digital version on the manufacturer’s website.
Consulting online forums can also be useful. Many people share their experiences with different lamp types. They can offer tips on what tools you’ll need and which parts require extra care. It’s valuable to gather as much information as possible before starting the disassembly process.
Step 2: Unplug and Secure the Lamp
Before disassembling your floor lamp, always unplug it first. Unplugging ensures there’s no risk of electrical shock. It’s crucial to handle the cord gently to avoid any damage. Make sure to unplug from the wall socket and not by pulling on the cord itself. This can prevent fraying and long-term issues.
Next, it’s important to secure the lamp. A wobbly lamp can cause accidents while working on it. Clear the surrounding area to create a safe workspace. Lay down a soft cloth or towel to protect delicate parts. This setup ensures nothing gets scratched or broken.
If the lamp is tall or heavy, get some help to hold it steady. Stabilizing the lamp keeps it from tipping or falling during disassembly. Using a makeshift brace or support can also be useful. This might include leaning the lamp against a sturdy surface. Safety always comes first.
Having the right tools nearby speeds up the process. Make sure a screwdriver, pliers, and other needed tools are within reach. Consider creating a small toolkit specifically for lamp disassembly. This helps maintain focus and efficiency during your work.
Step 3: Remove the Lampshade
Once the lamp is secured, the next step is to remove the lampshade. Start by examining how the lampshade is attached. Some lampshades are held in place by a finial at the top. Gently unscrew or lift the finial to release the lampshade. If you encounter resistance, avoid forcing it to prevent damage.
Other lampshades may have clips attached to the bulb socket. In this case, carefully pinch the clips to detach the shade. Make sure to support the shade with your other hand. This will help you avoid dropping and breaking it. Once detached, set the lampshade aside in a safe place.
For floor lamps with a harp, you’ll need to remove the harp as well. The harp is the metal frame that supports the lampshade. Gently squeeze the two sides together to release it from the saddle. This allows you to lift it off easily. Be mindful of any delicate parts.
If your lamp has a more complex or unique design, refer to specific instructions. Manufacturer manuals or diagrams can be helpful. Look online for guides that match your lamp type. Following these steps makes it easier to navigate unique models.
Organize all parts once the lampshade is removed. Keeping screws, clips, and small pieces together prevents them from getting lost. Using small containers or zip-lock bags for storage is a good idea. This makes reassembly more straightforward and hassle-free.
Step 4: Detaching the Bulb and Socket
After removing the lampshade, the next step is to detach the bulb and socket. First, ensure the lamp is unplugged to avoid any risks. Gently unscrew the bulb in a counterclockwise direction. Handle the bulb carefully to prevent it from dropping or breaking. Place it in a safe spot once removed.
Now, focus on the socket. Some sockets are simply screwed into place, while others may be held by additional clips or screws. If screws are present, use a screwdriver to loosen them. Take care to note the screw locations to ensure easy reassembly. Once the screws are removed, gently pull the socket out from its housing.
For lamps with wired sockets, you may need to disconnect some wires. Carefully note the arrangement of the wires before disconnecting them. Label the wires if necessary. This can be done using simple tags or tape for future reference. Use pliers if wires are tightly connected.
If you encounter a socket with a twist-off design, twist it counterclockwise to detach. Some sockets might require a bit more effort to release. Avoid using excessive force to prevent damage. Gently wiggling the socket can help if it seems stuck.
Organize all parts as you go. Keeping everything in one place makes reassembly smooth. Small containers or zip-lock bags are ideal for holding screws and other tiny components. Being methodical during disassembly simplifies the process in the long run.
Step 5: Disassembling the Lamp Base
With the bulb and socket removed, the next step is to disassemble the lamp base. Start by examining how the base is attached to the pole. Often, you’ll find screws or bolts holding the two parts together. Use a screwdriver or wrench to remove these fasteners. Keep the screws in a small container to avoid losing them.
Once the screws or bolts are removed, gently separate the base from the pole. Some bases may have additional weights for stability. If you encounter any resistance, check for hidden fasteners. Place the separated parts on a soft cloth to prevent scratches or damage.
Many lamp bases house electrical components. Carefully open the bottom of the base to access these parts. You might see wire connections that need to be detached. Take note of how the wires are arranged. Labeling these connections will make reassembly straightforward.
Separate the wires using wire cutters if necessary. Avoid pulling the wires forcefully to prevent damage. Use pliers to carefully disconnect tight connections. If the base has any additional components like a switch, remove them according to the manufacturer’s instructions.
After disassembly, organize all the parts. Keep screws, wires, and other small pieces in labeled containers. This helps ensure that nothing gets lost. Proper organization makes future repair or reassembly much easier and efficient.
Tools Required for Disassembling a Floor Lamp
Having the right tools is essential for disassembling a floor lamp. The most commonly needed tools are basic hand tools. These include screwdrivers, pliers, and wrenches. A set of these tools will cover most tasks. Having them organized in a toolbox can be helpful.
Screwdrivers come in various types, but typically, both Phillips and flathead screwdrivers are required. Pliers help when you need extra grip to pull out stubborn parts or tighten components during reassembly. Wrenches may be necessary for tightening or loosening bolts. Each tool serves its own unique purpose in the disassembly process.
| Tool | Use |
|---|---|
| Screwdriver (Phillips and Flathead) | For removing screws. |
| Pliers | To grip and pull out components. |
| Wrench | For loosening and tightening bolts. |
A small container is useful for keeping screws and other small parts organized. This prevents them from getting lost during the disassembly process. Additionally, having labels or markers helps keep track of where each part belongs. This is particularly useful if the lamp has many similar-looking screws or bolts.
If your lamp has electrical components, you may also need wire cutters and electrical tape. Wire cutters help with detaching any connected wires safely. Electrical tape can be used to secure wire ends after they have been disconnected. Ensuring you have all these tools ready makes the disassembly smoother and more efficient.
Safety Precautions While Disassembling a Floor Lamp
When disassembling a floor lamp, safety is paramount. Start by unplugging the lamp from the wall outlet. This eliminates any risk of electrical shock. Work on a stable surface to avoid mishaps. Ensuring your workspace is well-lit can also prevent accidents.
Wearing safety gloves is strongly recommended. Gloves protect your hands from sharp edges or broken glass. If your lamp has glass components, handle them with extra care. Ensure you have a first-aid kit nearby in case of minor injuries. This preparation helps you address any immediate concerns promptly.
Keep tools and small components organized. Scattered tools can become tripping hazards. Use small containers to hold screws and other parts. Neatness in your workspace helps maintain focus. It also reduces the risk of losing important components.
If you need to cut wires, use appropriate wire cutters. After cutting, use electrical tape to secure exposed wire ends. This prevents accidental shocks later. Always inspect the wires for any nicks or cuts before handling them.
Be aware of your surroundings while working. Make sure children and pets are not around to avoid interruptions and possible accidents. Inform others in the house about your activity. Communication ensures everyone stays safe during the disassembly process.
Repair and Replacement: When to Disassemble a Floor Lamp?
Deciding when to disassemble a floor lamp often depends on its condition. If the lamp starts flickering or doesn’t turn on, internal components might need inspection. Loose wires or faulty sockets can cause these issues. In such cases, disassembly helps identify and fix the problem. This way, you save money by avoiding unnecessary replacements.
Physical damage is another reason for disassembly. Cracked shades or bent poles not only look unpleasant but can also affect functionality. Disassembling the lamp allows you to replace damaged parts. Ensure you have suitable replacement components ready. Taking the lamp apart makes targeted repairs easier.
Sometimes, disassembly is needed for cleaning purposes. Dust can accumulate inside the lamp, affecting its brightness and aesthetics. Internal components might also gather dust, leading to overheating. A thorough clean-up can improve the lamp’s performance. Removing and cleaning each part restores the lamp to its original condition.
Upgrading older lamps is another reason for disassembly. Older models may not be compatible with modern bulbs or smart home systems. By taking the lamp apart, you can replace outdated components. This upgrades the lamp without buying a new one.
Shipping or moving also necessitates disassembling the lamp. Transporting a fully assembled lamp increases the risk of damage. Taking it apart makes it compact and manageable. This is especially useful when moving to a new home or sending the lamp for repair.
Getting Professional Help for Lamp Disassembly
Sometimes, the complexity of disassembling a floor lamp may require professional assistance. If you encounter intricate wiring or unique lamp designs, it’s better to seek help. Professionals have the right tools and expertise. They can disassemble the lamp without causing damage. This ensures all repairs or replacements are done correctly.
Another reason to hire a pro is the risk of electrical hazards. Handling electrical components without proper knowledge can be dangerous. Electricians or lamp repair specialists know how to safely manage these risks. They also follow safety standards that might be difficult to understand for a layperson. This way, you avoid any accidental injuries.
Finding a professional can be as simple as a quick online search. Many local electricians and handymen offer lamp disassembly services. Check reviews and ratings before making a choice. You can also ask for recommendations from friends or family. A referral often leads to reliable service.
| Professional Type | Services Offered |
|---|---|
| Electricians | Wiring, socket repair |
| Lamp Repair Specialists | Complete disassembly, cleaning, and part replacement |
| Handymen | General disassembly and minor repairs |
Cost is another factor when considering professional help. While DIY might seem cheaper, improper disassembly can lead to additional costs. Hiring a professional ensures the job is done right the first time. This saves you money in the long run. Properly disassembled and reassembled lamps last longer and function better.
Time is also saved by hiring experts. Disassembling a lamp can be a tedious process for someone unfamiliar with it. Professionals do the job quickly and efficiently. This allows you to focus on other tasks while ensuring your lamp is in good hands.
Frequently Asked Questions
If you’re thinking about disassembling a floor lamp, here are some common questions and answers to help guide you through the process. This section covers everything from tool requirements to safety tips.
1. What tools are needed to disassemble a floor lamp?
To disassemble a floor lamp, you’ll need some common household tools. Essential items include screwdrivers (both flathead and Phillips), pliers, and possibly a wrench for any bolts. Having these basic tools ready can make the process smoother.
You might also need wire cutters if there are electrical components involved. Small containers for screws and other small parts will help keep things organized. This ensures no pieces get lost during the disassembly.
2. How can I ensure safety while disassembling a floor lamp?
Safety is crucial when working on electrical items like lamps. Always unplug the lamp first to eliminate any risk of electric shock. It’s also advisable to wear gloves to protect your hands from sharp edges or glass parts.
Working in a well-lit area on a stable surface will reduce accidents. Additionally, keeping a first-aid kit nearby is good practice in case of minor injuries. These precautions help make the task safer and more efficient.
3. Is it easy to replace parts of my floor lamp?
Replacing parts of your floor lamp can be straightforward if you follow the right steps. First, identify which part needs replacement, such as the bulb socket or wiring components. Make sure to purchase compatible replacement parts before starting the repair work.
If you’re unsure about how to proceed, consult the manufacturer’s manual or search online for guides specific to your lamp model. Having guidance ensures you don’t accidentally damage other parts while replacing something.
4. Can I clean my floor lamp while it’s assembled?
Certain parts of your floor lamp can be cleaned without full disassembly, but thorough cleaning usually requires taking it apart. Dust can accumulate inside lamps and affect light quality over time, so periodic maintenance is important.
If you’re just doing surface cleaning, use a soft cloth and gentle cleaner on accessible areas like the pole and base. For deeper cleaning involving internal components, it’s better to disassemble those sections carefully.
5. When should I consider getting professional help?
If lacking experience with electrical components or encountering complex designs, seek professional assistance for safety reasons . Electricians or specialized repair technicians have expertise in handling intricate issues without causing additional damage.
An expert ensures all aspects are correctly addressed during repairs or replacements involving significant risks like faulty wiring . Hiring professionals saves time by efficiently resolving problems rather than trial-and-error methods yourself .
Conclusion
Disassembling a floor lamp may seem daunting, but with the right tools and safety measures, it becomes manageable. Understanding the parts and steps involved ensures that you can perform repairs or replacements efficiently. This process not only saves money but also extends the life of your lamp.
When in doubt, seeking professional help can make the disassembly hassle-free and secure. Always prioritize safety and organization to achieve the best results. With proper guidance, even intricate tasks like these become easier and more rewarding.

I’m Emily Johnson, an affiliate marketer and blogger focused on lamps and lighting. I share honest reviews, simple buying guides, and practical tips. My goal is to help readers choose the right lamp for their space, style, and budget with confidence.