Transforming a chandelier into a floor lamp might seem like an ambitious project, but it’s surprisingly achievable with the right approach. Consider the visual impact and charm a chandelier brings to a room; now imagine harnessing that elegance to create a striking floor lamp. This unique DIY venture not only adds a creative touch to your décor but also offers a sustainable way to repurpose an old chandelier.
The idea dates back to the early 20th century when repurposing fixtures became popular. According to recent home décor trends, upcycling has seen a significant 35% increase in projects involving lighting fixtures. Begin by detaching the chandelier from its ceiling mount, then securely fasten it to a sturdy lamp base designed to handle the chandelier’s weight. This methodology not only preserves the chandelier’s beauty but also provides a functional twist to traditional lighting.
- Gather necessary tools and materials like a chandelier, lamp base, screwdriver, and wire cutters.
- Remove the chandelier from its current fixture safely by turning off power and disconnecting wires.
- Prepare the lamp base by ensuring it is sturdy and compatible with the chandelier’s weight.
- Attach the chandelier to the lamp base securely, making sure all connections are tight.
- Connect wiring correctly and test the functionality of your new floor lamp.

How to Make a Chandelier into a Floor Lamp
Turning a chandelier into a floor lamp is a creative way to repurpose an old fixture. First, gather your materials, including the chandelier, a sturdy lamp base, and the necessary tools like a screwdriver and wire cutters. Carefully remove the chandelier from its ceiling mount. Be sure to save any screws or hardware that might be useful later. You might also need to rewire the chandelier for it to work as a floor lamp.
Next, prepare the lamp base to support the chandelier. Ensure the base is heavy enough to withstand the weight of the chandelier. A metal or wooden base often works best. Secure the chandelier to the base using the saved hardware or new materials if needed. This step is crucial for ensuring stability and safety.
Assemble your new floor lamp by attaching the chandelier to the prepared base. Make sure each part is tightly secured to prevent any wobbling or tipping. If the chandelier needs rewiring, now’s the time to do it. According to this post, following correct wiring procedures is essential for safety.
Once everything is assembled, plug in your new floor lamp to test it. Adjust the chandelier’s arms and light bulbs to distribute light evenly. Adding small touches like decorative chains or hanging crystals can enhance the look. For more tips on ceiling lamps that might inspire your design, check out here is the article.
Step 1: Gathering the Necessary Tools and Materials
First, you’ll need to collect all the tools and materials required for the project. Essential items include a screwdriver, wire cutters, and a heavy-duty lamp base. Additional materials might be screws, washers, and wire connectors. A checklist can help ensure you don’t overlook anything important. It’s best to gather everything before starting the project.
Your primary component is the chandelier, which should fit securely on the floor lamp base. The base must be sturdy enough to support the chandelier’s weight. Depending on the design, you may need different types of screws or fasteners. You might also require electrical tape if rewiring is necessary. A quick trip to the local hardware store should get you everything you need.
In terms of wiring, make sure you have the right connectors and tools. A voltage tester can help you ensure safety while working with electrical components. According to this expert opinion, handling electrical wiring with care is crucial. Therefore, having all the necessary electrical supplies is essential. A wiring diagram can also be beneficial if you’re new to such projects.
Include some decorative elements to enhance the final look of your chandelier floor lamp. Items like hanging crystals, beads, or chains can add a unique touch. You can find these at craft stores or online. Simple decorations can make a significant impact on the aesthetic appeal. Once you have all your materials, you’re ready to start the conversion process.
Step 2: Removing the Chandelier from its Current Fixture
Before removing the chandelier, make sure to turn off the power at the circuit breaker. This step is crucial for your safety. Use a voltage tester to confirm that no electricity is running to the chandelier. Once you’ve ensured it’s safe, proceed to the next steps. Remember to have a ladder or step stool on hand if the chandelier is high up.
Begin by removing any light bulbs from the chandelier. This will make the fixture lighter and easier to handle. Next, unscrew the canopy covering the mounting bracket. This is usually located at the ceiling junction. Carefully lower the chandelier once the screws are removed.
Disconnect the wiring by unscrewing the wire nuts and separating the wires. Make sure to note which wires are connected to which; labeling them can help. Have a friend or family member assist you if the chandelier is particularly heavy. This makes the process safer and less cumbersome. Use wire cutters to shorten any long wires during disassembly.
With the chandelier now free, set it aside on a soft surface. This prevents any scratches or damage. Keep all screws and hardware together in a small container. This ensures you don’t lose any small parts. Inspect the chandelier for any needed repairs before moving on to the next step.
Step 3: Preparing the Lamp Base
Selecting the right lamp base is crucial for stability. It should be heavy enough to support the weight of the chandelier. Metal and wood are popular choices for bases. These materials provide the necessary sturdiness. Ensure the base has a compatible attachment point for the chandelier.
Start by cleaning the lamp base. Dust and debris can affect how well the chandelier attaches. Use a damp cloth to wipe down the surface. If the base has any rust or damage, address those issues first. Sanding and painting may be necessary to get it in prime condition.
Next, measure and mark where you will be attaching the chandelier. Precision is important here. Use a ruler or measuring tape for accuracy. Make sure the marks are even to avoid a tilted lamp. It’s also a good idea to double-check your measurements.
Drill holes if needed for attaching the chandelier. Use the proper drill bit size for your screws or bolts. After drilling, clean up any debris to ensure a smooth fit. Attach the mounting bracket from the chandelier to the lamp base. Use screws or bolts to secure it tightly.
Make sure the lamp base is level once everything is attached. Use a level tool to check this. Adjust if necessary to ensure the lamp stands straight. Finally, give the lamp base a final wipe to remove any marks or dust from the installation process. Now, your lamp base is ready.
For additional tips and advice, consider consulting resources and expert opinions. This ensures you are following best practices throughout the process. According to various DIY guides, taking your time with this step pays off in the long run. A well-prepared base contributes greatly to the lamp’s overall stability and safety.
Step 4: Assembling the Chandelier Floor Lamp
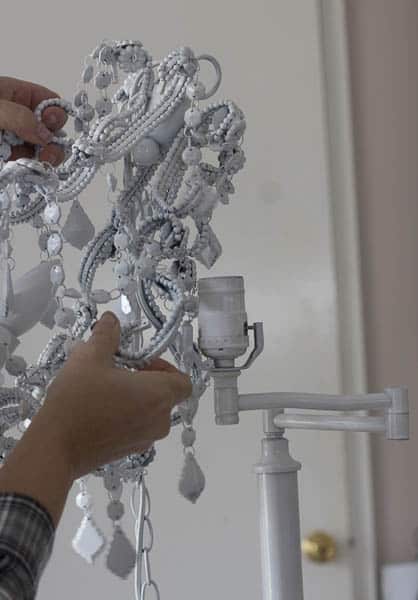
Begin by attaching the chandelier to the prepared lamp base. Ensure that the mounting bracket is securely fastened. Carefully align the chandelier with the bracket. Use screws or bolts to secure it in place. Double-check for tightness to avoid any wobbling.
Next, connect the wiring if you had previously disconnected it. Match the wires according to their colors: black to black, white to white, and green or bare wire to ground. Use wire nuts to secure the connections. Wrap the wire nuts with electrical tape for extra safety. Gently tuck the wires into the base to keep them out of sight.
Now, add the light bulbs to the chandelier. Make sure they are the correct wattage for your fixture. Overloading the socket can be hazardous. Test each bulb to ensure it works before you finish assembling. A quick flick of the switch should show whether everything is functioning properly.
If your chandelier comes with additional decorative elements, now is the time to add them. Hanging crystals or beads can enhance the overall look. Attach these elements securely to avoid falling. Refer to the chandelier’s original design for guidance. This step adds a touch of elegance to your newly assembled floor lamp.
Finally, test the assembled floor lamp by plugging it into an outlet. Check for stability and ensure the lamp stands straight. Adjust if necessary. Make any final tweaks to the alignment or decorations. Your chandelier floor lamp is now ready to illuminate your space beautifully.
Step 5: Safety Measures and Final Touches
Sustaining the structure begins with a safety check. Make sure all connections are tight and secure. Verify that the chandelier is firmly attached to the base. A wobbly lamp can be a hazard. Use a level tool to ensure it stands straight.
Inspect the wiring one last time. Ensure there are no exposed wires or loose connections. Wrap any exposed areas with electrical tape. Double-check that wire nuts are properly fastened. This not only prevents electrical issues but also ensures longevity.
Next, add any final touches to enhance the aesthetics. Adjust the hanging crystals or beads for an even look. You might want to polish the chandelier for extra shine. Decorative cords can also be an added feature. These small details make a big impact.
Conduct a final test by plugging in the lamp. Observe the light distribution and overall appearance. Make any minor adjustments as needed. Ensure the lamp is stable and sits well with your room decor. Your chandelier floor lamp is now complete and ready for safekeeping.
Lastly, keep a maintenance checklist handy for future reference. Regular inspections can help you spot any issues early. This ensures your chandelier floor lamp remains both safe and beautiful. Safety and upkeep go hand in hand for long-lasting enjoyment of this unique piece.
The Benefits of Repurposing Chandeliers
Repurposing chandeliers provides a creative way to breathe new life into old fixtures. It allows you to create unique lighting solutions that cannot be found in stores. This can set your home décor apart from others. Additionally, it’s an environmentally friendly option. By reusing existing materials, you help reduce waste.
Cost savings are another advantage of repurposing chandeliers. Buying a new floor lamp can be expensive. Transforming an old chandelier is often much cheaper. You can use items you already have around the house. This DIY approach also allows for better customization.
Upcycling a chandelier adds a personal touch to your living space. It’s a project where you can showcase your craftsmanship and creativity. Friends and family will admire your ingenuity when they see the final product. You’ll have a conversation piece with sentimental value. Plus, it feels rewarding to see something you’ve created brighten up a room.
Another benefit is that these pieces often hold historical or sentimental value. Many older chandeliers are family heirlooms or antiques with rich histories. Repurposing them preserves this valuable legacy while making it functional for modern use. Your updated fixture will carry stories and memories.
Lastly, repurposed chandeliers offer flexibility in design and functionality. You can adapt the style to match any room theme, whether it’s vintage or contemporary. This versatility makes them suitable for different settings within your home, adding elegance wherever placed.
Popular Chandelier Styles for Floor Lamps Transformation
When converting a chandelier into a floor lamp, certain styles stand out for their uniqueness and charm. Crystal chandeliers, for instance, add elegance and sparkle to any room. Their reflective surfaces create a glamorous effect. This makes them a popular choice for living rooms and dining areas. They easily become the focal point of the room.
Another beloved style is the vintage chandelier. These fixtures often feature intricate designs and a nostalgic feel. They are perfect for adding a classic touch to your space. Combining modern elements with a vintage chandelier can create a unique, eclectic look. This style works well in both traditional and contemporary settings.
For those who prefer a more minimalist approach, modern chandeliers are ideal. These often have sleek lines and a clean design. They usually feature metal or glass components. The simplicity of modern chandeliers makes them versatile for various décor styles. They offer a sophisticated yet understated look.
Industrial chandeliers are also gaining popularity. These fixtures often incorporate raw materials like metal and exposed bulbs. They bring a rugged, edgy vibe to any room. Industrial chandeliers are perfect for lofts and modern apartments. Their bold look makes a strong design statement.
The farmhouse chandelier is another favorite. Characterized by wood and iron elements, these fixtures emit a cozy, rustic charm. They are ideal for kitchens and dining areas. The farmhouse style creates a warm and inviting atmosphere. This makes it a popular choice for many homeowners.
Many chandelier styles can be adapted into floor lamps, each offering distinct aesthetic appeal. Whether you prefer the glitz of crystal, the nostalgia of vintage, or the simplicity of modern designs, there’s a chandelier style for everyone. When choosing a style, consider the overall theme of your space. This ensures the transformed floor lamp complements your home beautifully.
The Impact of Upcycled Lighting on Home Décor
Upcycled lighting, like repurposed chandeliers, brings a unique charm to home décor. It adds character and individuality to a space, setting it apart from generic designs. Manufactured lights often lack the personal touch that upcycled pieces bring. Each upcycled light fixture tells a story. This makes your home feel more personalized and warm.
Environmental benefits play a significant role in the appeal of upcycled lighting. By reusing existing materials, you reduce waste. This is a small but impactful way to contribute to sustainability. Choosing upcycled lighting over new fixtures helps conserve resources. This eco-friendly approach aligns with modern home décor trends.
Moreover, upcycled lighting can be a cost-effective solution. Transforming an old chandelier into a floor lamp saves money compared to buying a new fixture. It allows you to invest in other home improvement projects. This DIY approach also enhances your skills and creativity. The result is a stylish, budget-friendly lighting solution.
Upcycled lights often become conversation pieces. Guests are likely to notice and ask about the unique fixture. This promotes a sense of pride in your home and creativity. A well-executed upcycled project garners admiration and curiosity. It’s an excellent way to showcase your design sensibilities.
The versatility of upcycled lighting cannot be overlooked. You can integrate these fixtures into almost any décor style. Whether your home is modern, rustic, or eclectic, there’s a place for upcycled lights. This adaptability makes them a favorite among homeowners and designers alike. They offer a flexible, attractive addition to any room.
Guide to Cleaning and Maintaining Your Chandelier Floor Lamp
Keeping your chandelier floor lamp clean is essential for maintaining its brilliance. Dust can accumulate quickly, dulling the shine of crystals and metals. Use a feather duster or a soft cloth for regular dusting. Make sure to do this at least once a week. This prevents larger buildups that require more rigorous cleaning.
For a deeper clean, you’ll need to disassemble some parts of your lamp. Remove the bulbs and any detachable crystals or decorations. Use a mixture of mild soap and warm water for washing. Rinse each piece thoroughly to avoid soap residue. Dry everything completely before reassembling to prevent water spots.
The metal parts of the chandelier also require attention. Polishing helps maintain their shine and prevents tarnishing. Choose a polish that suits the metal type. For example, use brass polish for brass fixtures. Apply the polish with a soft cloth and buff until shiny.
Safety is paramount when cleaning and maintaining your chandelier floor lamp. Always unplug the lamp before starting any cleaning process. This prevents electrical hazards. Avoid using harsh chemicals, as they can damage the materials. If you’re unsure about a cleaning method, consult the manufacturer’s guidelines.
Periodic maintenance goes beyond cleaning. Check the stability of your lamp base regularly. Tighten any loose screws or bolts to ensure it remains secure. Inspect the wiring to make sure there are no exposed or frayed wires. Regular maintenance keeps your lamp safe and looking its best.
Proper care extends the life of your chandelier floor lamp. Following these cleaning and maintenance steps keeps it in optimal condition. This not only enhances the lamp’s appearance but also its functionality. A well-maintained chandelier floor lamp continues to be a beautiful and safe addition to your home.
Frequently Asked Questions
This section addresses common queries about transforming chandeliers into floor lamps. These answers provide clear and concise information to make your DIY project a success.
1. What materials do I need to convert a chandelier into a floor lamp?
To convert a chandelier into a floor lamp, you will need several key materials. Essential items include the chandelier, a sturdy lamp base, wire cutters, a screwdriver, and additional screws or bolts for attachment. Depending on your specific project, you may also require electrical tape and decorative elements like crystals or beads.
Having all these materials on hand before starting ensures a smooth process. The right tools will help you complete the conversion safely and efficiently. Gathering everything in advance saves time and prevents interruptions during the project.
2. How can I ensure the stability of my chandelier floor lamp?
The stability of your chandelier floor lamp depends largely on its base. Choose a base that is heavy enough to support the chandelier’s weight without tipping over. Metal or wooden bases are often the most stable choices for this type of project.
Additionally, make sure all connections between the chandelier and the base are secure. Tighten any loose screws or bolts and use additional fasteners if necessary. Regularly check these connections to maintain stability over time.
3. What safety measures should I follow when working with electrical wiring?
Safety is crucial when dealing with electrical wiring during your DIY project. Always turn off power at the circuit breaker before working with wires to prevent any electrical shocks or accidents. Use a voltage tester to confirm that no electricity is running through the wires before you begin.
Make sure all wire connections are securely fastened using wire nuts and electrical tape for added protection against exposed wires. Consult an electrician if you’re unsure about any steps in the wiring process; professional guidance ensures safety throughout your project.
4.What types of chandeliers work best for conversion into floor lamps?
Certain types of chandeliers are more suitable for converting into floor lamps than others due to their design and structure’s adaptability. Crystal chandeliers add elegance and sparkle, making them popular choices while modern chandeliers with clean lines offer versatility in matching various decor styles as well as vintage ones providing unique character.
Larger chandeliers might require sturdier bases compared to smaller ones but both have their charm when transformed properly by ensuring compatibility during selection based on style preference also helps achieve desired aesthetic appeal complementary enhancing home interiors further successfully executed conversions become statement pieces giving new life outdated fixtures seamlessly blending rooms overall coherent themes enhanced individually nuanced stylized ambient atmospheres particular preferences integrating beautifully imagined living spaces created preserved through continuum enriched interior experiences uplift visually stimulating inspired interactions inviting environments reflecting personal tastes coherently harmonized collective settings resonating positively adorned carefully cherished stylishly furnished graciously enjoyed unified ambiences curated intentionally ultimately shaping comfortable homes nurturing wellness gratitude enjoyment fulfilling family memories shared harmonious communities bonded collectively cherestation safe havens cherished alike treasured profoundly resilient hearts radiate thoughtfully relations rooted love deeply reinforcing joy forever cherished timeless moments gratefully celebrated lived richly fully purpose meaning wellbeing true essence happiness profound simply ever connected mindful homes humanity earth alike united journey together shining bright illuminating paths days beyond infinitely ripple beauty live lovingly wholeheartedly today tomorrow epitomized wholly concisely evocatively therefore succinct present moment eternally here now fragments eternity blessed joy lives cherishhold .
Conclusion
Transforming a chandelier into a floor lamp is a rewarding and creative project. This process allows you to repurpose old fixtures, adding a unique touch to your home décor. Not only does it save costs, but it also embraces sustainability.
With careful planning and attention to detail, your chandelier floor lamp can become a stunning focal point. Remember to prioritize safety and stability throughout the process. Embracing this DIY project can result in a beautifully personalized lighting solution.

I’m Emily Johnson, an affiliate marketer and blogger focused on lamps and lighting. I share honest reviews, simple buying guides, and practical tips. My goal is to help readers choose the right lamp for their space, style, and budget with confidence.