Discovering that improper lampshade installation can reduce light efficiency by up to 50% might surprise those who underestimate the task’s importance. Ensuring the correct method doesn’t just enhance aesthetic appeal; it optimizes light distribution and extends the lamp’s lifespan. Let’s delve into the meticulous steps required to affix a lampshade to a floor lamp expertly.
Starting with the right lampshade size, it’s crucial to match it with the lamp base for balanced proportions. Historically, floor lamps evolved from basic designs to intricate styles, demanding more sophisticated approaches to lampshade attachment. Notably, using a compatible harp and finial can dramatically stabilize the shade, reducing risks of tipping and enhancing overall functionality.
- Turn off and unplug the lamp.
- Remove the existing lampshade by unscrewing the finial at the top.
- Place the new lampshade over the harp, aligning it properly.
- Screw the finial back onto the harp to secure the shade.
- Turn on the lamp to check for stability and light diffusion.
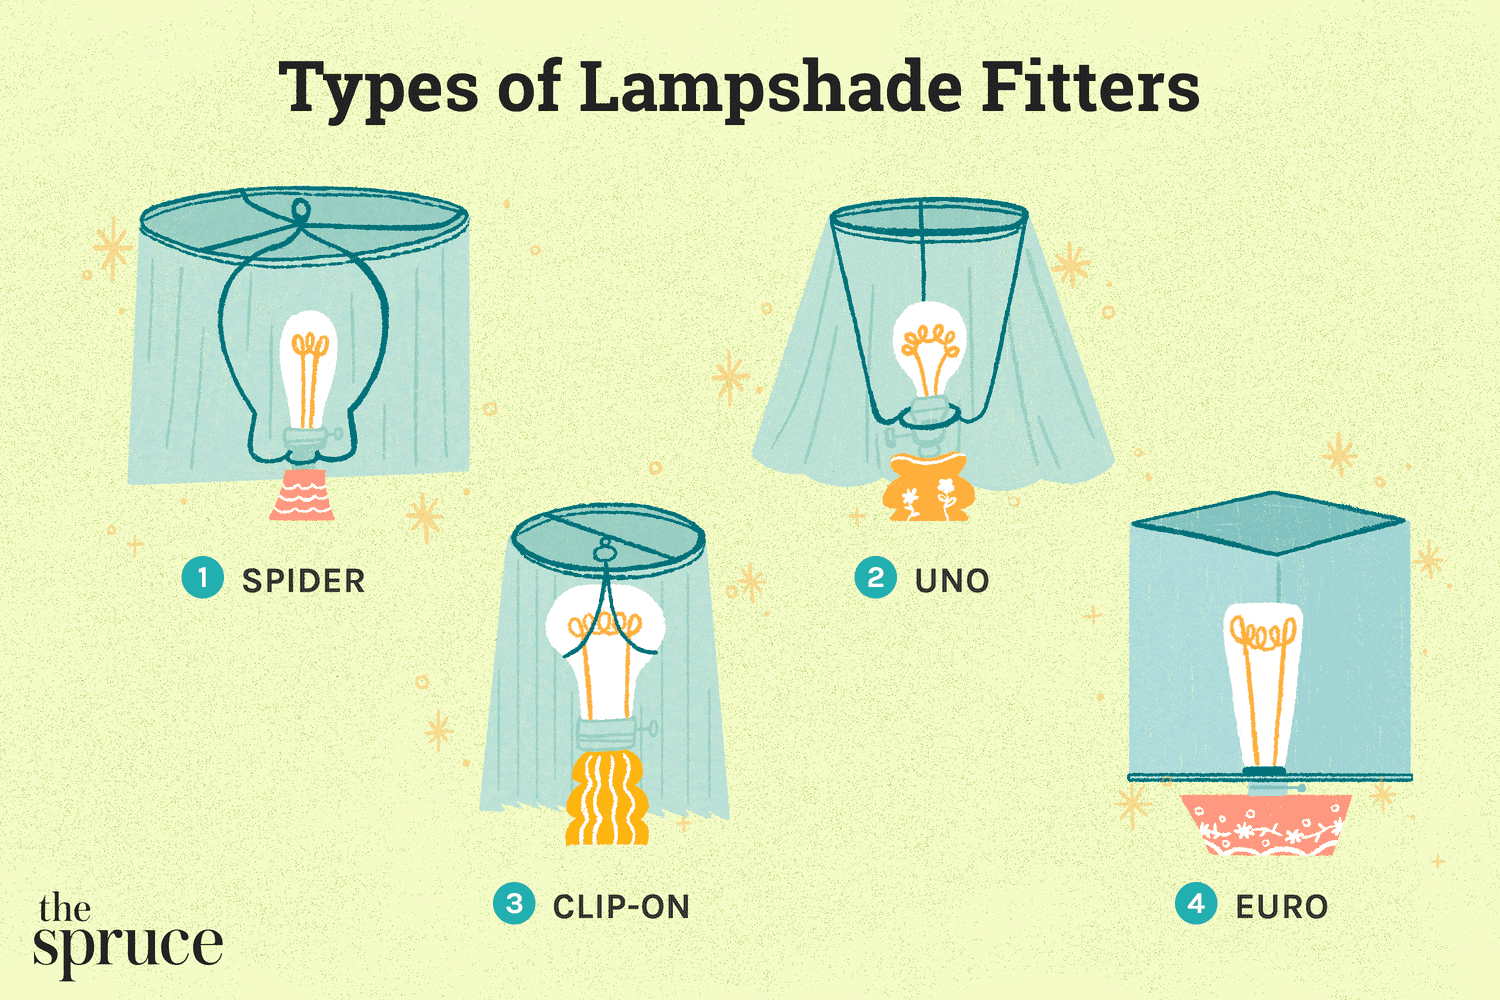
:max_bytes(150000):strip_icc()/types-of-lampshade-fittings-6742943-final-2-53530431336341488a799406cb5c33a5.png)
How to Put a Lampshade on a Floor Lamp
Choosing the right lampshade is the first step. You need a shade that complements the lamp base in both size and style. If the shade is too big, it will look unbalanced; if it’s too small, it won’t cover the bulb properly. According to this post, the proportions are key to a harmonious look. Always measure your lamp before purchasing a new shade.
Next, prepare your lamp for installation. Remove the current lampshade by unscrewing the finial at the top. After removing the finial, lift off the old shade carefully. This step ensures that your lamp is ready for the new shade without any obstructions. Make sure your lamp is turned off and unplugged to prevent accidents.
Positioning the new lampshade correctly on the lamp is crucial. Place the shade over the harp, aligning it properly. Once it’s positioned, secure it with the finial you removed earlier. If done correctly, this ensures the lampshade sits evenly and securely. You might want to double-check the stability of the shade to make sure it won’t tilt.
Finally, test the stability and light diffusion. Turn on the lamp to see how the new shade affects the light. Adjust if needed to make sure the light is evenly distributed. For tips on where to place your lamp for the best lighting, here is the article. Maintaining an even light diffusion is key for both functionality and aesthetics.
Step 1: Choosing the Right Lampshade
Choosing the right lampshade starts with understanding the shape you need. Lampshades come in various shapes like drum, empire, and bell. Each shape serves a different purpose and fits different styles of lamps. For instance, a drum shade offers a modern look, while a bell shade gives a more traditional appearance. According to this post, matching the shade shape to your lamp’s style enhances the overall aesthetic.
The size of the lampshade is equally important. A shade that’s too large will overpower the lamp, while one that’s too small will look out of place. Generally, the height of the shade should be about two-thirds the height of the lamp base. This proportion ensures a balanced and visually pleasing look. Always measure your lamp before selecting a shade.
Materials play a significant role in both appearance and light diffusion. Common materials include fabric, paper, and metal. Fabric shades provide a warm, diffused light and fit well in living rooms. Metal or glass shades offer a more direct, focused light, ideal for reading areas. Consider the room’s decor and lighting needs when selecting the material.
Color and pattern can make a big difference. Neutral colors like white, beige, and grey blend well with most interiors. However, a bold-colored or patterned shade can serve as a statement piece. Use this opportunity to add personality to your room. A carefully selected color can tie together your room’s decor seamlessly.
Step 2: Preparing the Lamp for Lampshade Installation
Before installing the new lampshade, ensure the lamp is turned off and unplugged. Safety should always come first when handling electrical items. Carefully remove the old lampshade by unscrewing the finial at the top. After removing the finial, lift the old shade off. This clears the way for your new lampshade without any obstructions.
Next, check the harp, which is the metal frame that holds the lampshade in place. Make sure it is securely fastened to the base of the lamp. If the harp is loose, tighten it to ensure stability. Also, inspect the socket for any debris that might prevent proper installation. Clean the socket area if necessary, to avoid any complications later.
If your lamp requires a new harp, now is the time to install it. Harps come in various heights to accommodate different shade sizes. Choose one that matches the height of your new shade. Remove the old harp by squeezing its sides together and lifting it off the saddle. Attach the new harp by sliding it onto the saddle and releasing the sides to lock it in place.
Finally, gather all the parts needed for the new lampshade installation. This usually includes the new shade, a harp (if needed), and a finial. Lay them out on a flat surface for easy access. This organization helps ensure a smooth installation process. Having everything ready reduces the chances of missing any steps.
Step 3: Positioning the Lampshade on the Lamp
Start by placing the lampshade over the harp. Align the center hole of the shade with the top of the harp. Ensure it’s sitting evenly on all sides. This step is critical for achieving balance. A poorly positioned shade can look tilted or unstable.
Next, secure the lampshade with the finial. Thread the finial onto the top of the harp, turning it clockwise until it’s snug. Don’t overtighten it, as this can damage the shade or the harp. The finial should hold the shade firmly in place. Check that the lampshade does not wobble.
For lampshades that have a clip-on feature, attach them directly onto the bulb. Ensure the bulb is off and cool to the touch before handling. Align the clip inside the shade with the bulb. Gently press down until the clip fits securely. This type of shade is common for smaller lamps.
If using a washer-style shade, place the washer over the socket before screwing in the bulb. This ensures the shade stays in place. Ensure that the washer is level and secure. A loose washer can cause the shade to tilt. Always verify stability after positioning it.
Finally, step back and observe your work from different angles. Check the alignment of the lampshade with the lamp base. Make sure it looks visually balanced. Adjust it if necessary. Proper positioning not only ensures safety but also contributes to the overall aesthetics of your room.
Occasionally, you might need to make tiny adjustments to perfect the alignment. Slightly moving the shade in small increments can make a big difference. Use a spirit level if you have one. A perfectly positioned lampshade enhances both function and style, creating a pleasant ambiance.
Step 4: Securing the Shade with Harp and Finial
Begin by making sure the lampshade is properly positioned on the harp. Positioning it wrong can lead to an uneven and unstable shade. Once the lampshade is in place, you’re ready to secure it. This step guarantees that your shade won’t tilt or fall off. It’s an essential part of the process.
Take the finial and screw it onto the top of the harp. Turn the finial clockwise until it feels snug but don’t overtighten. Overtightening can result in damaging the finial or the harp threads. Also, ensure the finial matches the lamp style. It not only secures the lampshade but also adds a decorative touch.
For better security, ensure the harp is tightly fitted into the saddle. A loose harp can affect the stability of the lampshade, causing it to wobble. Check that the harp’s ends are properly secured in the saddle slots. If necessary, replace the harp with one that fits more tightly. Stability is key for a functional and aesthetically pleasing lamp.
Some lamps come with a different shade securing mechanism. For these, follow the manufacturer’s instructions carefully. Common alternatives include clip-on or washer fittings. Here’s a quick comparison of each:
| Type | Characteristics |
|---|---|
| Clip-On | Clips directly to the bulb, no harp needed. |
| Washer | Sits between the bulb socket and the bulb. |
After securing the shade, give it a slight shake to test stability. It should not move or wobble. If it does, check all connections and tighten them as needed. Securing the shade with the harp and finial correctly ensures a safe and attractive lighting solution. Your lampshade should now be firmly in place, ready to light up your space.
Step 5: Testing the Stability and Light Diffusion
Once the shade is secured, it’s time to test its stability. Gently tap the lampshade to ensure it doesn’t wobble or shift. A stable lampshade will stay firmly in place. If it moves, check the harp and finial connections. Secure them more tightly if necessary.
Next, turn on the lamp to examine how well the shade diffuses light. The light should distribute evenly, without casting harsh shadows. Observe how the light spreads across the room. This will give you an idea of whether the shade is properly aligned. Adjust the shade if you notice any uneven lighting.
Consider the material and color of the lampshade in this evaluation. Fabric shades often provide a soft, diffused light, while metal shades focus light more directly. This affects both the room’s ambiance and the shade’s functionality. It’s essential to match the shade type to the room’s lighting needs. Always test the light in different settings to find the best fit.
To further assess light diffusion, switch between different wattage bulbs. This helps you see how different light intensities interact with the shade. Make note of which bulb provides the best lighting. Here’s a quick guide on bulb wattage and suitable shades:
| Wattage | Shade Type |
|---|---|
| 40W | Fabric, for softer light |
| 60W | Paper, for medium brightness |
| 75W | Metal, for focused light |
Lastly, assess the overall aesthetic impact. Stand back and view the lamp from different angles to ensure it looks good in the room. Consider how the light interacts with nearby furniture and decor. If the lampshade complements the room while providing adequate light, you’ve done a great job. A well-installed shade enhances both the lamp’s usefulness and the room’s beauty.
The Importance of Properly Installing a Lampshade
Properly installing a lampsh shade is crucial for several reasons. First, it ensures the safety of everyone in the room. A poorly installed lampshade can easily tip over or touch the bulb, posing fire hazards. Additionally, it can cause shadows and uneven lighting, making it harder to see. Ensuring a correct installation contributes to both safety and functionality.
A well-installed lampshade also enhances the aesthetic appeal of your space. It complements the lamp base and fits seamlessly into your overall decor. When everything is aligned properly, your room looks more put-together and stylish. This seemingly simple element can elevate the entire look of your living area. It’s an opportunity to showcase your style.
The right installation maximizes light diffusion, improving room ambiance. Different materials affect how light spreads, so secure installation ensures optimal performance. Whether you need soft ambient light or focused task lighting, proper lampshade placement makes a difference. Here’s a quick comparison:
| Material | Effect on Light Diffusion |
|---|---|
| Fabric | Softer, more even light |
| Paper | Moderate diffusion with slight focus |
| Metal | Direct and focused light |
An incorrectly installed shade can damage the lamp over time. Loose connections may lead to wobbles that stress the lamp’s structure. Over time this can weaken various components like screws or harps, shortening its lifespan. A stable setup minimizes wear and tear on these parts making them last longer and safer.
Ensuring your lampshades are correctly installed saves you money in the long run too! Replacing damaged shades or repairing broken lamps can add up quickly — especially if it happens often due poor installation practices initially followed through carelessness later down line during maintenance times ahead potentially risking permanent failure causing higher costs replacements required eventually otherwise avoidable situations occurred instead putting much thought effort upfront ensuring done right first go-around readily achievable maintaining value investments home thoroughly appreciated loved ones alike forevermore!
Common Mistakes to Avoid when Installing a Lampshade
One common mistake is choosing the wrong size lampshade. A shade that’s too large or too small throws off the lamp’s balance and aesthetics. Be sure to measure the lamp base and select a shade that’s about two-thirds its height. This proportion creates visual harmony. Ignoring this step can lead to an awkward, unbalanced appearance.
Another frequent error is neglecting to secure the shade properly. A loose shade can wobble, making it unsafe. Ensure the harp and finial are tightly fixed. If your shade is clip-on, it should fit snugly on the bulb. Securing all parts helps maintain stability and safety.
Placement of the lampshade also matters greatly. Many people position it too high or too low, affecting light diffusion. The bottom of the shade should cover the socket and the top of the lamp base. This placement ensures optimal light spread and prevents glare. Misaligned shades can cause uneven lighting and discomfort.
Using the wrong type of bulb can diminish the effectiveness of the lampshade. Bulbs that are too bright or too dim can disrupt the desired ambiance. Choose a bulb that complements the shade material and intended lighting function. A well-matched bulb helps achieve the best lighting results. The wrong bulb can cause unwanted shadows or overly harsh lighting.
Finally, skipping the cleaning and maintenance steps is a pitfall. Dust and dirt build-up can affect both appearance and light quality. Regularly clean your lampshade to keep it in good condition. Simple steps like dusting or using a mild detergent can make a big difference. Neglecting this can lead to reduced light diffusion and diminished aesthetics.
Maintaining and Cleaning Your Lampshade for Longevity
Proper maintenance extends the life of your lampshade and keeps it looking fresh. Regular cleaning prevents dust and grime from affecting the light quality. Use a soft brush or a vacuum with a brush attachment to remove dust. This approach is gentle yet effective. For deeper cleaning, a mild detergent works well.
Different materials require different cleaning methods. Fabric shades can often be cleaned using a damp cloth with mild soap. Metal or glass shades might need a specific cleaner to avoid streaks or damage. Always check the manufacturer’s instructions. Using the wrong cleaning agents can ruin the material.
Be mindful of where you place your lamp to minimize the need for frequent cleaning. Avoid areas with heavy traffic or lots of dust. Placing your lamp in a cleaner environment helps maintain its appearance. This reduces the time you’ll need to spend on upkeep. Consistent care keeps your lampshade looking new.
Periodically inspect your lampshade for wear and tear. Check for any signs of damage, such as tears, discoloration, or loose fittings. Addressing these issues early prevents more significant problems down the line. Here’s a quick checklist for maintenance:
- Dust regularly with a soft brush or vacuum.
- Use a damp cloth with mild soap for deeper cleaning.
- Avoid harsh chemicals on any shade material.
- Keep lamps in low-dust areas.
- Inspect for damage and repair promptly.
Storing your lampshade correctly is also essential. If you need to store it, keep it in a dry, cool place away from direct sunlight. Use protective covers to avoid dust accumulation. Proper storage helps maintain the structure and color of the shade. This ensures it’s ready for use when you need it again.
Frequently Asked Questions
Installing a lampshade on a floor lamp can raise various questions. Here, we provide clear answers to help you easily handle this task.
1. Which shade shape is best for different lamp styles?
Lampshades come in shapes like drum, empire, and bell. Drum shades offer a modern look and work well with contemporary lamps. Empire shades have a sloped design that suits traditional lamps, while bell shades bring an elegant, classic touch. Each shape complements specific lamp bases to enhance overall aesthetics.
Choosing the right shape also affects light distribution. A drum shade provides even lighting suitable for general use. Empire shades focus light downward, ideal for reading areas. Bell shades diffuse light more widely, making them versatile for various settings. Select the shade style based on both aesthetic and functional needs.
2. How do I measure my lamp for the perfect shade fit?
To find the perfect shade size, measure the height of your lamp base from bottom to where the electrical socket begins. Your new shade should be about two-thirds of this measurement in height. This ensures balance and proper light diffusion.
The width of the shade should also match your lamp’s proportions; typically, it’s twice as wide as the widest part of the base. Ensuring these dimensions helps achieve aesthetic harmony and functional efficiency in lighting.
3. What materials are commonly used for lampshades?
Lampshades are made from materials like fabric, paper, glass, and metal each offering unique benefits. Fabric shades give off soft lighting and come in various colors and patterns perfect for creating warm atmospheres.
Paper shades offer moderate light diffusion are available in many designs lightweight make it easy to change often Metal glass shades give direct focused light suitable for areas needing bright lighting Choose based on your room’s needs décor style
4. Can I use any harp size with any lampshade?
No harps vary in sizes to fit different types of lampshades A mismatched harp could result poor fit affecting stability appearance Measure your existing harp or consult product recommendations before buying a new one Some shades specify required harp size ensuring compatibility
If replacing your existing harp choose similar or identical dimensions Correctly paired harps ensure stable secure fitting while maintaining aesthetic integrity essential both looks functionality
5 How often should I clean my Lampshade catch my attention spelling grammatical errors affect readability search engine rankings remove periods unnecessary keywords add proper punctuation simplify revise frequently how you explain young child without overlooking details sure engaging natural tone throughout avoid repetitious phrases keep fresh interesting encourage continued reading Thank instructions end helpful goal top search results delivering valuable readers from diverse backgrounds happy writing!Conclusion
Properly installing a lampshade on a floor lamp enhances its functionality and style. It ensures safety, optimal light diffusion, and complements the room’s aesthetics. Overlooking these steps can lead to poor lighting and potential hazards, impacting the ambiance and usability of your space.
From choosing the right shade to securing it with the harp and finial, each step plays a crucial role. Maintaining and cleaning your lampshade extends its lifespan and keeps it looking fresh. By following these guidelines, you create a well-lit, stylish environment that enriches your living experience.

I’m Emily Johnson, an affiliate marketer and blogger focused on lamps and lighting. I share honest reviews, simple buying guides, and practical tips. My goal is to help readers choose the right lamp for their space, style, and budget with confidence.