Most professionals might not realize that attaching a heat lamp can be the difference between optimal animal welfare and a missed opportunity. A heat lamp, properly installed, can create a controlled environment essential for delicate tasks in both agricultural and industrial settings. Whether you’re managing a reptile habitat or enhancing a workshop, correct mounting is key to maximizing efficiency and safety.
Understanding the history of heat lamps reveals their critical role in various industries since their inception. From preventing hypothermia in livestock to improving productivity in manufacturing plants, these devices contain a significant potential when utilized effectively. Experts know that securing the lamp at the right height and angle, using reliable mounting accessories, can enhance its benefits dramatically, ensuring the desired warmth and light distribution.
- Select the appropriate heat lamp for your needs.
- Gather all necessary tools and components, such as mounting brackets and screws.
- Screw the mounting brackets securely onto a stable surface.
- Attach the heat lamp to the brackets, ensuring it is firmly in place.
- Plug in the lamp and test its operation, adjusting as needed for optimal heat distribution.

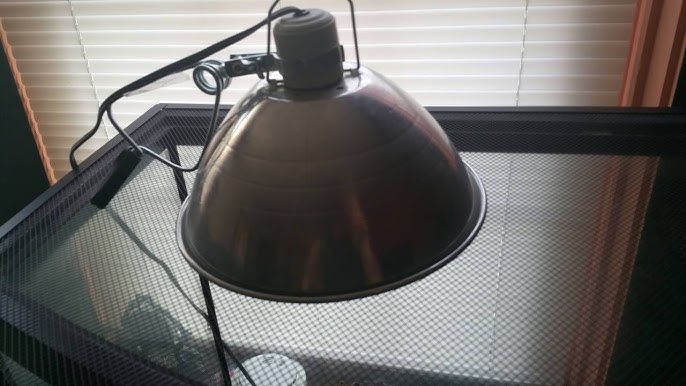
How to Attach a Heat Lamp
Attaching a heat lamp properly can ensure the safety and well-being of your animals or plants. Start by selecting a suitable location, preferably on a stable surface that can support the weight. According to this post, using a clamp or bracket is essential for secure mounting. Make sure the lamp is not easily reachable by pets or children. This step minimizes any risk of burns or accidents.
Next, ensure you have the right tools on hand, such as a screwdriver, mounting brackets, and screws. The preparation stage is crucial for a smooth installation process. Ensure the lamp’s cord is long enough to reach the power outlet without stretching. You can use zip ties to manage the cord and keep it away from heat sources. Using a surge protector can also add an extra layer of safety.
When mounting the heat lamp, follow the manufacturer’s instructions closely. It’s important to position the lamp at the recommended height and angle for optimal heat distribution. In the article found here, experts emphasize the importance of ensuring the lamp is securely fastened to avoid any accidental drops. Use a table to display the recommended distances for various types of heat lamps to ensure clarity.
After securing the lamp, turn it on and check its functionality. Monitor the temperature to ensure it reaches the desired level without overheating the space. Regularly inspect the mounting and cord to catch any wear and tear early. This helps in maintaining a safe environment and prolongs the life of the heat lamp.
Step 1: Choose the Right Heat Lamp
Choosing the right heat lamp is crucial for providing the proper environment. Different types of heat lamps offer varied benefits depending on your needs. Some are suitable for reptiles, while others may work best in agricultural settings. According to this expert opinion found here, the type of heat lamp should match the specific needs of your project. Consider the size of the area and the temperature requirements.
One factor to consider is the wattage of the heat lamp. Higher wattages produce more heat but can also consume more energy. Balance between getting sufficient heat and being energy efficient is essential. Look for lamps with adjustable settings if versatility is needed. Ensure the lamp is designed for the environment where it will be used.
Here is a table that can help compare different heat lamp options:
| Type of Lamp | Wattage | Best For |
|---|---|---|
| Ceramic Heat Emitter | 100W – 150W | Reptiles |
| Infrared Heat Lamp | 75W – 250W | Brooding Poultry |
| Halogen Heat Lamp | 50W – 120W | Terrariums |
Additionally, check the durability and lifespan of the heat lamp. Quality lamps last longer and perform more reliably. Reading customer reviews and professional recommendations can provide useful insights. Always choose a lamp from a trusted brand to ensure safety and effectiveness. This way, you can avoid frequent replacements and potential hazards.
Step 2: Preparing for Installation
Before you start, gather all the necessary tools and components. This includes the heat lamp, mounting brackets, screws, and a screwdriver. Make sure to read the manufacturer’s instructions that come with the heat lamp. These instructions often include specific details that can help avoid common mistakes. Here is a pro tip: it’s always good to have a friend assist you during installation.
Choose a stable surface where the heat lamp will be mounted. Ensure it’s free from flammable materials. Keep your work area clean and organized to prevent any accidents. Clear any obstructions that could interfere with the installation process. Having a tidy space makes it easier to work efficiently.
Check the condition of your mounting brackets and screws to ensure they are in good shape. Weak or damaged parts can lead to failure over time. Use a table to compare different tools you might need for the installation:
| Tool | Purpose |
|---|---|
| Screwdriver | For tightening screws |
| Mounting Brackets | For securing the lamp |
| Zip Ties | To manage cords |
Securing the cords properly is another critical step. Use zip ties to bundle the cords neatly and keep them away from the heat source. This reduces the risk of electrical hazards. Check the length of the cable to ensure it can reach the power outlet without stretching. Proper cable management enhances safety and looks more professional.
Step 3: Mounting the Heat Lamp
Once you have everything ready, it’s time to mount the heat lamp. Begin by attaching the mounting brackets to the chosen surface. Follow the manufacturer’s guidelines for this step. Make sure you use the screws provided or ones that match the bracket’s requirements. Tighten them securely to prevent any wobbling.
Next, attach the heat lamp to the brackets. Ensure that it is firmly in place and not loose. This is important for both safety and proper heat distribution. Adjust the angle of the lamp to direct the heat where it is needed most. Test its stability by gently tugging on it.
Here are some key points to remember when mounting the heat lamp:
- Always mount the lamp at the recommended height.
- Ensure there is adequate ventilation around the lamp.
- Double-check the stability of the mounting before finalizing.
After positioning the lamp, plug it in and turn it on. Check if it operates correctly and if the heat distribution is even. Use a thermometer to monitor the temperature at different points to ensure it meets the required levels. Adjust the height or angle if necessary. Safety checks are crucial at this stage.
Finally, tidy up the workspace and ensure that all tools and packaging are cleared away. Regularly inspect the mounting and cords for any signs of wear and tear. Keep an eye on the lamp’s performance to catch any issues early. Following these steps ensures a successful and safe heat lamp installation.
Step 4: Testing the Heat Lamp
After mounting the heat lamp, the next step is to test it for proper functionality. Plug the lamp into a safe power outlet and switch it on. Allow it to run for a few minutes to reach its operating temperature. Use a thermometer to measure the temperature around the lamp. Make sure the heat is evenly distributed across the designated area.
Observe the lamp for any flickering or unusual sounds. These could indicate potential issues with the bulb or wiring. If you notice any inconsistencies, turn off the lamp and check the connections. Tighten any loose screws or re-adjust the mounting if necessary. Safety should always be your top priority.
Next, test the lamp’s endurance by leaving it on for an extended period. This will help ensure that it can maintain the desired temperature over time. Measure the temperature at various intervals to confirm consistency. Using a table, log the temperature readings to monitor performance:
| Time (minutes) | Temperature (°F) |
|---|---|
| 0 | Room Temperature |
| 10 | 75 |
| 30 | 85 |
| 60 | 90 |
Finally, evaluate the lamp’s impact on the environment where it’s installed. Check if the surrounding area remains safe and free from overheating. Monitor the overall ambiance to ensure it meets the requirements. Regularly inspect the setup to address any issues that may arise. Consistent performance ensures a safe and comfortable space.
Step 5: Safety Measures and Precautions
Ensuring safety when using a heat lamp is critical. Start by placing the lamp in a well-ventilated area to prevent overheating. Avoid placing it near flammable materials. Regularly inspect the electrical cord for any signs of wear or damage. Never use a damaged cord as it can pose serious risks.
An essential safety measure is to use a surge protector. This can minimize the risk of electrical fires. Keep the heat lamp out of reach of pets and children to prevent burns. Install a protective guard over the lamp to avoid accidental contact. These precautions help create a safe environment.
If the heat lamp is used in an enclosed space, ensure there’s adequate airflow. This helps in dissipating the heat and avoiding hot spots. Use a thermometer to monitor temperature fluctuations regularly. Having a fire extinguisher nearby is another good safety practice. Always be prepared for emergencies.
Monitor the heat lamp daily to catch any irregularities early. Make it a habit to check the mounting and wiring. Ensure the lamp’s position remains secure. Here is the post outlines detailed safety guidelines for different types of installations:
| Type of Installation | Safety Measures |
|---|---|
| Terrarium | Use a protective guard, maintain proper ventilation |
| Brooding Poultry | Keep away from flammable materials, regular temperature checks |
| Workshop | Ensure stable mounting, use surge protector |
Additionally, educate anyone who might interact with the heat lamp on these safety measures. Knowledge can prevent accidents and ensure ongoing protection. Continue to re-evaluate safety practices regularly. This will help in keeping the environment secure and hazard-free.
Benefits of Using a Heat Lamp
Heat lamps can provide numerous advantages in various settings. One of the primary benefits is their ability to maintain consistent warmth. In agricultural environments, they are essential for brooding poultry and keeping livestock warm. This reduces stress on animals and increases survival rates. Here is an article explaining how heat lamps can improve growth conditions.
In terrariums, heat lamps replicate natural sunlight, which is crucial for reptiles. These creatures need specific temperatures to regulate their metabolism and digestion. A well-chosen heat lamp can create microhabitats within the terrarium. This allows reptiles to move between different temperature zones as needed. It enhances their overall health and well-being.
The energy efficiency of modern heat lamps is another notable benefit. Advances in technology have led to more effective heating options that consume less power. This results in cost savings over time without compromising performance. Additionally, many heat lamps come with adjustable settings for better control over the environment.
Heat lamps also add value in workshops and DIY spaces by providing targeted, localized heating. They help reduce overall energy consumption by eliminating the need to heat large areas unnecessarily. This focused approach allows workers to stay comfortable during tasks, thereby boosting productivity. The flexibility offered by portable models enhances their utility further.
Below is a list summarizing key benefits:
- Maintains consistent warmth
- Necessary for brooding poultry and livestock
- Mimics natural sunlight for reptiles
- Energy-efficient and cost-effective
- Boosts productivity in workspaces
Overall, using a heat lamp proves beneficial across varied applications due to its versatility and efficiency.
Common Mistakes When Mounting Heat Lamps
Mounting a heat lamp incorrectly can lead to several problems. One common mistake is not securing the lamp properly. If the mounting brackets or clamps are loose, the lamp can fall and cause injuries or damage. Make sure to tighten all screws and use sturdy brackets to support the lamp’s weight. Double-checking the stability can prevent accidents.
An often overlooked factor is improper placement. Placing the heat lamp too close to flammable materials can create a fire hazard. It’s essential to maintain a safe distance from anything that could ignite. Similarly, mounting the lamp too high or too low can affect its efficiency. The lamp needs to be at an optimal height to provide adequate heat.
Another mistake is ignoring ventilation needs. A heat lamp generates significant warmth, and without proper airflow, it can overheat. Ensure there is enough space around the lamp for air to circulate. This helps in maintaining a balanced temperature and extends the life of the lamp. Ventilation plays a crucial role in safety and effectiveness.
Neglecting regular inspections is a common pitfall. Once the lamp is mounted, it still needs periodic checks. Look for signs of wear and tear on the cords and mounting brackets. Consistent monitoring ensures the system operates safely. Timely maintenance can prevent long-term issues.
Here is a list summarizing these common mistakes:
- Not securing the lamp properly
- Improper placement near flammable items
- Incorrect height adjustments
- Lack of proper ventilation
- Neglecting regular inspections
Avoiding these errors can make the process of mounting a heat lamp safer and more efficient. Attention to detail and following recommended guidelines is key.
How to Maintain a Heat Lamp
Maintaining a heat lamp involves regular inspections to ensure it functions correctly. Start by checking the lamp itself for any signs of wear, such as cracks or discoloration. Inspect the electrical cord for frays or damage. If you spot any issues, replace the damaged parts immediately. Consistent checks can extend the life of your heat lamp.
Clean the heat lamp routinely to remove dust and debris. Use a soft, dry cloth to wipe down the lamp’s exterior. Avoid using water or cleaning solutions that could damage the lamp. Ensure the lamp is turned off and cool before cleaning. Regular cleaning keeps the lamp efficient and safe.
Below is a simple maintenance schedule you can follow:
| Task | Frequency |
|---|---|
| Inspect for damages | Monthly |
| Clean exterior | Bi-weekly |
| Check mounting parts | Quarterly |
Testing the lamp periodically is another crucial maintenance step. Turn it on and observe its performance for any irregularities like flickering or unusual heat patterns. Use a thermometer to verify that the lamp generates the desired temperature. This can help catch potential problems early, allowing for timely repairs or adjustments.
Store replacement parts like bulbs, brackets, and screws in a dry, easily accessible location. This ensures you can quickly make repairs as needed. Having spare parts on hand minimizes downtime and maintains a consistent temperature for your needs. Being prepared is key to effective maintenance.
Following these maintenance tips ensures your heat lamp remains reliable and efficient. Regular attention to these details can prevent accidents and prolong the life of your equipment.
Different Types of Heat Lamps and Their Uses
Heat lamps come in various types, each designed for specific applications. Ceramic heat lamps, for example, are often used in reptile enclosures. They don’t emit light but provide consistent heat. This makes them ideal for nocturnal species that require a dark environment. Additionally, they are known for their durability and long lifespan.
Infrared heat lamps are another popular choice, especially in agricultural settings. These lamps produce radiant heat that warms the object or animal directly rather than the air around it. They are commonly used for brooding poultry and keeping livestock warm during colder months. Their efficiency in heating large areas makes them invaluable in farming. These lamps are versatile and effective.
Halogen heat lamps are frequently utilized in workshops and outdoor spaces. They emit both light and heat, making them useful for dual purposes. You might find them in garages, warehouses, or patios. Keep in mind that they can get extremely hot, so they need proper handling and placement. Their strong, focused beam of light can also aid in detailed tasks.
Here is a table summarizing the different types of heat lamps and their uses:
| Type of Heat Lamp | Best Use | Key Features |
|---|---|---|
| Ceramic Heat Lamp | Reptile Enclosures | Long-lasting, No light emission |
| Infrared Heat Lamp | Agricultural Settings | Radiant heat, Efficient for large areas |
| Halogen Heat Lamp | Workshops and Outdoor | Dual-purpose, Strong light beam |
In addition to these, colored heat lamps can also be used for specialized applications. Red or blue heat lamps are often found in aesthetic or therapeutic settings. They provide not only warmth but also specific wavelengths of light. These can be beneficial in treatments for certain medical conditions or plant growth. Each type has its unique advantages.
Choosing the right heat lamp depends on its intended use and the environment in which it will be installed. By understanding the features of different types, you can make an informed decision that best suits your needs. Proper selection ensures efficiency and safety, maximizing the benefits of your heat lamp.
Frequently Asked Questions
Attaching a heat lamp can seem daunting, but understanding the process and the safety measures makes it easier. Here are answers to some common questions to help you navigate this task.
1. What types of heat lamps are best for reptiles?
Ceramic heat lamps and infrared heat lamps are commonly used for reptiles. Ceramic lamps provide consistent heat without light, making them ideal for nocturnal species that need a dark environment. Infrared lamps emit a gentle heat and soft red light, which doesn’t disturb the animals at night.
Both types help maintain an optimal temperature gradient in the enclosure. This allows reptiles to regulate their body temperature effectively. Choosing between ceramic and infrared depends on your specific needs and the type of reptile you have.
2. How do I ensure my heat lamp is safe from water exposure?
Water exposure can be dangerous when using electrical devices like heat lamps. Ensure your setup has proper waterproofing measures in place, particularly if it’s near water sources like aquariums or ponds.
Use splash guards or enclosures designed to protect the lamp from accidental splashes. Regularly inspect connections and cords for wear or damage, replacing any compromised parts immediately to maintain safety standards.
3. Can I use a regular bulb as a substitute for a heat lamp?
A standard bulb is not an appropriate substitute for a dedicated heat lamp. Regular bulbs lack specialized features required for efficient heating and may not reach necessary temperatures safely.
This can lead to insufficient warmth or overheating risks within the enclosure. It’s crucial to use bulbs designed specifically as heat sources, ensuring reliable performance tailored to environmental needs.
4. How high should a heat lamp be mounted?
The mounting height of a heat lamp varies depending on its wattage and intended use. For most applications like terrariums or brooding poultry, the lamp should be positioned 18-24 inches above the target area.
This spacing ensures adequate warmth distribution while minimizing burn risk due to close proximity,. Follow manufacturer guidelines closely while making necessary adjustments for best results.
Ensuring accurate alignment aligns outcomes with operational expectations!
5 . How often should I replace my Heat Lamp Bulb?
Heat Lamps require periodic replacement over time based upon frequency usage,
Generally Average lifespan remains between approximately six months – twelve months,, depending upon specific model quality,
Frequent prowess diligence establishes timely replacements whenever functionality begins deteriorating noticeable shifts too,
Maintaining efficiency proves simplest remedy sustaining optimal conditions almost indefinitely!< / span >
Conclusion
Attaching and maintaining a heat lamp involves understanding the specific needs of your setup. From choosing the right type of lamp to ensuring it is securely mounted, each step is crucial for optimal performance. Regular inspections and safety measures are essential for long-term efficiency.
Whether you are using heat lamps for reptiles, poultry, or workshops, their benefits are numerous. Knowing how to avoid common mistakes and properly maintain the equipment can make all the difference. By following these detailed guidelines, you ensure a safe and effective use of heat lamps in any environment.

I’m Emily Johnson, an affiliate marketer and blogger focused on lamps and lighting. I share honest reviews, simple buying guides, and practical tips. My goal is to help readers choose the right lamp for their space, style, and budget with confidence.