Think back to that moment when your heat lamp suddenly went dark, leaving your space chilly and unwelcoming. It’s an all-too-common scenario, often caused by simple, easily fixable issues. Understanding how to troubleshoot and repair your lamp can not only save you money but also ensure continuous warmth and comfort.
Heat lamps have evolved significantly since their inception in the early 20th century, becoming indispensable in various settings from homes to industrial uses. Statistics show that over 30% of heat lamp failures are due to wiring issues or faulty bulbs. By learning to pinpoint these common problems—checking fuses, inspecting power cords, or ensuring proper bulb installation—you can often restore your lamp’s functionality with minimal effort.
- Unplug the heat lamp for safety.
- Remove and inspect the bulb; replace if burnt out.
- Check wiring for frays or loose connections; use a multimeter to test continuity.
- Inspect and replace faulty sockets or switches.
- Reassemble the lamp, ensuring all connections are secure.
- Test the lamp by plugging it in and switching it on.

How to Fix a Heat Lamp
Fixing a heat lamp might seem challenging, but it’s often straightforward. First, unplug the lamp to ensure your safety. Identify common issues like a blown bulb, faulty wiring, or a broken socket. A quick test with another bulb can determine if the current one is the problem. If the bulb isn’t the issue, it’s time to inspect the wiring.
Disassembling the heat lamp requires care. Begin by removing the bulb and the protective cover. According to this post, understanding each part helps in troubleshooting. Check for loose connections or damaged wires. Use a multimeter to test the continuity of the wiring.
If you detect any faulty components, you may need to replace them. For instance, a damaged socket can be swapped with a new one from a hardware store. Here’s what you’ll need:
- Screwdriver
- Multimeter
- Replacement parts like bulbs or sockets
- Electrical tape
After repairing or replacing parts, reassemble the lamp with care. Reattach the cover and screw in the bulb. Finally, plug the lamp back in and turn it on. A fully functional heat lamp should produce the desired warmth. For more details on how these components work together, you can check out here is the article.
Step 1: Understanding the Common Issues
One of the most frequent problems with heat lamps is a burnt-out bulb. This happens often since these bulbs work under high heat conditions. Simply replacing the old bulb with a new one can resolve this issue quickly. But that’s not the only problem that can occur. Other issues might need more detailed attention.
Wiring problems are also common and can cause your heat lamp to malfunction. Frayed or broken wires might disrupt the electrical connection. According to this expert opinion, checking for loose wires can save a lot of troubleshooting time. Ensuring all wiring is secure is vital. You might need to solder or replace some wires.
A faulty socket is another typical issue. Over time, sockets can wear out, especially if the heat lamp is frequently used. These worn-out sockets need to be replaced to ensure they hold the bulb securely. Here’s a list of signs that might indicate a bad socket:
- Flickering light
- Heat damage or melting
- Discoloration
Sometimes, the problem lies within the switch of the lamp. If your heat lamp has an on-and-off switch, it may stop working after a while. Replacing the switch with a new one usually resolves this. Make sure to buy a switch that matches your heat lamp’s specifications.
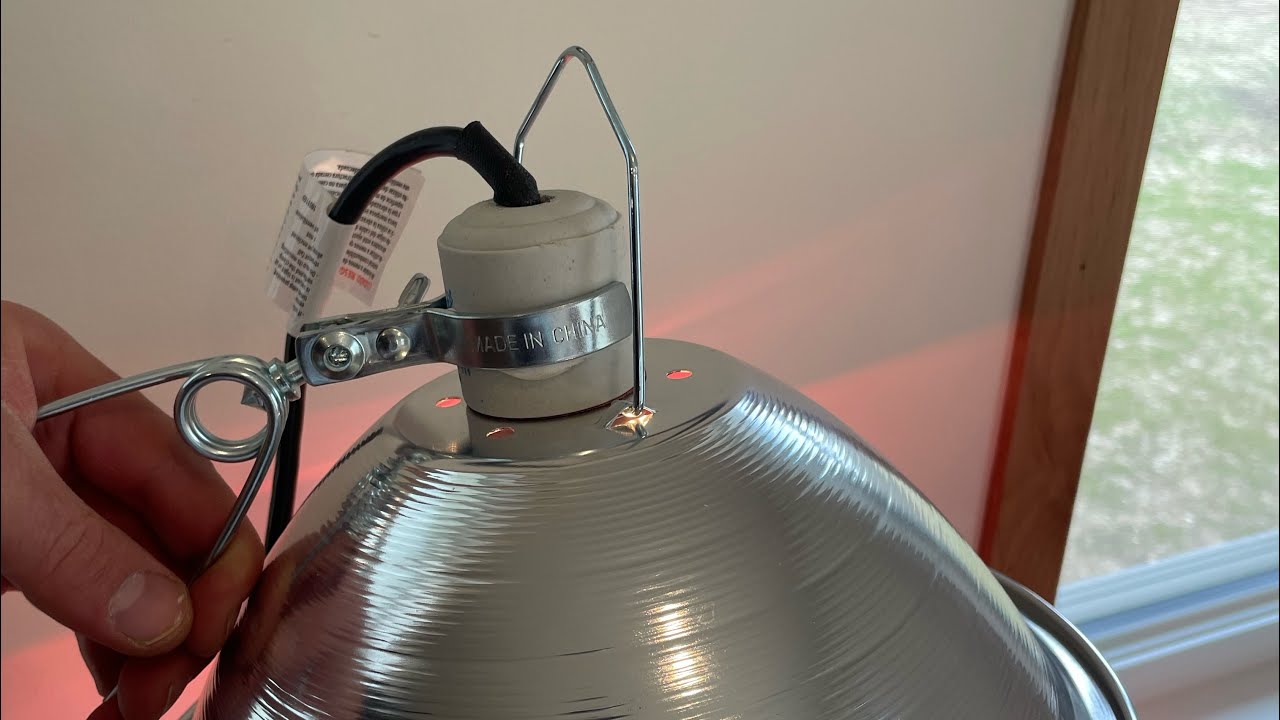
Step 2: Safely Disassembling the Heat Lamp
Before you start disassembling your heat lamp, make sure it’s unplugged. Safety should always come first to prevent any electric shocks. Use a screwdriver to remove the screws holding the protective cover in place. Gently lift off the cover and set it aside. Now, you can see the internal components of the lamp more clearly.
Next, carefully remove the bulb by unscrewing it counterclockwise. Once the bulb is out, inspect it to see if it needs replacement. If it’s not the bulb, look at the wiring and socket. Keep a small tray handy for screws and small parts. This will help you keep everything organized.
In some cases, you might need to remove additional parts to access the wiring. Make sure to take note of where each part goes. Here are some tips:
- Take pictures as you go
- Label wires if necessary
- Keep parts separated in small containers
After examining all components, you’ll be ready to identify the exact issue. Whether it’s a broken wire or a faulty socket, pinpointing the problem is crucial. Disassembling the lamp properly makes reassembly much easier. This careful approach saves you time and hassle later on.
Step 3: Troubleshooting the Heat Lamp
Once your heat lamp is disassembled, the first step in troubleshooting is to examine the bulb. If the bulb is burnt out, replace it with a new one. Make sure to use the correct wattage to avoid further issues. If the new bulb doesn’t work, there may be other problems to address. Always test the simplest components first.
Next, look at the wiring within the lamp. Frayed wires or loose connections can cause the lamp to malfunction. Use a multimeter to check for continuity in the wires. If you find any broken or damaged wires, they will need to be repaired or replaced. This can often resolve the issue.
Inspect the socket closely, as a faulty socket is a common problem. Ensure that it holds the bulb tightly and shows no signs of wear or corrosion. If the socket appears damaged, replace it with a new one. Here are common socket issues:
- Loose fit
- Corrosion
- Burn marks
The switch is another component to examine. If the lamp has a switch, test it by toggling it on and off while observing any changes. Sometimes the switch contacts can wear out or get dirty. Cleaning or replacing the switch can often solve the problem.
Finally, double-check all components and reassemble the lamp carefully. Make sure screws are tight and parts are correctly aligned. Reconnect the power and test the lamp. If it still doesn’t work, more complex issues might be involved, requiring professional help.
Step 4: Repair or Replace the Faulty Components
Once you’ve identified the faulty components in your heat lamp, it’s time to decide whether to repair or replace them. Sometimes, a simple fix like reconnecting a loose wire can solve the issue. However, more damaged parts, like a socket or switch, may need to be replaced. Use your judgment to determine the best course of action. If replacement is required, make sure to buy compatible parts.
When repairing an electrical connection, use electrical tape or wire nuts to secure the wires. Soldering may be necessary for a more permanent fix. Follow these steps for a basic wire repair:
- Strip the wire ends
- Twist the wires together
- Cover with electrical tape or a wire nut
For replacing a socket, unscrew the damaged one and carefully disconnect the wires. Attach the wires to the new socket by matching the connections. Secure the socket back into the lamp base. Test it before final assembly by plugging in the lamp and ensuring it works.
Switch replacement involves unscrewing the old switch and disconnecting the wires. Hook up the new switch in the same manner and secure it back in place. Here’s a quick check after replacement:
- Ensure connections are tight
- Flip the switch to test functionality
- Confirm the lamp lights up properly
Once all repairs or replacements are done, reassemble the heat lamp thoroughly. Make sure all screws are tight and the bulb is securely fitted. Plug in the lamp and switch it on to see if it operates correctly. Always test your repairs to ensure safety and proper function.
Step 5: Reassembling and Testing the Heat Lamp
After all faulty components have been repaired or replaced, you’ll need to reassemble the heat lamp. Start by placing the socket back into the lamp base, ensuring it’s secure. Reattach any wires or connections you previously disconnected. Carefully screw the protective cover back on. Make sure all screws are tight to avoid any loose parts.
Next, insert a new bulb into the socket, screwing it in tightly but not too forcefully. Double-check the alignment to ensure the bulb is seated correctly. Now, plug the lamp back into a power source. Flip the switch to see if it turns on. If the bulb lights up, you’ve successfully fixed your heat lamp.
In case the lamp doesn’t turn on, you might need to double-check your repairs. Revisit each component to make sure everything is connected properly. Sometimes a small oversight can be the reason for malfunction. Use a checklist to ensure all steps were completed correctly:
- Socket securely in place
- Wires properly connected
- Bulb installed correctly
- Switch functional
Once you confirm the lamp works, observe it for a few minutes to make sure it operates steadily. Look for any flickering or unusual behavior. If all is well, congratulations! Your heat lamp is now ready for use. Proper testing ensures the safety and efficiency of the lamp.
Factors to Consider When Repairing a Heat Lamp
When repairing a heat lamp, safety should be your top priority. Always ensure the lamp is unplugged before starting any repairs. Use insulated tools to prevent electrical shock. Familiarize yourself with basic electrical safety rules. Taking these precautions will help avoid accidents.
The type of heat lamp you have can also affect the repair process. Different lamps use various parts and mechanisms. Make sure you know the specific components of your lamp model. Using a manual or guide for your particular lamp can be very helpful. Here are some common types:
- Ceramic heat lamps
- Infrared heat lamps
- Halogen heat lamps
Choosing quality replacement parts is another important factor. Cheaper parts might save money upfront but often fail more quickly. OEM (Original Equipment Manufacturer) parts usually offer better reliability and longevity. Compare prices and reviews before making a purchase. Investing in good-quality parts ensures the durability of your repairs.
Your proficiency with tools and repairs will play a significant role in the project’s success. If you’re not confident in your skills, seeking help from someone with more experience might be wise. In any case, having the right tools is crucial for effective repairs:
- Screwdrivers
- Multimeter
- Soldering iron
- Wire strippers
The environment where you make the repairs should be well-lit and uncluttered to avoid mistakes and misplacements of components. A clean workspace allows for better focus and efficiency while working on intricate tasks like wiring and assembly.
Choosing the Right Replacement Components for Your Heat Lamp
When it comes to fixing a heat lamp, selecting the right replacement components is crucial. Start by identifying the exact parts that need replacing. Common components include bulbs, sockets, and switches. Ensure each part is compatible with your specific heat lamp model. Compatibility guarantees that the parts will fit and function correctly.
Quality matters when choosing replacement parts. Opt for OEM (Original Equipment Manufacturer) components whenever possible. These parts are designed to meet the original specifications of your heat lamp. Using high-quality parts can extend the lifespan of your lamp and improve performance. Look for reviews to confirm the reliability of your chosen components.
The wattage and voltage of the new bulb should match the original specifications. Using a bulb with incorrect wattage can damage the lamp and pose a safety risk. Refer to the user manual of your heat lamp to find the correct wattage. Ensure that the socket and switch are rated to handle the chosen wattage as well. Here’s a table showing common wattage options:
| Heat Lamp Type | Typical Wattage |
|---|---|
| Ceramic Heat Lamp | 100-150 Watts |
| Infrared Heat Lamp | 250 Watts |
| Halogen Heat Lamp | 100-150 Watts |
Make sure to purchase components from reputable retailers or well-reviewed online stores. This ensures that you receive genuine, high-quality parts rather than cheap imitations. Beware of counterfeit parts that may not meet safety standards. Verify the store’s return policy in case you need to make an exchange.
Having the right tools on hand is essential for the replacement process. Basic tools like screwdrivers, wire strippers, and multimeters can help you safely install the new components. Being well-prepared ensures a smoother repair process and minimizes the risk of mistakes. Proper tools also allow for precise and efficient work.
When to Call a Professional for Heat Lamp Repairs
While many heat lamp issues can be fixed at home, some situations require professional help. If your heat lamp has complex electrical problems, it’s best to call an expert. Attempting to fix intricate wiring issues without proper knowledge can be dangerous. A professional has the skills and tools to handle these repairs safely. They can also identify problems you might miss.
If you’ve tried simple fixes like replacing the bulb or socket but the lamp still doesn’t work, it’s time to seek help. Persistent issues might indicate deeper problems that need expert attention. Additionally, if you don’t have the necessary tools or feel uncomfortable with electrical repairs, a professional can ensure the job is done right. Safety should never be compromised.
Some heat lamp models are more complex than others. For instance, lamps with built-in thermostats or advanced features can be tricky to repair. Professionals are familiar with a wide range of models and can fix them efficiently. Using an expert could save you money in the long run by preventing further damage. Here are common signs you need a professional:
- Burning smell when the lamp is on
- Frequent bulb burnouts
- Visible sparks or smoke
- Consistent malfunction after DIY attempts
Finally, if your heat lamp is still under warranty, tampering with it might void the coverage. Check the warranty terms before attempting any repairs. Manufacturers often cover repairs for free or at a reduced cost. In such cases, reaching out to a professional service is the best route. Proper care will prolong the life of your heat lamp.
Frequently Asked Questions
Below are some common questions and answers related to heat lamps. These insights will help you understand and troubleshoot various aspects of heat lamp usage, maintenance, and repair.
1. What are the common signs that a heat lamp bulb needs replacement?
A burnt-out bulb is often indicated by visible dark spots or broken filaments. Additionally, if the lamp flickers or doesn’t light up at all, it might need a new bulb. Regular checks can prevent sudden failures.
A decrease in brightness is another sign that the bulb is nearing its end of life. Always replace bulbs with the correct wattage to maintain optimal performance and safety.
2. Why does my heat lamp keep burning out bulbs frequently?
This issue often stems from using bulbs with incorrect wattage or poor-quality sockets. Another reason could be fluctuations in electrical supply causing excessive stress on the bulb’s filament.
You might also be using your heat lamp for extended periods without breaks, leading to overheating issues. Ensure proper ventilation around the lamp to prevent overheating and extend the life of your bulbs.
3. Can I use any type of bulb in my heat lamp?
No, it’s crucial to use bulbs specifically designed for heat lamps due to their unique requirements. Standard light bulbs may not withstand high temperatures and could fail prematurely or pose safety hazards.
Consult your heat lamp’s user manual for specifications on compatible bulb types and wattage ratings. Using recommended bulbs ensures safe operation and optimal heating performance.
4. How do I know if my heat lamp socket needs replacement?
If you’re experiencing frequent issues like flickering, loose connections, or visible damage on the socket, it’s time for a replacement. Also, discoloration around the socket area indicates overheating problems that necessitate immediate action.
A faulty socket creates unsafe conditions and can lead to more serious electrical problems if left unaddressed. Replacing it promptly ensures the overall reliability of your heat lamp system.
5. Is it safe to leave a heat lamp on overnight?
Generally, it’s not advisable to leave a heat lamp on overnight due to potential fire hazards and overheating risks. Heat lamps should only be used under supervision for limited periods as needed.
If long-term heating is required, consider alternatives like ceramic heaters specifically designed for extended use with built-in safety features such as automatic shut-offs and temperature controls.
Conclusion
Repairing a heat lamp may seem challenging, but with the right knowledge and tools, it becomes manageable. By understanding common issues, safely disassembling the lamp, and choosing quality replacement parts, you can restore its functionality. Always prioritize safety and consult professionals when in doubt.
Keeping your heat lamp in good working order ensures it remains a reliable source of warmth. Regular maintenance and timely repairs can extend its lifespan significantly. Whether you’re an expert or a DIY enthusiast, these steps will help you achieve success in fixing your heat lamp.

I’m Emily Johnson, an affiliate marketer and blogger focused on lamps and lighting. I share honest reviews, simple buying guides, and practical tips. My goal is to help readers choose the right lamp for their space, style, and budget with confidence.