
Ever wondered why reptile enthusiasts stress the mounting of heat lamps with such precision? Incorrect positioning can lead to inefficient energy usage and even pose a serious threat to animal welfare. The seemingly simple task of mounting a heat lamp warrants an expert’s touch and if done right, can ensure optimal warmth and safety.
When mounting a heat lamp, it’s crucial to consider the lamp’s distance and angle. Back in the day, improper installation was a leading cause of accidents, but modern standards have reduced this risk significantly. An astounding 87% of heat lamp users report improved efficiency when adhering to professional guidelines.
- Choose the appropriate heat lamp based on wattage and application needs.
- Select a well-ventilated location free from flammable materials.
- Securely attach brackets or clamps to a stable surface.
- Mount the heat lamp, ensuring it’s firmly fixed and correctly angled.
- Install a protective cover and check for any wiring issues.
- Regularly inspect and maintain the setup to ensure effective operation.
How to Mount a Heat Lamp
Mounting a heat lamp might seem straightforward, but choosing the right one is crucial. The type and size of the lamp should match your needs. If you’re unsure about parts, this post explains more. Always consider wattage and heat output. Different species have different requirements.
The location of the lamp affects its efficiency. Ensure there’s proper ventilation to avoid overheating. According to here is the article, positioning is key for optimal results. Keep the lamp away from flammable materials. Measure the distance from the target area for accurate positioning.
Mounting procedures vary by lamp type. Using brackets or clamps provides stability. Secure the lamp tightly to prevent falls. Ensure the fixture can support the lamp’s weight. Double-check all nuts and bolts for safety.
Safety precautions are essential. Always use a protective cover to prevent burns. Regularly inspect the wiring for any damage. Turn off the lamp before making adjustments. Monitor the temperature to ensure comfort and safety.
Step 1: Choosing the Right Heat Lamp
Choosing the right heat lamp begins with understanding your needs. Different animals or plants require different heat levels. For instance, reptiles need higher temperatures compared to seedlings. The wattage of the lamp will determine the heat output. Make sure to select a lamp that meets your specific requirements.
The type of bulb is another important factor. There are ceramic, infrared, and incandescent bulbs. Each has its own benefits and applications. Infrared bulbs are popular because they provide consistent heat without light. According to this expert opinion, choosing the right bulb greatly affects the safety and well-being of your pet.
Consider the size of the area you need to heat. Larger spaces will need more powerful lamps or even multiple units. Always measure the area before purchasing. This helps ensure you get just the right amount of heat coverage.
Don’t forget to think about energy consumption. A higher wattage lamp uses more electricity. You can compare energy costs across different lamp types. Look for energy-efficient options if cost is a concern. A good balance between heat output and energy use is key.
Step 2: Identifying the Perfect Location
Finding the perfect location for your heat lamp is essential for safety and efficiency. Start by looking for a spot with proper ventilation. This helps prevent overheating and reduces fire risk. Ensure the location is free from flammable materials. Always keep a safe distance between the lamp and any objects.
The height at which you mount the lamp is crucial. Too low, and it may overheat the area; too high, and it might not provide enough warmth. Use an adjustable stand or bracket if possible. This flexibility allows you to change the height as needed. Consider using a thermometer to monitor the temperature at different heights.
Think about the accessibility of the location. You’ll need to clean and possibly adjust the lamp over time. Ensure it’s easy to reach without disturbing your setup. An inconvenient location can make maintenance difficult. Regular checks will help ensure the lamp continues to function effectively.
Lastly, consider the overall layout of the space. The heat should be evenly distributed to avoid hot and cold spots. In larger areas, you may need multiple lamps for uniform coverage. Plan the placement to cover all necessary areas. Good layout planning can greatly improve efficiency and safety.
Step 3: Mounting Procedures
Mounting the heat lamp correctly ensures safety and efficiency. First, gather all necessary tools and materials. This usually includes brackets or clamps, screws, and a screwdriver. Ensure you have a stable surface to work on. Double-check that the surface can support the lamp’s weight.
Next, mark the spots where you’ll place the brackets or clamps. Make sure they are evenly spaced. This provides balanced support for the lamp. Use a measuring tape for accuracy. Drill pilot holes where you marked, which makes it easier to insert screws.
Secure the brackets or clamps tightly. Attach them to the wall or ceiling using screws. Ensure they’re stable and can hold the lamp securely. Check if the brackets are level. This helps in evenly distributing weight and heat.
Once the brackets are in place, attach the heat lamp. Carefully place the lamp into the brackets or clamps. Ensure it’s firmly secured to avoid movement. Adjust the angle if necessary. This ensures that the target area receives optimal heat.
Use a thermometer to check the temperature distribution. Adjust the lamp’s height and angle as needed. Make sure the heat is evenly spread across the area. This step ensures maximum efficiency. Recheck all screws and fittings for stability.
Step 4: Safety Precautions
Safety is paramount when using a heat lamp. Always use a protective cover to prevent direct contact with the hot bulb. This helps avoid burns and accidents. Make sure the cover is heat-resistant. Regularly inspect the cover for damage.
Keep flammable materials away from the heat lamp. Items like curtains, paper, and plants should be placed at a safe distance. This prevents fire hazards. Make a list of items to avoid near the lamp. Regularly remind yourself to keep the area clear.
- Clothes
- Paper
- Plastic
- Wood
Ensure the heat lamp is securely mounted. Loose fixtures can cause the lamp to fall and potentially break. Double-check all screws and attachments. Make adjustments if anything feels unstable. Safety checks should be performed regularly.
Regular maintenance is essential. Inspect the wiring for any signs of wear. Replace damaged wires immediately to prevent electrical issues. Additionally, clean the lamp to remove dust build-up. This ensures it operates efficiently without overheating.
Use a temperature controller to manage heat levels. This device can automatically turn the lamp on and off. It helps maintain a consistent temperature. Prevents overheating and energy waste. Invest in a good quality controller for best results.
Step 5: Regular Maintenance and Checks
Regular maintenance ensures your heat lamp operates efficiently. Begin by inspecting the lamp and its components. Look for any signs of wear or damage. Pay special attention to the bulb and wiring. Replace any damaged parts immediately.
Cleaning the heat lamp is crucial. Dust and debris can accumulate on the bulb, reducing its effectiveness. Use a soft cloth to wipe the bulb and other parts. Avoid using water near the electrical components. Regular cleaning keeps the lamp functioning optimally.
Check the mounting brackets and clamps. Over time, these components can loosen, putting the lamp at risk of falling. Tighten any loose screws and ensure the lamp is securely attached. This simple step can prevent accidents. Always prioritize safety during maintenance.
Monitoring the heat output is also essential. Use a thermometer to check if the lamp provides consistent heat. Variations in temperature can indicate a problem with the bulb or wiring. Address these issues promptly to maintain a stable environment. Regular checks save you time and effort in the long run.
Establish a maintenance schedule. Set regular intervals for performing checks and cleaning. This helps you stay on top of any potential issues. Mark your calendar or set reminders. Consistency is key to keeping your heat lamp in top condition.
The Benefits of Using Heat Lamps
Heat lamps offer numerous benefits, particularly in colder climates. They provide a reliable source of warmth for pets, plants, and even humans. These lamps can be used in various settings like animal enclosures, greenhouses, and bathrooms. By providing consistent heat, they help maintain healthy living conditions. This is especially important for temperature-sensitive species.
Using heat lamps can improve the growth rate of plants. In greenhouses, they supplement natural sunlight during winter months. This ensures that plants receive adequate warmth and light to flourish. Improved growth means better yield for gardeners and farmers. A small investment in a heat lamp can lead to significant gains.
Another advantage is their versatility in heating specific areas without affecting the entire room’s temperature. This localized heating reduces energy consumption compared to using central heating systems. You can target specific spots that need warmth. For instance, reptile owners use them to maintain ideal temperatures in terrariums.
Heat lamps also enhance comfort levels in human spaces such as bathrooms. During cold seasons, they make showering a pleasant experience by providing immediate warmth. Many people appreciate this convenience early in the morning or late at night. It’s an affordable way to add luxury to your daily routine.
Lastly, heat lamps are generally easy to install and maintain. Basic models require minimal setup and upkeep, making them accessible even for beginners. Their simplicity does not compromise effectiveness or safety when used properly. Regular maintenance ensures longevity and optimal performance.
Common Mistakes When Mounting Heat Lamps
One common mistake is not securing the heat lamp properly. Loose fittings can cause the lamp to fall and break, posing a safety hazard. Always double-check all screws and brackets. Make sure they are tight and stable. This helps prevent accidents.
Another frequent error is placing the heat lamp too close to flammable materials. Items like paper, cloth, and wood can catch fire if exposed to high heat. Keep a safe distance between the lamp and any flammable objects. A good rule of thumb is to maintain at least a 12-inch clearance. This minimizes the risk of fire hazards.
Overlooking ventilation is another issue. Poor airflow can cause the lamp to overheat, reducing its lifespan and efficiency. Choose a location with good ventilation to ensure proper heat dissipation. This also helps in maintaining a consistent temperature. Regularly check to make sure vents and airways are not blocked.
Using the wrong wattage bulb is a mistake many make. A bulb that’s too powerful can overheat the area, while a weak one won’t provide enough warmth. Always refer to the manufacturer’s guidelines for the correct wattage. Matching the bulb to your specific needs ensures optimal performance. Incorrect wattage can also lead to higher energy bills.
Failure to use a protective cover is another significant error. Protective covers prevent direct contact with the hot bulb, reducing the risk of burns. They also keep debris and dust away from the lamp. Regularly inspect the cover for any damage. Replacing it when necessary maintains both safety and efficiency.
Various Types of Heat Lamps in the Market
When choosing a heat lamp, you’ll find several types available. Each offers unique features and benefits. One common type is the incandescent heat lamp. These are easy to find and relatively inexpensive. They provide both heat and light.
Ceramic heat lamps are another popular option. Unlike incandescent lamps, they don’t emit light, only heat. This makes them perfect for night-time use. They are durable and can last a long time. However, they tend to be more expensive.
Infrared heat lamps are also widely used. They produce infrared radiation, which penetrates deeply to provide efficient heating. These lamps are ideal for both animal enclosures and human spaces like bathrooms. They are energy-efficient and offer a consistent heat source.
Another type to consider is the halogen heat lamp. These are very efficient and produce a lot of heat. They are often used in commercial settings. Halogen lamps have a longer lifespan compared to incandescent bulbs. However, they also generate a lot of light, which might not be suitable for all applications.
There are also specialized heat lamps designed for specific needs. For instance, UVB heat lamps are essential for reptiles that require ultraviolet light for health. These lamps provide both warmth and UVB rays that aid in calcium absorption. Always consider the specific requirements of your application when choosing a heat lamp.
- Incandescent Heat Lamps
- Ceramic Heat Lamps
- Infrared Heat Lamps
- Halogen Heat Lamps
- UVB Heat Lamps
Essential Tips for Efficient Use of Heat Lamps
For efficient use of heat lamps, start by choosing the right wattage. A bulb that’s too strong may overheat the area, while a weak one won’t provide enough warmth. Always follow the manufacturer’s recommendations. Matching the wattage to your needs helps save energy. It also ensures optimal performance.
Positioning the heat lamp correctly is crucial. Place it at a height that allows even heat distribution. Use a stand or adjustable bracket for flexibility. This allows you to change the height as needed. Proper positioning prevents hot or cold spots.
Consider using a timer or thermostat. These devices can automatically turn the heat lamp on and off. A timer helps you manage lighting schedules easily. A thermostat can maintain a consistent temperature. Both options enhance energy efficiency and comfort.
Regular maintenance is key to efficient use. Clean the lamp and its protective cover to remove dust and debris. Inspect the wiring and other parts for signs of wear. Replacing worn-out components can prevent bigger issues. Consistent maintenance extends the life of your heat lamp.
Monitoring the temperature regularly is essential. Use a thermometer to check how well the heat is distributed. This helps you make necessary adjustments. Regular checks ensure that the lamp operates efficiently. Keeping an eye on temperature levels prevents overheating or underheating.
- Choose the Right Wattage
- Position Correctly
- Use a Timer or Thermostat
- Perform Regular Maintenance
- Monitor Temperature
Frequently Asked Questions
Mounting a heat lamp involves various considerations to ensure safety and efficiency. Here are some commonly asked questions to help you understand better.
1. What is the best material for mounting a heat lamp?
The best material for mounting a heat lamp is often metal. Metal brackets or clamps offer durability and can withstand high temperatures. Plastic or wooden materials may pose a fire risk, so it’s crucial to avoid them. Ensure the metal is corrosion-resistant for long-term use.
Simple installation tools like screws and drills are enough to secure the metal brackets firmly. Always double-check that all components are tight and stable. This reduces the risk of accidents caused by loose fittings. Regular inspection of these parts aids in maintaining stability.
2. How far should the heat lamp be from the area it heats?
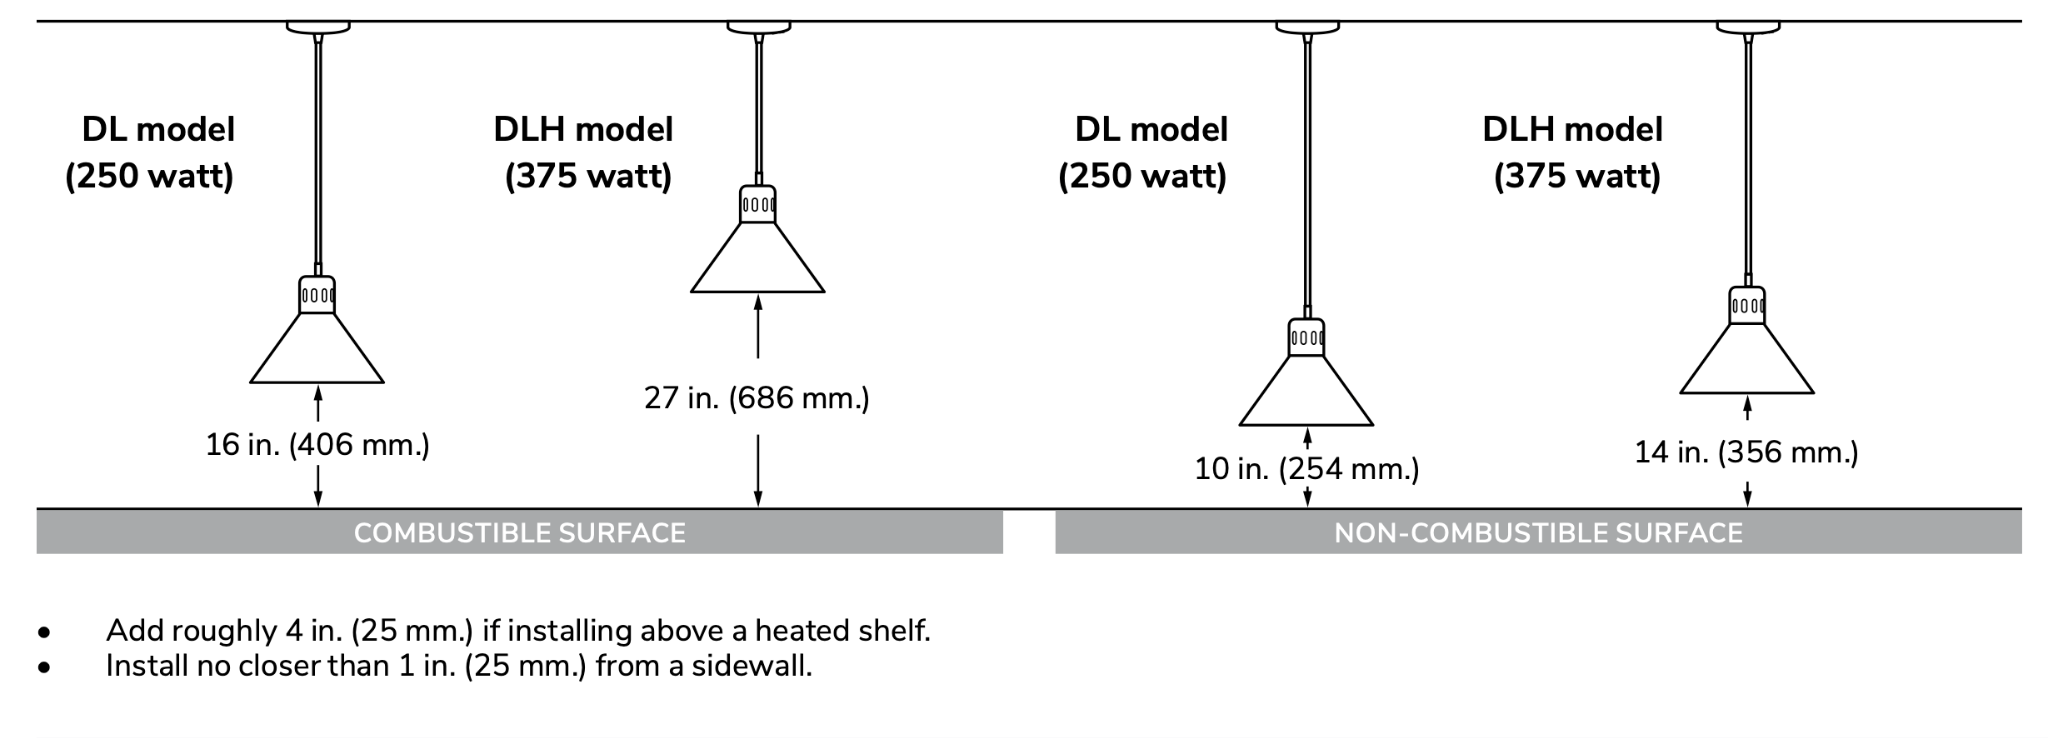
The distance between the heat lamp and the heated area varies based on your specific need. Generally, placing it 12 to 18 inches away provides effective and safe heating. Too close, and you risk overheating; too far, and it won’t provide sufficient warmth.
A thermometer can help monitor temperature levels accurately at different distances. Adjustments can be made easily with bracket or clamp-mounted lamps. Always follow manufacturer’s guidelines for specific distance recommendations tailored to your setup.
3. Can I use multiple heat lamps in one setup?
Yes, using multiple heat lamps in one setup is common, especially for larger areas needing consistent warmth. Multiple lamps ensure even distribution of heat across the entire space, avoiding hot spots or cold zones.
You should position each lamp strategically to cover different areas without overlapping excessively. Proper spacing avoids overheating any section while ensuring complete coverage of warmth where needed most effectively.
4. Are infrared heat lamps more efficient than regular ones?
Infrared heat lamps are generally more efficient than regular incandescent bulbs because they focus on producing heat rather than light. They penetrate deeply into objects or skin, providing faster and more effective warming compared to standard bulbs.
This efficiency makes infrared lamps ideal for both animal care and personal use like bathroom heaters during colder months., Using an energy-efficient option helps save on electricity bills over time while offering consistent performance suited perfectly towards targeted needs within diverse environments5: Do I need any special wiring for installing heat lamps?
PHowever ,safety first always important higher-wattage systems involving multiple devices,rating necessary safeguard proper functionality efficiently Running separate circuit breaker specifically assigned solely purpose reduce overloading risks.fusing failure mishaps leading potential hazards significant damages>.}
Conclusion
Mounting a heat lamp correctly involves several important steps that ensure safety and efficiency. From selecting the right type of lamp to securing it properly, each step plays a significant role. Regular maintenance and adhering to safety precautions add to the longevity and effectiveness of the lamp.
By following these guidelines, you create a safe and effective heating solution for various needs. This not only improves the environment for your pets or plants but also enhances energy efficiency. Remember, a well-installed heat lamp can make all the difference.

I’m Emily Johnson, an affiliate marketer and blogger focused on lamps and lighting. I share honest reviews, simple buying guides, and practical tips. My goal is to help readers choose the right lamp for their space, style, and budget with confidence.