
Ever considered transforming everyday kitchen ingredients into a mesmerizing piece of art? A lava lamp crafted using salt is not just a simple DIY project, but a fascinating way to explore density and chemical reactions. It’s an engaging activity that marries science and creativity beautifully.
The concept of the lava lamp dates back to the 1960s when it was originally designed using wax and oil. Salt, however, offers an equally captivating yet less conventional method of creating this iconic decoration. By leveraging the solubility and density differences between salt and water, you can recreate the hypnotic motion of a classic lava lamp.
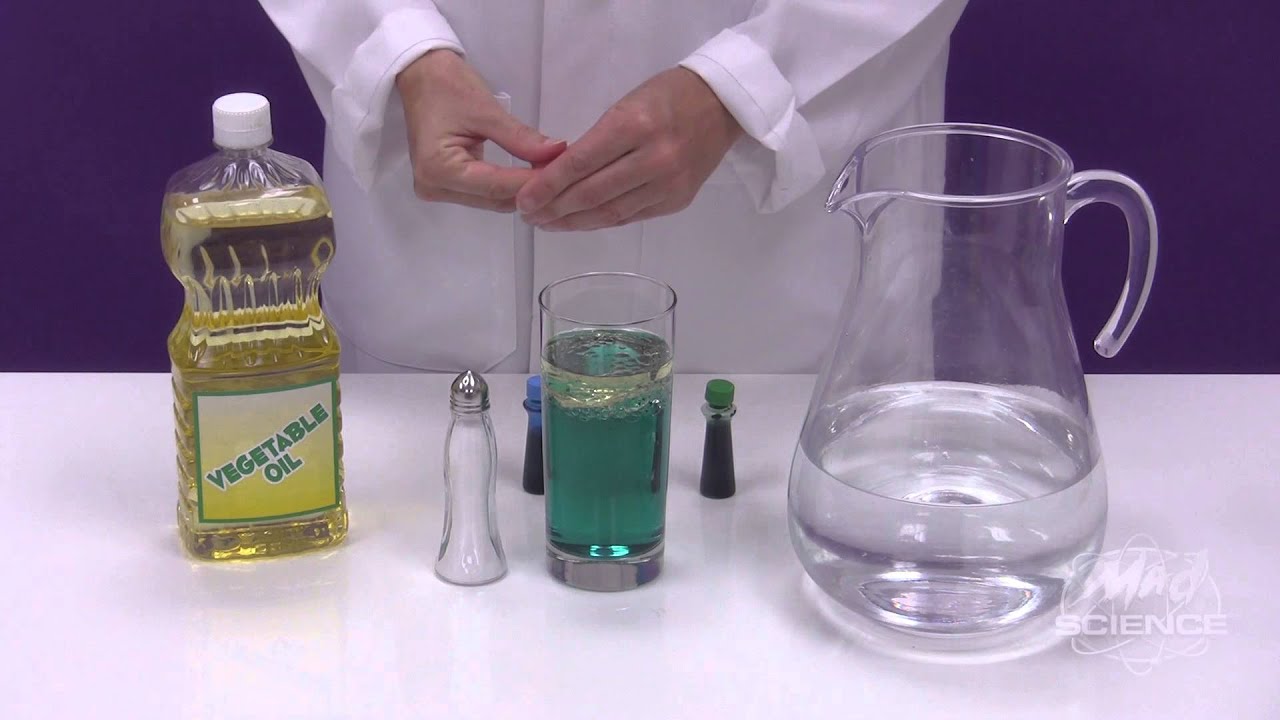
- Gather materials: clear plastic bottle, water, vegetable oil, food coloring, and table salt.
- Fill the bottle three-quarters full with water and add a layer of vegetable oil on top.
- Add a few drops of food coloring to the water for visual effect.
- Slowly pour in table salt to initiate the lava-like movement.
- Seal the bottle tightly and gently tilt to enhance interaction between the liquids.
Source: ytimg.com
How to Make a Lava Lamp With Salt
Creating a lava lamp with salt is a fascinating project that combines art and science. To begin, gather your materials: a clear plastic bottle, water, vegetable oil, food coloring, and table salt. Fill the bottle three-quarters full with water followed by a layer of oil. This mixture showcases the contrasting densities of oil and water. Interested in more lamp-related insights? Check this post for additional information.
Next, add a few drops of your chosen food coloring to the water. The color will add a beautiful touch to your homemade lamp. Now, pour in the salt slowly. As the salt sinks to the bottom, it pulls blobs of oil down with it. When the salt dissolves, the oil rises back to the top, which creates the iconic lava lamp effect.
This fun and educational activity not only entertains but also teaches basic chemistry concepts. The principle behind the lava lamp lies in the different densities of liquids and how they interact. The salt temporarily increases the density of the oil, causing it to sink, and when it dissolves, the oil floats back up. The looping motion is mesmerizing to watch.
You can customize your lava lamp by experimenting with different types of oils or adding more or less salt. Change the food coloring for a new look each time you use it. You may even find more ideas by reading diverse articles and posts. Making your own lava lamp can be a recurring family activity that is both fun and educational for everyone involved.
Step 1: Gather Your Materials
Before you start, you will need to gather a few simple materials for your salt lava lamp. Collect a clear plastic bottle, some table salt, vegetable oil, water, and food coloring. These items are often readily available in most households. Using these everyday items makes the project both affordable and accessible. Plus, it’s a fun way to repurpose common kitchen supplies.
Make sure the clear plastic bottle is clean and empty. This step is essential as impurities can affect the final result. Table salt is your primary ingredient for creating the lava effect. You will also need vegetable oil as it helps to create the separation between the liquids. Lastly, food coloring adds a visual appeal, making your lava lamp vibrant and exciting.
According to the this expert opinion, it’s crucial not to use Epsom salts in your lava lamp as they can cause issues. Stick to regular table salt for the best results. Gathering the right materials sets the foundation for a successful DIY project. Therefore, attention to detail matters from the very start.
Here’s a list of materials to get you started:
- Clear plastic bottle
- Table salt
- Vegetable oil
- Water
- Food coloring
Making sure you have all these items before you start will streamline the process. With everything in place, you’re ready to proceed to the next step.
Step 2: Prepare the Water and Salt Mixture
To prepare the water and salt mixture, you need to start by filling your clear plastic bottle three-quarters full with water. Room temperature water works best for this purpose. After filling, let the water sit for a few minutes to settle. This helps eliminate any air bubbles. Once settled, you can proceed with adding salt to the mixture.
When adding salt, start slowly to ensure it dissolves properly in the water. Use common table salt for the best results. Different salts might not mix as well or could create unwanted reactions. Giving the bottle a gentle shake can help the salt dissolve faster. Continue adding salt until it starts to collect at the bottom of the bottle.
Monitor the mixture closely as you add the salt. You are looking for a balance where some salt remains undissolved at the bottom. This excess salt increases the density of the water, making it easier for the oil to sink at first. Too much salt can also cloud the solution, so add gradually and observe the changes.
Once you’re happy with the salt concentration, set the bottle aside to stabilize. It’s important to let everything dissolve properly before moving on to the next step. This simple preparation sets the stage for the exciting lava lamp effects. Your water and salt mixture is now ready for the next phase.
Step 3: Assemble the Lamp
Now that you have your water and salt mixture ready, it’s time to assemble the lamp. Start by finding a stable surface to work on, as spills can get messy. Slowly pour vegetable oil into the bottle until it’s almost full. Remember, oil and water don’t mix, so you’ll see a clear separation between them. The oil will naturally float on top of the water.
Next, add a few drops of food coloring directly into the oil layer. This may sound odd, but the food coloring will eventually sink through the oil and mix with the water. Choose a color that stands out well against the clear liquid. Here’s how the layering should look:
| Layer | Description |
|---|---|
| Bottom | Water mixed with salt and food coloring |
| Top | Vegetable oil |
After adding the food coloring, seal the bottle tightly with its cap. This prevents any spills or leaks when you move the bottle. Now, flip the bottle upside down a couple of times to kickstart the interaction. Watch as blobs of colored water move through the oil, creating that iconic lava effect.
If you want to enhance your lava lamp experience, place a small flashlight or lamp under the bottle. The light passing through the layers will make the colors pop even more. You can use LED lights for a more eco-friendly option. Assembling your salt lava lamp correctly ensures a captivating display that will amaze everyone.
Feel free to experiment with different food coloring combinations to see how they blend. You might even mix multiple colors in layers for a stunning visual effect. Creativity plays a big role in making this DIY project a true masterpiece. Enjoy your newly made lava lamp and the mesmerizing show it puts on!
Step 4: Add Food Coloring for Effect
Once your lamp is assembled, it’s time to add food coloring for an eye-catching effect. Start with one to two drops of food coloring; a little goes a long way. The drops will pass through the oil and spread into the water underneath. You can use different colors to create a unique, layered look. Watching the colors interact with the salt and water is quite mesmerizing.
To create a multicolor effect, you could add colors one at a time. Wait for the first color to diffuse completely before adding the next. This way, the colors stay distinct rather than blending into a single hue. Here’s a practical list of color combinations you might enjoy:
- Red and blue for a purple mix
- Yellow and red for a fiery orange
- Green and blue for a teal effect
- Red, yellow, and blue for a rainbow look
Using more than just standard food coloring can give your lava lamp an extra flare. Neon and metallic food colorings are also available and can add a shiny or glittery effect to your lava lamp. These specialty colors are often available in baking sections of stores. They can create stunning visual effects when light hits them.
If you decide to use glow-in-the-dark or UV-reactive food coloring, consider lighting options. Place your lava lamp in a dark room with a black light nearby to see it glow. It’s an exciting choice for parties or as a nightlight. Ensuring you choose the right lighting enhances the overall magical experience of your lava lamp.
Feel free to experiment and have fun with this step. Whether you stick to classic single colors or get creative with combinations, adding food coloring is the final touch that brings your lava lamp to life. Enjoy the process and the beautiful, dynamic art piece you’ve created.
Step 5: Visualize the Lava Effect
After adding the food coloring, give your lava lamp a few minutes to settle. You should start seeing blobs of colored water floating through the oil. These blobs create the iconic lava effect. The cycle of sinking and rising depends on the differences in density between the water and oil. This dynamic motion is what makes lava lamps so mesmerizing.
To enhance the visual effect, place your lava lamp in a well-lit area or use a nearby light source. An LED lamp or a small flashlight can highlight the colors beautifully. Experiment with different lighting angles to see how the colors change. The interplay of light and color adds another layer of fascination. Here’s a helpful tip: avoid direct sunlight as it can heat the lamp and alter the effect.
If you notice the blobs are not moving much, try gently tilting the bottle. This encourages the interaction between the oil and water. Sometimes, small adjustments can make a big difference. For an even better effect, consider placing your lamp on a slowly rotating platform. This creates a continuous, dynamic display.
Another way to enhance visualization is by adding a small amount of glitter or glow-in-the-dark particles. These elements will float along with the colored blobs, adding sparkle and glow to the visual effect. Use them sparingly to avoid overcrowding the lava design. This extra touch makes your lamp stand out.
Watching your completed lava lamp in action is incredibly satisfying. The floating blobs provide endless entertainment and relaxation. Feel free to experiment with different designs and colors to see what you like best. Once you understand the basics, you can even adjust the oil and salt concentration to customize the lava flow speed. Enjoy the captivating beauty of your homemade lava lamp!
The Science Behind Salt Lava Lamps
Salt lava lamps work based on the principles of density and solubility. Density refers to how much mass a substance has in a given volume. Water is denser than oil, so when you pour oil into water, it floats. Adding salt to the mix temporarily changes these densities. As salt dissolves in water, it makes the solution denser and causes interesting interactions.
Here’s what happens step-by-step:
- First, the water becomes denser as salt dissolves in it.
- Then, blobs of oil are pulled downward by the dense salted water.
- The salt eventually dissolves completely, making the blobs less dense again.
- The less dense blobs then float back up to the top.
This repeating cycle creates the classic lava effect you’re familiar with in lava lamps.
This dynamic movement is also influenced by buoyancy, which is the force that makes objects float or sink. When blobs of oil become heavy with dissolved salt water, they sink due to gravity overcoming buoyancy. Once those blobs lose their added weight because the salt dissolves out, buoyancy pushes them back up to the surface. This interplay between gravity and buoyancy keeps your lamp’s display lively.
Temperature plays a crucial role too. Warmer temperatures can accelerate how fast salts dissolve and redeposit within the layers. If your room is too cold or hot, you might notice changes in how quickly or slowly your lava lamp “flows.” Ensuring an ambient room temperature helps maintain predictable and enjoyable motion within your lamp.
Certain types of salts might affect performance differently. Inappropriate salts like Epsom salts might not dissolve properly or could even cause clumping issues as noted in various sources. For instance, using basic table salt ensures consistency in achieving that ebbing-and-flowing look most effectively without complications from other additives found in specialized salts like Epsom (as mentioned earlier).
Safety Measures for Making a Salt Lava Lamp
Safety is crucial when making a salt lava lamp, particularly if children are involved. Always work in a well-ventilated area to avoid any potential irritation from spilled substances. Ensure the workspace is free from clutter to prevent accidents. Consider wearing protective eyewear just in case any liquid splashes. It’s also wise to keep a cloth or paper towels nearby for immediate clean-up.
When using food coloring, be cautious as it can stain both skin and surfaces. Use it sparingly and only under supervision if younger kids are helping. If any spills occur, clean them up right away to prevent stains from setting. Keeping disposable gloves on hand can also be useful. This helps you manage the project without worrying about stained fingers.
Vegetable oil can make surfaces slippery, so be extra careful not to spill it. If some oil does get on the floor or work surface, wipe it up immediately to avoid slipping hazards. Maintaining a tidy area reduces the risk of accidents. Additionally, avoid placing the bottle on uneven surfaces. A stable, flat area ensures the lamp stays upright.
Once the lava lamp is assembled, ensure the bottle cap is tightly secured. This will prevent spills and leaks when you move it around. It’s also a good idea to test the seal by gently shaking the bottle to make sure no liquid escapes. Proper sealing is essential for safety, especially if the lamp is being handled by kids.
If you choose to add any extra elements like glitter or glow-in-the-dark particles, make sure they are non-toxic and safe to use. Double-check the product labels for any warnings or precautions. Using non-toxic materials ensures an added layer of safety. By following these measures, you can enjoy the project while staying safe.
Customizing Your Salt Lava Lamps
Customizing your salt lava lamp allows you to get creative and make it uniquely yours. Start by experimenting with various food coloring combinations. You can add one color at a time or mix several for a rainbow effect. Consider layering different colors for a dynamic look. Watching how the colors interact adds an extra layer of fascination.
You can also try using different types of oils. While vegetable oil is the most common, oils like baby oil or mineral oil can give a different visual effect. They might have varying viscosities, which could affect how the blobs move. Test different oils in smaller batches first. This helps you find the perfect consistency for your lava lamp.
Adding embellishments like glitter or tiny beads can make your lamp more eye-catching. Choose materials that float at different levels in the liquid. This creates additional movement and sparkle. Non-toxic glitter is a popular choice since it’s safe and reflects light beautifully. Ensure any added materials are light enough to float without sinking permanently.
Don’t forget about the external appearance of your lava lamp. Decorating the bottle with stickers, paint, or colorful tape can make it stand out even more. A custom-designed bottle not only looks attractive but also complements whatever theme you’re going for. Personalizing the exterior makes your lamp a fun conversation piece.
If you’re tech-savvy, consider integrating LED lights for an extra pop of color. Placing a small LED base under the bottle can illuminate the whole lamp. Some LED bases even come with remote controls, allowing you to change colors or set light patterns. This feature can elevate your lamp from a simple DIY project to a high-tech art piece.
Frequently Asked Questions
Here are some common questions and answers related to making a lava lamp with salt. This information should help you understand the science behind it and troubleshoot any issues.
1. What types of oil can be used in a salt lava lamp?
You can use different types of oils like vegetable oil, baby oil, or mineral oil. Vegetable oil is commonly used due to its availability and cost-effectiveness. Baby oil and mineral oil provide different visual effects due to their varying viscosities.
Experimenting with different oils can give you unique results. Each type of oil affects how quickly or slowly the blobs move, adding distinct characteristics to your lava lamp’s display.
2. Why does the salt need to sink to the bottom?
The salt needs to sink so it can carry blobs of oil down through the water layer. As the salt dissolves, it releases the oil blobs, which then rise back up due to their lower density compared to water.
This process creates the visual effect of continuous motion in the lamp. It’s this sinking and rising action that makes lava lamps so captivating to watch.
3. Can I add glitter or other small objects for extra effects?
Yes, you can add glitter or tiny beads for extra visual appeal. Choose non-toxic materials that float well within the liquid mixture for best results.
The added elements will interact with the moving colored blobs, creating an even more dazzling effect. Just ensure not to overcrowd the bottle with too many additions.
4. How do I prevent leaks from my homemade lava lamp?
Tightly seal your bottle cap after assembling your salt lava lamp to prevent leaks. Testing the seal by gently shaking the bottle ensures no liquid escapes before full use.
If you’re still concerned about leaks, consider using a glue gun around the bottle cap edges for added sealing protection. Proper sealing keeps your project safe and mess-free.
5. Is temperature important in making a salt lava lamp?
Yes, temperature plays a crucial role in how well your lava lamp functions. The room temperature affects how fast salts dissolve and interact with oils inside the bottle.
A room that’s too hot may speed up reactions too much while being too cold might slow them down significantly. Keeping an ambient temperature helps maintain consistent movement within your lamp.
Conclusion
Creating a lava lamp with salt is not only a fun DIY project but also an excellent way to explore scientific principles like density and buoyancy. By following the simple steps and incorporating creative customizations, you can make a captivating and educational piece of art. The entire process is both engaging and educational, making it ideal for various age groups.
Safety measures ensure a smooth and enjoyable experience while experimenting with different techniques and materials. From using appropriate oils to adding unique visual elements, the possibilities are endless. This project encourages scientific curiosity and creativity, providing a perfect blend of fun and learning.

I’m Emily Johnson, an affiliate marketer and blogger focused on lamps and lighting. I share honest reviews, simple buying guides, and practical tips. My goal is to help readers choose the right lamp for their space, style, and budget with confidence.