To paint a brass lamp, first clean the surface thoroughly and use a primer designed for metal. Then, apply acrylic paint in thin coats, allowing each coat to dry completely before applying the next.
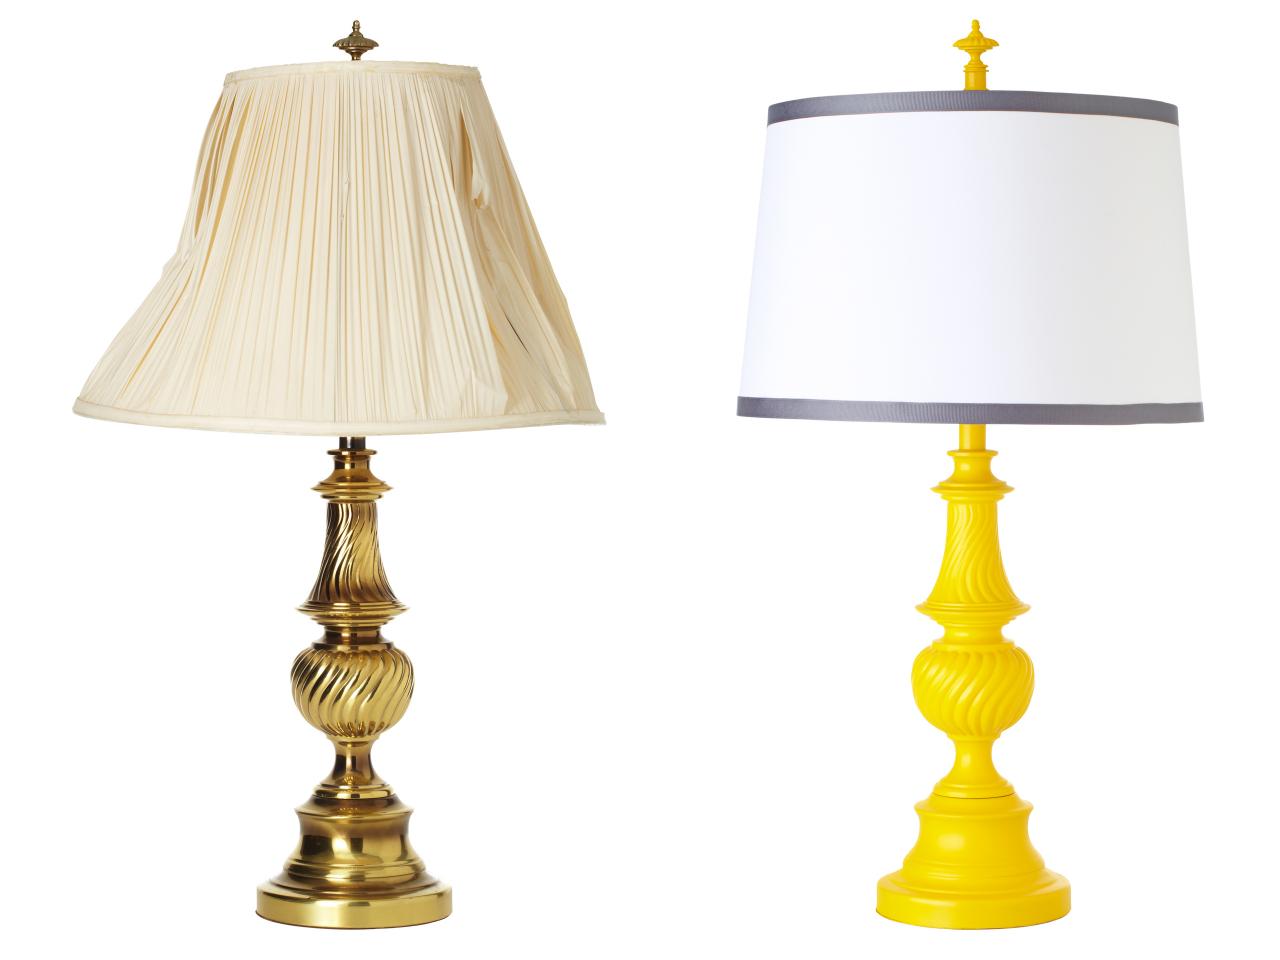
Have you ever looked at an old brass lamp and thought, “I wish I could give you a new look”? Well, guess what? You can! Painting a brass lamp is a simple and affordable way to update its appearance and breathe new life into your space.
In this blog post, we’ll walk you through the step-by-step process of how to paint a brass lamp. From choosing the right paint to prepping the surface and applying a smooth finish, we’ve got you covered.
So grab your paintbrush and let’s get started on transforming that tired old lamp into a stunning statement piece!
Credit: www.jennasuedesign.com
How to Paint a Brass Lamp for a Stylish Makeover? Revamp Your Space
Transforming a brass lamp through a fresh coat of paint is a simple yet effective DIY project that can breathe new life into your home decor. Whether you want to update the lamp to match a new color scheme or just give it a modern touch, painting it yourself can be a satisfying and budget-friendly solution.
In this guide, we’ll explore easy DIY techniques to paint a brass lamp, providing you with step-by-step instructions and tips to achieve a professional-looking finish. So, let’s get ready to revitalize your space with a personalized and rejuvenated brass lamp!
Materials And Preparation
When it comes to giving your brass lamp a fresh, new look, proper materials and preparation are key. By choosing the right paint, cleaning the brass surface, using a primer, and preparing the lamp for painting, you can achieve a professional-looking finish that will transform your lamp into a stunning decor piece.
Choosing The Right Paint
When it comes to painting a brass lamp, acrylic paint is a top choice. This type of paint is known for its durability and ability to adhere well to metal surfaces. It provides excellent coverage and creates a smooth, even finish. Look for acrylic paint specifically designed for metal surfaces, as this will ensure the best results.
Cleaning The Brass Surface
Before you begin painting, it’s crucial to thoroughly clean the brass surface. This will remove any dust, dirt, or grease that may affect the adhesion of the paint. Start by wiping down the lamp with a soft cloth and warm, soapy water. Be sure to reach all the nooks and crannies. After cleaning, rinse the lamp with clean water and dry it thoroughly with a clean cloth.
Using A Primer
Using a primer is essential when painting a brass lamp. The primer creates a smooth and even base for the paint to adhere to. It helps with paint adhesion, coverage, and durability. Look for a primer specifically designed for metal surfaces. Apply a thin, even coat of the primer to the lamp, following the manufacturer’s instructions. Allow the primer to dry completely before moving on to the next step.
Preparing The Lamp For Painting
Before applying the paint, it’s important to prepare the lamp for painting. Start by protecting any areas you don’t want to be painted with painter’s tape. This includes the electrical cord and any decorative elements you want to keep in their original color. Place a cut cardboard box or plastic sheet underneath the lamp to protect your work surface.
Now, it’s time to apply the paint. Shake the can of paint for a full minute to ensure proper mixing. Hold the can about 8-10 inches away from the lamp and spray a thin, even coat of paint. Keep your strokes smooth and consistent. Allow the first coat to dry completely before applying additional coats, if desired.
Once you’re satisfied with the coverage, carefully remove the painter’s tape and reassemble the lamp. Allow the paint to cure fully according to the manufacturer’s instructions before handling or using the lamp.
By following these steps and choosing the right paint, cleaning the brass surface, using a primer, and preparing the lamp for painting, you’ll be able to transform your brass lamp into a beautiful piece that complements your decor. Get ready to enjoy the results of your DIY project and impress your guests with your creative skills!
Painting Techniques
If you’re looking for a quick and efficient way to paint your brass lamp, the spray painting method is the way to go. This method provides an even and smooth finish, making your lamp look like new in no time.
Before you start, make sure you have a well-ventilated area to work in. Place a cut cardboard box on top of a protected surface to catch any overspray. Shake the spray paint can vigorously for a minute to ensure the paint is mixed properly.
Hold the spray can about 8-12 inches away from the lamp base and begin spraying in a sweeping motion, ensuring that the entire surface is covered with a thin coat of paint. Allow the paint to dry completely before applying additional coats.
Repeat the spraying process, adding more coats of paint until the lamp base is evenly covered. Remember to let the paint dry completely after each coat. Once dry, remove any tape or protective coverings and reassemble the lamp.
Acrylic paint is a great option for painting brass lamps as it provides durability and excellent adhesion to metal surfaces. Before you begin, clean the brass surface thoroughly to remove any dirt or grime. This will ensure that the paint adheres well.
Next, apply a primer specifically designed for metal surfaces to further improve adhesion. Allow the primer to dry according to the manufacturer’s instructions.
Once the primer has dried, you can start applying the acrylic paint. Use a high-quality brush or foam brush to evenly apply the paint to the lamp base. Apply thin, even coats and allow the paint to dry completely between each coat.
If you’re looking for a specific color or finish, you can mix different shades of acrylic paint to achieve your desired look. Experiment with different color combinations until you find the perfect match for your lamp.
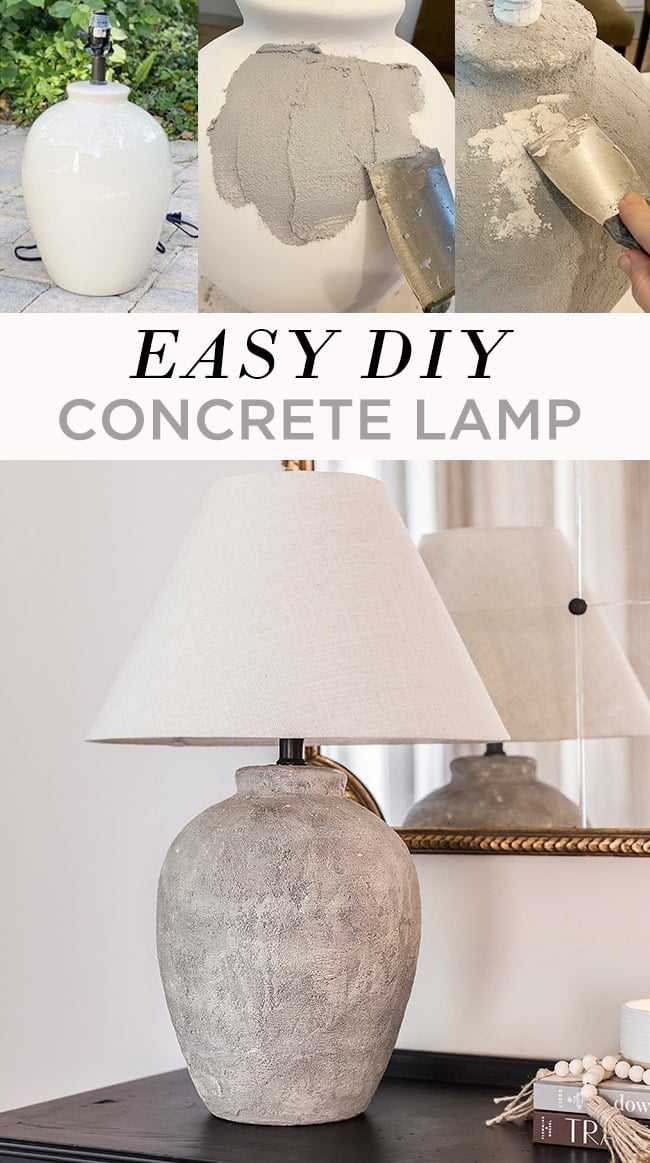
If you want to give your brass lamp a rustic or vintage look, chalk paint is an excellent choice. Chalk paint is easy to use and can provide a beautiful, matte finish to your lamp.
Start by cleaning the brass surface thoroughly, ensuring that all dirt and grime are removed. Unlike other painting methods, chalk paint doesn’t require a primer on metal surfaces.
Using a high-quality brush or foam brush, apply the chalk paint to the lamp base. Chalk paint has excellent coverage, so you may only need one or two coats. Allow each coat to dry completely before applying the next one.
If you want to enhance the distressed or aged look, you can use sandpaper to gently rub the edges or raised areas of the lamp base. This will give it a weathered appearance, adding to its overall charm.
Once the paint has dried and you’re happy with the finish, you can seal the chalk paint with a clear wax or varnish. This will protect the paint and give it a more durable finish.
Finishing Touches
Once you have completed the spray painting process and allowed the paint to dry completely, it’s time to add the finishing touches to your newly painted brass lamp. This final step will ensure that your lamp looks polished and professional.
Removing Tape And Reassembling The Lamp
Now that the paint has dried, carefully remove the painter’s tape that you used to protect certain areas of the lamp. Start by gently peeling off the tape from one corner, making sure not to damage the freshly painted surface. Slowly and steadily remove the tape, taking care to avoid any smudging or smearing of the paint.
Next, reassemble the lamp by putting back all the parts that you had taken apart before painting. This includes attaching the lampshade, finial, and any other components that were removed during the painting process. Make sure everything is securely in place and aligned properly.
Adding A Protective Finish
To ensure the longevity of your newly painted brass lamp, it’s essential to add a protective finish. This will not only enhance the appearance of the lamp but also provide a barrier against wear and tear.
There are various options for a protective finish, such as a clear varnish or lacquer specifically designed for metal surfaces. Apply the chosen protective finish according to the manufacturer’s instructions, making sure to cover the entire painted surface evenly. This will seal the paint and provide an added layer of protection.
Once you have applied the protective finish, allow it to dry completely. This may take a few hours or overnight, depending on the product used. Avoid touching or moving the lamp during this time to prevent any smudging or damage.
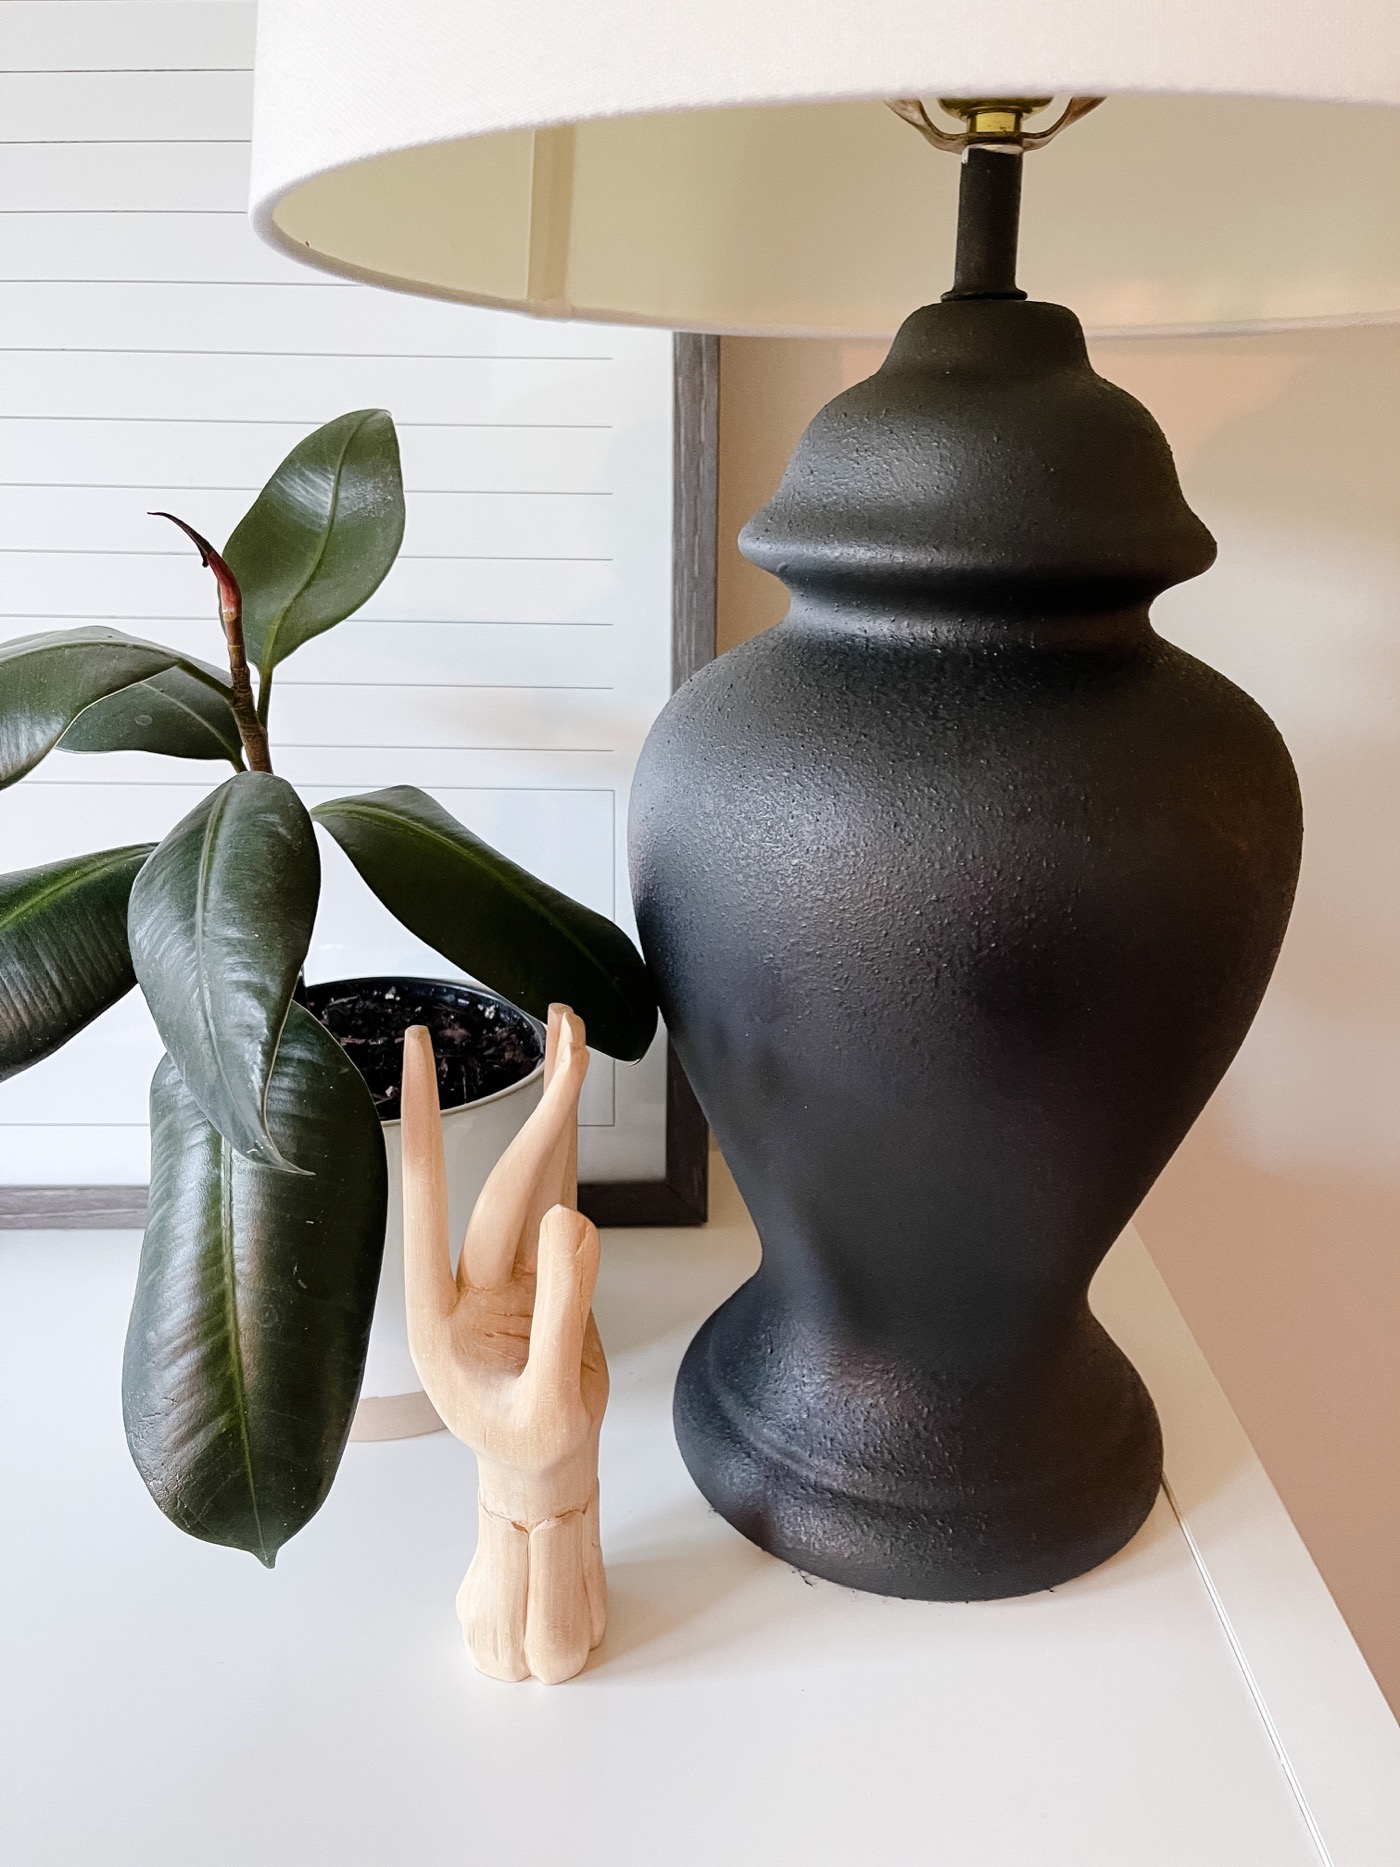
Lastly, step back and admire your beautiful painted brass lamp. With the finishing touches complete, your lamp is ready to be displayed in your home, adding a touch of elegance and style to any space.

Credit: www.pinterest.com
Troubleshooting And Tips
When it comes to painting a brass lamp, there can be a few common issues that you may encounter. Don’t worry, we’ve got you covered with some troubleshooting tips and handy advice to help you achieve a professional-looking finish. Let’s dive right in!
Dealing With Paint Drips
Pesky paint drips can be frustrating, but they’re not impossible to fix. Here’s what you can do to tackle them:
- Use a fine-grit sandpaper to gently sand away the drips once the paint has fully dried. Be careful not to sand too aggressively and damage the brass surface.
- If the drips are still visible after sanding, apply a second coat of paint to even out the surface. Remember to let each coat dry completely before applying the next one.
- If all else fails, consider using a small brush or a toothpick to touch up the drips with a fine, precise application of paint. This will help blend them in with the rest of the lamp.
Avoiding Common Mistakes
When painting a brass lamp, it’s essential to avoid some common mistakes that can affect the end result. Here are a few tips to keep in mind:
- Always clean the lamp thoroughly before painting to remove any dirt or oils that may prevent the paint from adhering properly. A mixture of vinegar and water works well for this step.
- Make sure to use a primer specifically designed for metal surfaces to ensure good adhesion and longevity of the paint.
- Apply thin layers of paint instead of thick coats to avoid drips and uneven coverage. Multiple thin coats will give you a smoother and more professional-looking finish.
- Properly ventilate the area while painting to avoid inhaling fumes. Consider working outside or in a well-ventilated room.
- Take your time and be patient. Rushing the process can lead to mistakes and a less-than-desirable outcome.
Tips For A Professional-looking Finish
If you want your brass lamp to have a polished and professional appearance, try following these tips:
- Use a high-quality acrylic paint that is specifically formulated for metal surfaces. This type of paint provides durability and excellent adhesion.
- Consider using a spray paint for a smooth and even application. Spray painting allows for better coverage and reduces the risk of brush strokes.
- Take your lamp apart before painting to ensure that every nook and cranny gets coated with paint.
- For a more professional look, apply a clear protective topcoat once the paint has fully dried. This will provide an added layer of protection and enhance the longevity of the paint job.
- Finally, don’t forget to clean your painting tools promptly after use to prolong their lifespan and ensure optimal performance for future projects.
By following these troubleshooting tips and handy advice, you’ll be well-equipped to paint your brass lamp with confidence, avoiding common pitfalls and achieving a professional-looking finish. Now, it’s time to grab your paintbrush and let your creativity shine!
Credit: lifelovelarson.com
Frequently Asked Questions For How To Paint A Brass Lamp
What Kind Of Paint Will Stick To Brass?
Acrylic paint is the best choice for painting brass. Clean the brass surface thoroughly and use a metal primer before painting for good adhesion. Spray painting is also an option, but be sure to clean the lamps and tape off any electrical components before painting.
Avoid using chalk paint on brass.
Can I Paint My Brass Lamps?
Yes, you can paint your brass lamps with acrylic paint. Clean the surface thoroughly, use a metal primer, and apply the paint evenly. Make sure to let each coat dry completely before applying the next one. Spray painting is recommended for easy application.
What Kind Of Paint Do You Use On A Metal Lamp?
To paint a metal lamp, use spray paint. Choose a brand with a built-in primer and pick your desired color and finish. Options include gloss (shiny), satin (medium shine), or flat (matte). Ensure the lamp is clean before applying the paint.
Can You Paint A Brass Lamp With Chalk Paint?
Yes, you can paint a brass lamp with chalk paint. Chalk paint adheres well to metal surfaces, including brass. Make sure to clean the lamp thoroughly before applying the chalk paint for better adhesion.
Conclusion
Transforming a brass lamp with a fresh coat of paint is an easy and affordable way to update your home decor. By using acrylic paint designed for metal surfaces, you can ensure durability and good adhesion. Before painting, make sure to thoroughly clean the brass surface and apply a primer.
Spray painting is a popular and effective technique for achieving an even and professional-looking finish. With the right paint and proper preparation, you can give your brass lamp a brand new look that fits your style. So, grab your paintbrush and get ready to add a touch of charm to your living space.

I’m Emily Johnson, an affiliate marketer and blogger focused on lamps and lighting. I share honest reviews, simple buying guides, and practical tips. My goal is to help readers choose the right lamp for their space, style, and budget with confidence.