There’s a certain satisfaction in bringing new life to an old lamp. As professionals, we understand that rewiring a table lamp not only ensures safety but also preserves the character of a beloved fixture. Perhaps you’ve encountered an antique lamp in dire need of updated wiring, a task that, with skill and precision, can be both rewarding and straightforward.
Rewiring a table lamp begins with a clear understanding of its construction and history. Often, older lamps were built with materials that degrade over time, making rewiring an essential step to prevent hazards. According to the National Fire Protection Association, electrical failures or malfunctions ignited roughly 44,880 home fires annually, underscoring the importance of such maintenance.
- Unplug the lamp and gather necessary tools: screwdriver, wire cutters, and replacement cord set.
- Remove the lampshade, bulb, and unscrew the base to access internal components.
- Thread new electrical cord through the lamp base, strip insulation from wire ends, and connect to appropriate terminals.
- Secure connections with wire nuts or clamps, ensuring all wires are properly insulated.
- Reassemble the lamp by replacing the socket in its position and securing the base with screws.
- Plug in the lamp and test for proper functionality to complete rewiring.

How to Rewire a Table Lamp
Rewiring a table lamp starts with gathering the right tools. A screwdriver, wire cutters, and a replacement cord set are essential. Before you begin, unplug the lamp for safety. Ensure you have a clean workspace with good lighting. These small steps help make the process smooth.
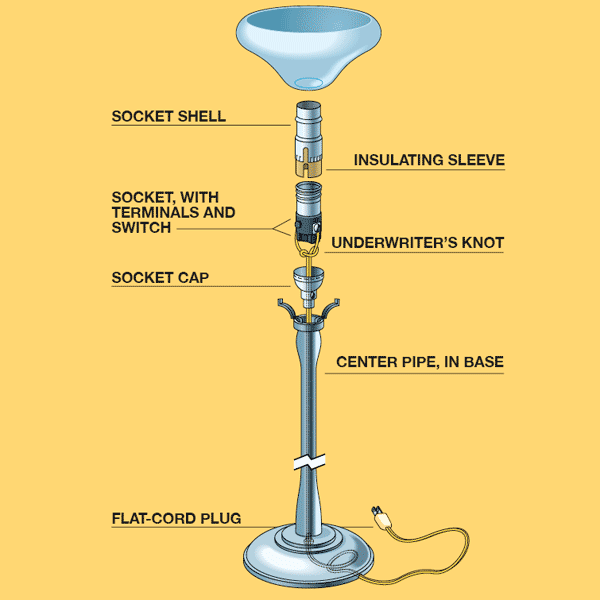
Begin by removing the lampshade and bulb. Next, unscrew the base to access the internal components. Carefully take out the old wiring. When doing this, remember where each wire goes. It will make reassembly easier later.
Now, take your new cord and thread it through the lamp’s base. Attach the wires to the appropriate connections, usually marked by screws. Tighten these connections securely. This will prevent any loose wires that could cause malfunctions. Check all connections twice.
Reassemble the lamp by screwing the base back into place. Put the bulb and lampshade back on. Finally, plug in the lamp to test it. If it lights up, your rewiring job was a success. It’s that simple!
Step 1: Safety Precautions and Equipment Preparation
Safety is the first and foremost step when rewiring a lamp. Always unplug the lamp before starting any work. This prevents accidental shocks. Ensure your workspace is dry and free from any liquids. A dry environment reduces the risk of electrocution.
Gather all the necessary tools before you begin. Common tools include a screwdriver, wire cutters, and a multimeter. Having everything ready makes the process easier. Double-check you have the right type of replacement cord. This ensures compatibility with your lamp.
It’s also wise to wear safety gloves. These protect your hands from sharp wires. Safety glasses are another good idea. They keep debris and small particles out of your eyes. Your safety gear should be comfortable.
Understanding the layout of your lamp is crucial. Take a few minutes to look over its structure. Knowing where the wires go will help later. Use a notepad to jot down important steps. This way, you won’t forget any crucial details.
Step 2: Disassembling the Table Lamp
Start by removing the lampshade and bulb. This gives you access to the internal parts. Set them aside in a safe place. Make sure you don’t lose any screws. They can be tricky to replace.
Next, use a screwdriver to remove the screws at the base. Once the base is open, you will see the internal wiring. Carefully pull out the old cord. Take note of how the wires are connected. This will be useful when you install the new wiring.
Inspect the socket and other components. Look for any signs of wear or damage. Sometimes, these parts also need to be replaced. It’s better to catch potential issues early. This ensures the lamp will work well once reassembled.
Keep all parts organized on your workspace. Sort screws and small components into separate containers or sections. This makes reassembly easier. Labeling parts can also help, especially if it’s your first time disassembling a lamp. Being organized saves time and avoids mistakes.
Step 3: Proper Wiring and Connections
Thread the new electrical cord through the lamp base. Make sure it extends enough to reach the socket. Strip about half an inch of insulation from the ends of the wires. This is where the connection will be made. It’s important for a solid connection.
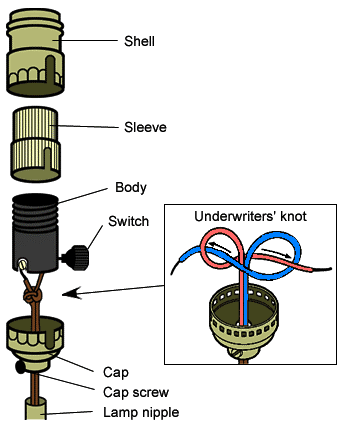
Connect the wires to the socket. Usually, there are two screw terminals, one brass and one silver. Attach the neutral wire (usually white) to the silver terminal. Attach the hot wire (usually black or colored) to the brass terminal. Tighten the screws securely.
Use wire nuts to secure any other connections inside the lamp. Twist the wires together before screwing on the wire nuts. This ensures a tight and safe connection. Cover exposed wires with electrical tape. This adds an extra layer of safety.
Refer to a wiring diagram if you are unsure about connections. These diagrams can be found online or in electrical manuals. They provide a visual guide for proper wiring. Following a diagram helps avoid common mistakes. It’s a helpful tool for anyone new to wiring.
Once all connections are made, gently tug on the wires. This checks the security of your connections. If they stay in place, you’ve done it correctly. Loose connections can cause malfunctions. Ensuring tight connections is crucial for safety and functionality.
Finally, reinstate the socket into the base of the lamp. Make sure all wires are tucked inside neatly. Reassembly should be smooth if everything is connected properly. Now the lamp is ready for testing. This step completes the wiring successfully.
Step 4: Reassembling the Lamp
Begin by placing the socket back into its original position. Ensure all wires are tucked safely inside the lamp base. Carefully screw the socket into place. This will secure it firmly. Make sure it’s aligned correctly.
Now, reattach the base of the lamp. Use the screws you set aside earlier. Tighten them securely using your screwdriver. Double-check each screw. This step ensures the lamp is stable.
Next, reinsert the light bulb into the socket. Make sure it’s screwed in tightly. Attach the lampshade back to its original place. This completes the external structure. Each component should fit snugly.
Finally, inspect the entire lamp for any loose parts. Wiggle each part to make sure they are securely fastened. Arrange any cords neatly to avoid tangles. A quick check prevents potential issues later. This step brings your lamp back to working order.
Use a checklist to ensure nothing is missed:
- Socket securely in place
- Base reattached tightly
- Light bulb properly inserted
- Lampshade attached
- All screws tightened
With everything in place, your lamp should be ready for a final test. This marks the end of the reassembling process. If all steps are followed correctly, the lamp will be ready for use.
Step 5: Testing the Rewired Lamp
After reassembling the lamp, it’s time to test it. Make sure the lamp is placed on a stable surface. Plug the lamp into an electrical outlet. Turn on the switch. Watch for any signs of malfunction.
Keep an eye out for flickering lights. This could indicate a loose connection inside the lamp. If everything is properly connected, the light should turn on smoothly. Listen for buzzing or unusual sounds. These sounds can signal wiring issues.
If the lamp doesn’t turn on, unplug it immediately. Double-check all connections inside the lamp. Ensure the wires are securely attached to the terminals. Sometimes, even a small adjustment can fix the problem. Safety should always be your priority.
For added security, use a multimeter to check for continuity. This ensures the flow of electricity is unbroken. Place the multimeter probes on the lamp’s plug prongs. A continuous beep or reading confirms proper wiring. This final check adds an extra layer of safety.
After confirming the lamp works, inspect it one last time. Ensure all parts are securely in place. Tighten any loose screws or connections. Your rewired lamp should now function correctly. Enjoy the bright, steady light of your safely rewired lamp!
Safety Aspects of Lamp Rewiring
When rewiring a lamp, safety should be your top priority. Always start by unplugging the lamp from any power source. This simple step can prevent serious accidents. Use a voltage tester to ensure there’s no residual current. This adds an extra layer of protection.
Proper insulation is essential for safe rewiring. Wires should have undamaged insulation to prevent shorts and shocks. If you find frayed or exposed wires, replace them immediately. Electrical tape can cover minor damages but is not a permanent solution. High-quality materials are worth the investment.
A well-lit workspace helps you see what you’re doing, reducing mistakes. Make sure the area is dry and free of moisture to avoid electric shocks. Organize your tools and parts so they’re easy to find. Good lighting and organization can make the job safer and faster. Safety gear like gloves and goggles also add protection.
When connecting wires, always follow color codes: white or gray for neutral, black for hot, and green or bare wire for ground. A wrong connection can create fire hazards or electrical failures. Secure all connections tightly using wire nuts or clamps designed for electrical use.
| Wire Color | Function |
|---|---|
| White or Gray | Neutral |
| Black | Hot |
| Green/Bare Wire | Ground |
If you’re unsure about any step, consult a professional electrician. Even small errors in wiring can lead to significant safety issues later on. Sometimes paying for expert help is cheaper than fixing costly mistakes later on. Always prioritize proper techniques over speed when it comes to electrical work.
Understanding the Importance of Regular Lamp Maintenance
Regular lamp maintenance is crucial for safety and longevity. Dusting the lampshade and base helps the lamp operate efficiently. Over time, dirt and grime can affect the light output. Make it a habit to clean your lamp regularly. This small effort can make a big difference.
Inspecting the electrical cord periodically is also important. Look for fraying or exposed wires. These can be signs that the lamp needs rewiring. Addressing these issues early can prevent electrical hazards. A damaged cord should be replaced promptly.
Lamps with adjustable parts can loosen over time. Tighten any screws or bolts to keep the lamp stable. An unstable lamp can tip over, causing damage or injury. Regular checks ensure that all parts remain secure. This keeps the lamp functioning properly.
Replacing burnt-out bulbs immediately is another good practice. A bad bulb can sometimes cause strain on the lamp’s wiring. Use bulbs with the correct wattage to avoid overheating. Incorrect wattage can damage the lamp and pose a fire risk. Follow the manufacturer’s guidelines to ensure safety.
- Dust lampshade and base
- Inspect electrical cord
- Tighten adjustable parts
- Replace burnt-out bulbs
- Use correct wattage
By caring for your lamp routinely, you can enjoy a well-lit, safe environment. Regular maintenance extends the life of your lamp. It minimizes the need for costly repairs. So, make sure to include your lamp in your regular cleaning schedule. Your effort will pay off in the long run.
Troubleshooting Common Lamp Wiring Problems
Sometimes, a lamp might not work as expected. One common issue is a loose connection. To fix this, unplug the lamp and check all the connections. Tighten any loose screws or wires. This small adjustment can often solve the problem.
Flickering lights are another frequent complaint. This can be caused by a faulty bulb or socket. First, try replacing the bulb. If the flickering continues, inspect the socket for wear and tear. Replacing a damaged socket can restore normal function.
If the lamp doesn’t turn on at all, check the cord for damage. Look for frayed wires or bends. Sometimes, a damaged cord needs replacing. Use a multimeter to test for continuity in the cord. This tool can help pinpoint the issue accurately.
A short circuit can happen if wires touch each other. This is a serious problem that requires immediate attention. Unplug the lamp and open the base to inspect the wiring. Separate any touching wires and secure them with electrical tape. Replace any damaged wires to prevent future issues.
Another issue could be tripped breakers. If your lamp keeps causing your circuit breaker to trip, there might be a problem with the internal wiring. Consult an electrician if you’re unable to find the problem yourself. Professional help can ensure the lamp is safe to use.
- Loose connections
- Faulty bulbs or sockets
- Damaged cords
- Short circuits
- Tripped breakers
Identifying and fixing these common problems can save you time and money. Always prioritize safety when dealing with electrical issues. If in doubt, seek professional assistance. Maintaining your lamp properly can ensure a longer lifespan and safer use.
Professional Help vs DIY for Lamp Rewiring
Deciding between professional help and DIY for lamp rewiring can be challenging. DIY rewiring can save money. It also provides a sense of accomplishment. However, it requires basic electrical knowledge. Mistakes can lead to safety hazards.
Professional help ensures the job is done correctly. Electricians are trained to handle complex wiring issues. They can identify problems that may not be obvious to amateurs. Hiring a professional may cost more initially. But, it can save money in the long run by preventing potential hazards.
Consider your skill level when making the decision. If you’re comfortable with tools and wiring, a DIY approach might be suitable. Follow safety guidelines and double-check connections. A well-done DIY project can be very rewarding. It also provides valuable learning experience.
On the other hand, if you’re unsure or lack experience, professional help is advisable. Electricians have the tools and expertise to ensure the job is safe. They can complete the task more quickly and efficiently. Hiring a pro reduces stress and ensures peace of mind.
- Cost-saving
- Sense of accomplishment
- Basic electrical knowledge required
- Mistakes can lead to hazards
- Trained professionals for complex issues
- Potential long-term savings
Weigh the pros and cons before deciding. If safety and reliability are your top priorities, hiring a professional is the best choice. For those confident in their skills, DIY offers a fulfilling alternative. Either way, proper wiring is crucial for a functional and safe lamp.
Frequently Asked Questions
Rewiring a table lamp might seem intimidating, but it is manageable with the right guidance. Below are some common questions that experts often encounter when tackling this task.
1. What tools do I need to rewire a table lamp?
For rewiring a table lamp, you typically need a screwdriver, wire cutters, and a replacement cord set. It’s also handy to have wire strippers and electrical tape for added safety measures.
A multimeter can be useful for checking continuity and ensuring there are no wiring issues. Having these tools prepared beforehand will make the process smoother and more efficient.
2. How long does it take to rewire a table lamp?
The time required to rewire a table lamp varies depending on experience and complexity. For most simple lamps, the process can take about 30 minutes to an hour.
If you encounter complications or are new to this task, it may take longer. Patience and precision are key to ensuring the job is done correctly.
3. Can I use any type of electrical cord for rewiring my lamp?
No, it’s important to use the correct type of cord meant for lamps, known as zip cords or SPT cords. These cords are usually labeled as SPT-1 or SPT-2 based on insulation thickness.
Using unsuitable cords can lead to safety hazards or poor performance of your lamp. Always check compatibility before purchasing replacement parts.
4. What safety precautions should I take when rewiring a lamp?
Always unplug the lamp before starting any rewiring work to avoid electrical shocks. Wear insulated gloves and goggles for additional protection against sharp wires and debris.
Ensure your workspace is dry and well-lighted to minimize risks of accidents while handling electrical components. Double-check each connection carefully before plugging in the rewired lamp.
5. How can I ensure my connections are secure?
Tighten all screw terminals snugly but without over-tightening them; overtightening could damage wires or components. Use wire nuts where necessary for secure connections between wires.
A gentle tug on each connected wire helps verify that they’re firmly attached without being loose.They should hold steady even with slight pressure applied.
Final Thoughts
Rewiring a table lamp can be a rewarding project that enhances both safety and functionality. With the right tools and precautions, it becomes a straightforward task even for beginners. Regular maintenance keeps lamps in optimal condition, extending their lifespan.
Whether you choose to DIY or seek professional help, the key is to prioritize safety. A well-maintained lamp not only brightens your space but also ensures peace of mind. So, don’t hesitate to give new life to your old fixtures.

I’m Emily Johnson, an affiliate marketer and blogger focused on lamps and lighting. I share honest reviews, simple buying guides, and practical tips. My goal is to help readers choose the right lamp for their space, style, and budget with confidence.