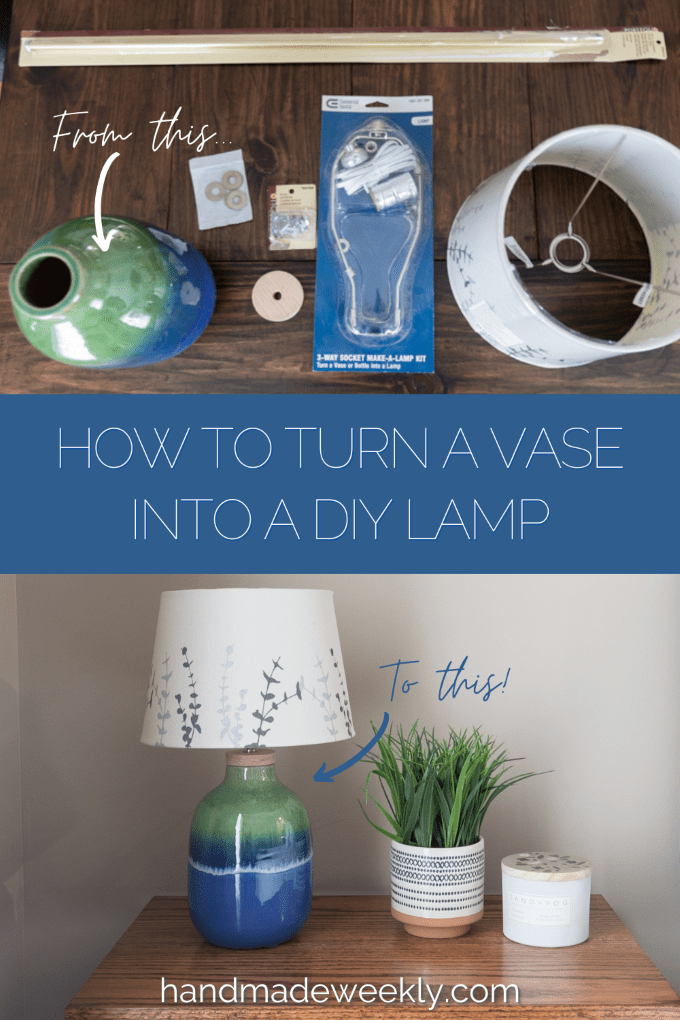
Transforming a vase into a functional table lamp can be a delightful fusion of art and practicality. Picture an old, unused vase collecting dust, then envision it bursting to life as a chic lamp, casting warm light in your living space. Such a transformation is not only aesthetic but sustainable, breathing new life into an otherwise forgotten object.
Creating a table lamp from a vase is not just a creative endeavor but also an echo of historical versatility in lighting design. In fact, DIY solutions like these have surged by 25% in recent years, reflecting a growing trend in personalized home decor. Using simple tools and a bit of ingenuity, you can turn a mundane vase into an elegant light source, adding a unique touch to any room.
- Gather your materials: vase, lamp kit, drill with glass/ceramic bit, lampshade, safety gear.
- Drill a hole in the vase for the lamp cord.
- Install the lamp kit by feeding the cord and securing the socket.
- Attach the harp and lampshade holder to the socket.
- Screw on the finial and attach the lampshade securely.
- Connect and test your lamp to ensure proper functionality.

How to Make a Table Lamp from a Vase
Creating a table lamp from a vase is a fun and crafty project. First, gather your materials: a vase, a lamp kit, a lampshade, and a drill. You’ll also need a drill bit made for glass or ceramic if your vase is composed of those materials. Once you have everything, you can begin the transformation.
To start, carefully drill a hole in the bottom of the vase. This hole will allow the cord to pass through easily. Take your time to avoid cracking the vase. Safety goggles and gloves are a good idea when handling power tools. Once the hole is drilled, thread the lamp cord through it.
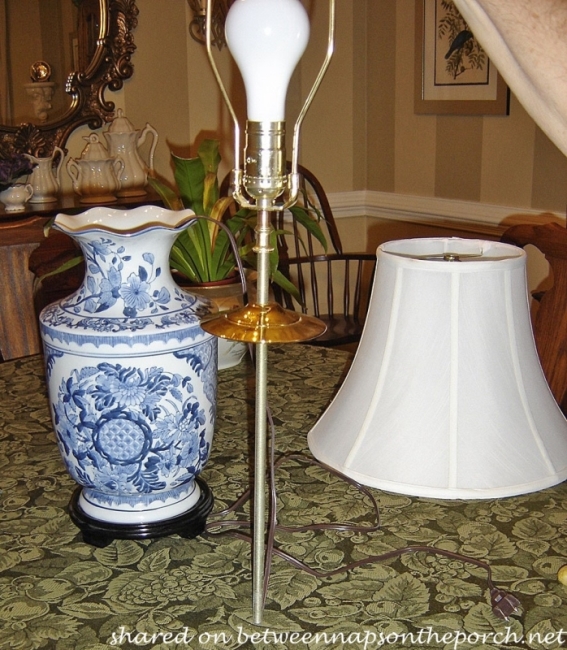
Next, install the lamp kit according to the instructions provided. Most kits include parts like a socket, harp, and base. Secure the socket to the top of the vase and assemble the harp to hold the lampshade. Make sure all connections are tight and secure.
Finally, attach the lampshade to the harp. Screw in a light bulb, plug in the lamp, and test it. If it works, you’ve succeeded in creating a unique table lamp from a vase. This DIY project adds a personal touch to your home’s decor and can make an old vase useful again.
Step 1: Gather Your Materials
Before you start, make sure you have all the necessary materials. This ensures that your project goes smoothly without any interruptions. The key materials you’ll need include a vase, a lamp kit, a lampshade, and a drill with a special bit if your vase is glass or ceramic. Make sure the vase size fits well with the lampshade you choose. Don’t forget safety gear like goggles and gloves for protection.
Besides these main items, you should also have a few common tools. You might need pliers, a screwdriver, and some electrical tape to secure connections. These tools help you work efficiently and safely. Having them ready makes the assembly process quicker.
It’s also helpful to have a clean workspace. A clutter-free area lets you organize materials and avoid losing small parts. Lay out everything before you start, so you can easily reach what you need. This setup helps in preventing accidents and keeps you focused on the project.
Here’s a quick checklist to ensure you don’t miss anything:
- Vase
- Lamp kit
- Lampshade
- Drill with appropriate bit
- Pliers
- Screwdriver
- Electrical tape
- Safety goggles and gloves
By gathering these materials, you’ll be ready to transform your vase into a stylish table lamp.
Step 2: Drill a Hole in the Vase
Drilling a hole in the vase is a crucial step in creating your table lamp. Begin by marking the spot where you want the cord to exit the vase. This is usually on the bottom or lower side of the vase. Use a pencil to lightly mark the spot. Double-check the placement to make sure it aligns with the base of your lamp kit.
Next, attach the appropriate drill bit to your drill. For ceramic or glass vases, you’ll need a specialized drill bit to prevent cracking. Put on your safety goggles and gloves before you begin drilling. Slowly and gently drill into the vase, applying steady pressure. It’s essential to go slow to avoid damaging the vase.
Here are some safety tips to consider:
- Wear safety goggles to protect your eyes
- Use gloves to keep your hands safe
- Drill at a slow speed to avoid cracking the vase
- Keep a steady hand and apply even pressure
Following these tips ensures a smooth process and helps you avoid accidents.
After the hole is drilled, clean the area to remove any dust or debris. Inspect the hole to ensure it is smooth and large enough for the lamp cord. If there are any rough edges, you can gently sand them down. Now, your vase is ready for the next step in the lamp-making process.
Step 3: Install the Lamp Kit
Installing the lamp kit is where your vase starts looking like a real lamp. Begin by feeding the lamp cord through the hole you drilled. Pull enough cord through so you can easily connect it to the socket. Make sure the cord is straight and not tangled.
Next, attach the base of the lamp kit to the top of the vase. Most lamp kits come with a threaded pipe that fits securely into the vase. Screw this pipe into the base of the lamp kit. Ensure it is tight, so it will hold the socket firmly. This foundation is essential for the stability of your lamp.
Now, it’s time to connect the electrical components. Follow the instructions provided with your lamp kit carefully. Typically, you’ll need to attach the wires from the cord to the socket. Use electrical tape to secure the connections and to make them safe. Double-check the wiring to ensure there are no loose connections.
After connecting the electrical components, assemble the rest of the lamp kit. This usually involves attaching the harp, which holds the lampshade, to the socket. Secure the harp properly to ensure it stays in place. The last step is to install the light bulb. Screw it into the socket, making sure it fits snugly.
Here’s a list of components you might work with:
- Lamp cord
- Threaded pipe
- Socket
- Harp
- Light bulb
By carefully following these steps, your lamp will come together nicely.
Step 4: Arrange the Lampshade Holder and Harp
Arranging the lampshade holder and harp is a crucial step in completing your lamp. Start by attaching the harp base to the socket. Make sure it’s firmly secured, providing a stable foundation for the lampshade. The harp usually comes in two parts that snap together around the socket. Once aligned, they lock into place.
Next, fit the lampshade holder, which is typically part of the harp system. This holder will keep your lampshade in place and ensure it sits correctly. Slide the holder onto the harp, adjusting it for height. Some lampshade holders have adjustable clips, making it easy to find the perfect position. Check that the holder is level for a properly aligned shade.
Now, attach the lampshade to the holder. Most lampshades have a finial or knob at the top that screws down, securing the shade to the harp. Tighten this finial to hold the lampshade firmly. Ensure the lampshade is straight and centered. Adjust as needed to get an even look.
Here’s a quick recap of the steps:
- Attach the harp base to the socket
- Fit the lampshade holder onto the harp
- Adjust the holder for proper height
- Screw on the finial to secure the lampshade
Following these steps ensures your lampshade will stay in place and look great.
Finally, give everything a final check. Make sure the lampshade is stable and straight. Lightly tug on the harp to ensure it is secure. If all looks good, your lamp is almost ready to illuminate your space. This step adds a professional touch to your DIY lamp project.
Step 5: Connect the Lampshade
Connecting the lampshade is the final step in your lamp-making journey. Start by placing the lampshade onto the harp, ensuring it sits properly on the holder. Align it so that it is straight and centered. This step is crucial for the lamp’s overall appearance.
Secure the lampshade using the finial, which is the decorative knob on top. Screw the finial onto the threaded rod at the top of the harp. Tighten it just enough to hold the shade firmly in place. Be careful not to over-tighten, as this can cause the shade to crack.
Here’s a brief checklist for this step:
- Place the lampshade onto the harp
- Ensure it is straight and centered
- Screw the finial onto the harp’s threaded rod
- Tighten to secure the shade
Following this checklist helps ensure the lampshade is properly attached and secure.
Now, check the entire assembly to make sure everything is in place. Tug lightly on the shade to ensure it doesn’t wobble. If all is secure, your lamp is ready for use. Turn on the lamp to see your creation light up the room. This step completes your transformation of a vase into a functional table lamp.
The Importance of Proper Wiring in Lamp DIY
Proper wiring is essential when creating a DIY lamp from a vase. Incorrect wiring can lead to potential hazards like electrical fires or short circuits. Ensuring all connections are secure and correctly installed is vital for your safety. It’s also necessary for the efficient functioning of the lamp. Taking time to wire carefully will result in a safer and more effective lighting solution.
One crucial aspect is using the right type of wires and connectors. A standard lamp cord is usually sufficient, but make sure it matches the socket specifications. Always double-check that the cord’s insulation is intact and not frayed. Use quality connectors to join wires securely, reducing the risk of loose connections.
Here are some tips for proper wiring:
- Always turn off power before handling any electrical components
- Use only compatible parts and connectors
- Double-check wire insulation for any damage
- Tightly secure all connections with electrical tape
Following these tips will help ensure safe and reliable wiring.
Next, consider labeling your wires if you take breaks between steps. This makes it easier to resume work without confusion. Also, keeping an organized workspace helps prevent mistakes and makes it simpler to focus on correct wiring procedures. Proper attention to detail during this step makes a big difference in both safety and performance.
Investing in a multimeter can be beneficial as well. This tool helps verify that all connections are live and working properly before fully assembling the lamp. Testing each wire ensures you haven’t missed any steps or made errors during installation. These precautions create peace of mind knowing your DIY lamp is safe to use.
Choosing the Right Vase for Your Lamp
Selecting the right vase for your DIY lamp project is crucial for both style and function. First, consider the size of the vase. It should be large enough to hold the lamp components but not too bulky for your table. A vase between 12 to 18 inches tall is typically ideal. Make sure it has a stable base to prevent tipping.
Material is another important factor. Glass, ceramic, and metal are popular choices. Each material has its own pros and cons. Glass and ceramic can be delicate, requiring careful handling. Metal vases are generally sturdier but can get hot, so use heat-resistant materials inside.
Here are some vase materials and their characteristics:
- Glass: Elegant but fragile, allows light diffusion
- Ceramic: Versatile in design, also delicate
- Metal: Durable and stylish, may require heat management
Considering these options helps you choose the best material for your needs.
Design and color also play a significant role. Opt for a vase that complements your room’s decor. Whether you prefer a modern, vintage, or rustic look, there’s a vase out there that fits your style. Keep in mind the lampshade design, as it should coordinate well with the vase.
Finally, ensure the vase can be easily altered. It should be able to withstand drilling if necessary and accommodate the lamp kit. Some vases come with pre-drilled holes, making the process simpler. Choosing the right vase makes your DIY lamp project smoother and more enjoyable.
Lighting Safety Tips for DIY Vase Lamps
Ensuring safety is crucial when making a DIY vase lamp. First, always turn off the power before working with any electrical components. This minimizes the risk of electric shock. Use insulated tools and wear rubber-soled shoes for extra protection. Safety should always come first.
Choose the right lamp kit for your project. Make sure the kit is compatible with the vase and meets safety standards. Look for certifications like UL or CE. These certifications indicate that the kit has been tested for safety. Using certified components reduces potential risks.
Proper grounding is essential for electrical safety. Ensure that the ground wire is securely connected. This helps prevent electrical shocks. If you’re unsure about grounding, consult an electrician. Taking this extra step ensures your lamp is safe for use.
Here are additional safety tips:
- Inspect the cord and socket for any damage before use
- Use the correct wattage for your light bulb
- Avoid placing the lamp near flammable materials
- Regularly check connections to ensure they remain secure
Following these tips will help keep your lamp safe and functional.
Finally, always test the lamp before using it in your home. Plug it into a surge protector to prevent any electrical mishaps. Turn it on and watch for signs of malfunction, such as flickering or unusual heat. A thorough test ensures that your DIY vase lamp is both safe and reliable for everyday use.
Maintaining Your DIY Vase Lamp over Time
Maintaining your DIY vase lamp is important to ensure it remains functional and safe. Regularly inspect the lamp for any signs of wear and tear. Pay special attention to the cord and socket connections. If you notice any fraying or loose parts, address them immediately to prevent potential hazards.
Cleaning your lamp is also essential. Dust and grime can accumulate over time, affecting the lamp’s appearance and performance. Use a soft cloth to gently clean the vase and lampshade. Avoid using abrasive cleaners as they can damage the materials. Regular cleaning keeps your lamp looking fresh and new.
Here are some maintenance tips:
- Check the cord for frays and replace if necessary
- Ensure the socket is secure and functioning properly
- Regularly dust the vase and lampshade
- Tighten any loose parts
Following these tips helps prolong the life of your lamp.
Also, periodically check the light bulb and replace it as needed. Using the correct wattage is crucial for safety and efficiency. An incorrect bulb can overheat and pose a risk. Always choose a bulb that matches the lamp’s specifications. This ensures optimal performance without compromising safety.
Finally, keep your lamp away from areas with high humidity or direct sunlight. Moisture and excessive heat can damage the vase and electrical components. Position your lamp in a cool, dry place to maintain its longevity. Proper maintenance ensures your DIY vase lamp continues to light your space beautifully over time.
Frequently Asked Questions
Curious about making a table lamp from a vase? We’ve compiled some common questions and detailed answers to help you with your DIY project.
1. What materials are needed to make a lamp from a vase?
To create a lamp from a vase, you’ll need several essential items. These include the vase itself, a lamp kit, and a lampshade. Additionally, you’ll need a drill with a special bit suitable for glass or ceramic if that’s what your vase is made of. Don’t forget safety gear such as goggles and gloves to protect yourself during the process.
Other helpful tools include pliers, a screwdriver, and some electrical tape to secure connections. Using quality materials and tools ensures the success of your DIY project. Make sure everything is prepared before you begin to avoid interruptions.
2. How do I ensure my vase doesn’t crack when drilling?
To prevent cracking while drilling into your vase, it’s crucial to go slow and steady. Use the correct drill bit designed for glass or ceramic materials. Apply minimal pressure; let the drill do most of the work. Cooling the vase with water can also help reduce the risk of cracking.
You should always wear safety goggles and gloves for protection when using power tools. Taking these precautions helps ensure your project proceeds smoothly without damaging your vase.
3. Can I use any type of bulb in my DIY lamp?
No, not all bulbs are suitable for use in DIY lamps made from vases. It’s essential that you choose bulbs that match the specifications provided in your lamp kit instructions. Generally, LED bulbs are highly recommended due to their low heat emission and energy efficiency.
Avoid using high-wattage incandescent bulbs as they can get very hot and may pose safety risks like overheating or even causing burns over time. Always refer to your kit’s guidelines for the safest bulb options.
4.What are some design tips for choosing the right lampshade?
Selecting the right lampshade involves more than just picking one that fits; it must also complement your room’s decor and style of your vase.For example,a modern geometric shade may clash with an antique-style,vase where classic or fabric shades would work beautifully.Match color schemes as well-harmonious colors provide balanced esthetic appeal