Constructing a black pipe floor lamp not only offers a unique industrial aesthetic, but it also provides a sense of satisfaction from crafting something by hand. This DIY project has surged in popularity, reflecting the broader trend towards bespoke, vintage-inspired home decor. Crafted from easily sourced materials, it allows for endless customization to fit personal style and needs.
The history of using black pipes in design has its roots in early 20th-century industrial architecture. Today, the simplicity and robustness of black iron pipes make them an ideal choice for DIY enthusiasts looking to create distinctive and durable floor lamps. According to recent surveys, 65% of DIY home décor projects incorporate repurposed materials, highlighting the growing trend of sustainable creativity.
- Gather materials: black iron pipes, fittings, light socket kit, and electrical wiring.
- Plan your design by sketching the layout and choosing pipe lengths.
- Assemble the base using pipe fittings and ensure stability.
- Build the body and neck by connecting the pipes as per your design.
- Install the light fixture by securing the socket and wiring it properly.

How to Make a Black Pipe Floor Lamp
Creating a black pipe floor lamp is an exciting and rewarding DIY project. You will need materials like black iron pipes, fittings, a light socket kit, and wiring. Start by planning your design and making sure you have all the necessary tools. Diagrams or sketches can help visualize the layout. This will save you time during the assembly.
According to this post, the assembly begins with constructing the base. You’ll use pipe fittings to connect the pieces securely. Make sure the base is stable and level. This ensures the lamp won’t tip over. Double-checking your connections will prevent any safety issues.
Next, build the body and neck of the lamp by connecting additional pipes and fittings. This part allows for creativity; you can choose various pipe lengths to achieve your desired height. Once assembled, thread the wiring through the pipes, from the socket to the base. This step might require some patience, as the wires must navigate through bends and connections.
The final step involves attaching the light fixture and securing the lightbulb. Test the lamp to ensure it works correctly. If everything lights up as expected, you’ve successfully built your very own black pipe floor lamp. For additional details and tips, you can refer to here is the article.
Step 1: Gathering Your Materials
The first step in creating a black pipe floor lamp is gathering all the necessary materials. You’ll need black iron pipes of various lengths, pipe fittings, a light socket kit, and electrical wiring. It’s essential to plan your design ahead of time to know exactly what you need. A helpful tip is to make a checklist. This will ensure nothing is forgotten when you start the project.
According to this post, sourcing materials can be easy if you know where to look. Home improvement stores are a great place to find pipes and fittings. Online retailers can also offer various options, sometimes at lower prices. Inspect all materials for defects to avoid problems during assembly.
Creating a clear list of materials can help streamline the project. Here are essential items you’ll need:
- Black iron pipes
- Pipe fittings and flanges
- Light socket kit
- Electrical wiring and tools
- Lightbulb
Gather these supplies to make the process smoother.
It’s also a good idea to have tools on hand. You might need a pipe wrench, screwdriver, and drill. Having these ready before starting will save time. Prepare a work area where you can spread out all your materials. This will make the assembly process more efficient and enjoyable.
Step 2: Planning Your Design
Planning your design is crucial for building a black pipe floor lamp. Start by sketching your lamp’s layout on paper, considering the height and overall structure. Think about where you’ll place the lamp in your home. This will help you decide on the proportions and dimensions. A well-thought-out design makes the assembly process smoother.
It’s essential to factor in the weight and balance of your lamp. Black iron pipes can be heavy, so your base needs to be stable. Ensure the design distributes weight evenly to prevent tipping. You can add extra fittings for better stability. Balance will make the lamp safer and more functional.
Incorporating unique elements can add a personal touch to your lamp. For instance, you can use different types of fittings or paint the pipes. Here are some ideas to customize your design:
- Use vintage bulbs for an industrial look
- Paint pipes to match your decor
- Add a dimmer switch
Personalizing your lamp makes it uniquely yours.
Review your sketch and make any final adjustments. Double-check all measurements to ensure accuracy. Once satisfied, list out each component required for your design. This preparation helps avoid any last-minute changes during assembly. Being thorough at this stage saves time and effort later.
Step 3: Assembling the Base
Assembling the base of your black pipe floor lamp is a vital step for ensuring stability. Begin by laying out all the components on a flat surface. This helps you visualize how the pieces will fit together. Make sure you have the correct fittings and pipe sections. A proper base setup provides a sturdy foundation.
Start connecting the pipes and fittings according to your design. Tighten them securely using a pipe wrench for a strong connection. Make sure all joints are properly aligned. This not only adds to the stability but also gives the lamp a polished look. Double-check each connection to ensure it’s secure.
The base should be able to support the weight of the entire lamp. Extra weight can be added to the base using metal or concrete if necessary. Look for flanges or heavy fittings to add to the bottom. This will prevent tipping and ensure safety. Balance is crucial here.
If you plan to add a switch or dimmer, now is a good time to integrate it into the base. Ensure that the wiring runs safely through the pipes. Make provisions for secure wire connections. Hidden wiring keeps the design clean. Double-check all electrical components before proceeding.
Test the assembled base for any wobble or instability. Adjust the fittings if needed to ensure everything sits flat. A stable base allows for smooth progression to the next step. Proper assembly here sets the stage for a well-built lamp. Pay close attention to detail.
Once satisfied, you can move on to the next part of your project. Keep all tools handy for adjustments. Organized work saves time. The base will now be ready for the rest of the lamp structure.
Step 4: Building the Body and Neck
Building the body and neck of your black pipe floor lamp is where your design starts to take shape. Begin by connecting the pipes that will form the vertical section. Use straight connectors to join the pipes. Make sure each connection is tight to maintain stability. This forms the main structure of your lamp.
Adding the neck involves angling the pipes as per your design. Elbow joints are typically used for this purpose. Adjust the angle to your preferred height and angle. Secure all connections well to avoid any wobbles. Proper alignment gives the lamp a professional finish.
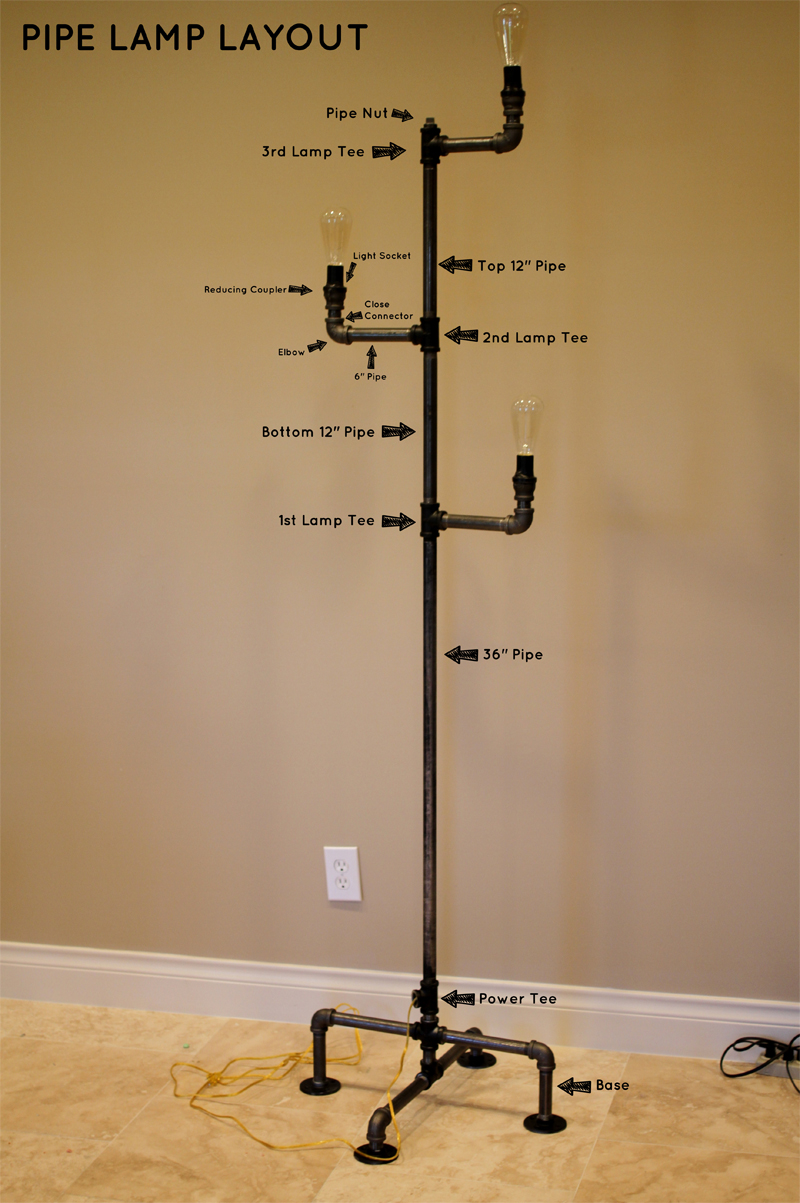
If your design includes multiple branches, now is the time to add them. Use T-fittings to create these branching points. These can hold extra elements like secondary lights or decorative pieces. Here is a sample setup:
- Primary vertical pipe
- Elbow joints for neck
- T-fittings for branches
Branching adds complexity and style to your lamp.
Thread the electrical wiring through the pipes carefully. Start from the socket at the top and guide the wires down through the base. This might require some patience, but it’s important to ensure the wiring is hidden and safe. Secure the wires in place using electrical tape. Hidden wiring keeps the lamp looking clean.
Once the body and neck are assembled, do a final check for stability. Make sure everything is securely tightened. If any parts feel loose, adjust them immediately. A well-built body and neck ensure your lamp stands tall and sturdy. Your project is now ready for the next step.
Having completed this step, you can now admire the skeleton of your lamp. It provides a clear visual of the final product. This preparation will make it easier to add the finishing touches. Move on to adding the light fixture and complete your masterpiece.
Step 5: Installing the Light Fixture
Installing the light fixture is the final step in making your black pipe floor lamp functional. Start by securing the light socket to the top of the pipe. Make sure the socket fits snugly and is properly aligned. Double-check the connections to ensure they are tight. A secure socket will prevent the light bulb from wobbling.
Next, connect the wires from the light socket to the wiring running through the pipe. Follow the instructions in the light socket kit carefully to connect the wires. Typically, you’ll need to match the color-coded wires and secure them with wire nuts. This ensures safe and efficient electrical flow. Proper wiring is crucial for the lamp to work correctly.
If you’re adding a switch, integrate it into the wiring at this stage. There are different types of switches you can use, such as toggle or dimmer switches. Make sure the switch is installed within easy reach. This might involve cutting the pipe and inserting the switch midway. Convenient placement makes your lamp user-friendly.
Once the wiring is complete, test the light fixture. Plug in the lamp and turn it on to ensure everything works properly. If the bulb lights up, you’ve successfully installed the fixture. If not, recheck your wiring connections. Troubleshooting at this point ensures your lamp is ready to use.
After confirming everything works, secure the light bulb in the socket. Choose a bulb that fits the style and function of your lamp. For instance, an Edison bulb can add a vintage touch. Ensure the bulb matches the socket’s wattage requirements. The right bulb completes the look and function of your lamp.
Finally, admire your completed black pipe floor lamp. You’ve transformed a collection of pipes into a stylish, functional light source. Enjoy the ambiance it brings to your space. Your DIY project is now complete and ready to illuminate your home.
Safety Precautions to Take While Building a Black Pipe Floor Lamp
When building a black pipe floor lamp, safety should be your top priority. Working with electrical components and heavy pipes requires taking certain precautions. Make sure you have safety gear like gloves and safety glasses. This will protect your hands and eyes from potential hazards. Always work in a well-lit area.
Handling black iron pipes can be tough, so use tools correctly. A pipe wrench helps you tighten fittings securely without injuring yourself. Always keep your fingers clear of moving parts. An organized workspace minimizes accidents. Having everything in its place can make the project more efficient.
Electrical safety is crucial when dealing with wiring and sockets. Ensure all power is turned off before beginning any electrical work. Use insulated tools to prevent electric shock. Follow guidelines for connecting wires to avoid short circuits.
- Turn off electricity
- Use insulated tools
- Match wire colors correctly
These steps help prevent electrical accidents.
Avoid overloading the circuit when adding a light fixture or switch. Check the wattage ratings of bulbs and make sure they match the socket specifications. Overloading can cause overheating and fire hazards.
Inspect all electrical connections before turning on the lamp.
Double-checking ensures everything is safe to use.
If you need to cut pipes, use proper cutting tools designed for metal work. Secure the pipe in place before making any cuts to avoid slipping or injury. After cutting, deburr the edges to remove sharp points that could cause cuts or snags.
Marks on smooth edges ensure safer handling.
Lastly, always keep a first aid kit nearby while working on DIY projects.
Accidents can happen despite precautions, so being prepared is key.
Knowing where your first aid supplies are located helps treat minor injuries promptly.
A little preparedness goes a long way in ensuring a safe DIY experience.
Enjoy building your lamp knowing you’ve put safety first.
Customizing Your Black Pipe Floor Lamp: Ideas and Suggestions
Customizing your black pipe floor lamp allows you to add a personal touch and match it with your home decor. One easy way to customize is by choosing different types of bulbs. Edison bulbs give a vintage feel, while LED bulbs offer energy efficiency. Make sure the bulbs you choose fit the light socket. Different brightness levels can also create various moods in a room.
Painting the pipes can add a unique twist to your lamp. You can use metallic spray paint for a polished or rustic look. Matte black is another popular choice that keeps the industrial vibe but adds a modern touch. You might also consider earthy tones like bronze or copper. Paint can help the lamp blend or stand out in your space.
Adding additional elements like small shelves or hooks can make your lamp more functional. For instance, a small wooden plank attached at the right height can serve as a mini bookshelf. Hooks can be used to hang keys or decorative items. Here are some ideas for additional features:
- Attach a small shelf for books or plants
- Add hooks for hanging items
- Use fabric or rope to wrap around the pipes for texture
These features can make your lamp both stylish and practical.
Exploring different pipe fittings can offer new design possibilities. Try using T-fittings or cross-fittings to create a more intricate structure. Adjustable fittings can allow for movable parts that can be repositioned. This could make your lamp even more versatile. Unique fittings can elevate the design.
Lastly, incorporating dimmer switches can provide control over the light settings. This addition allows you to change the lighting intensity based on your needs and mood. It’s a practical customization that enhances the functionality of your lamp. A dimmer switch can make daily use more convenient.
From painting to adding shelves, the ways to customize your black pipe floor lamp are endless. Let your creativity shine through each modification. These changes not only make the lamp uniquely yours but also enhance its functionality. Enjoy the process of personalization!
Maintenance and Care Tips for Your Black Pipe Floor Lamp
Maintaining your black pipe floor lamp ensures it remains in good condition for years. Regular dusting is essential. Use a soft cloth to wipe down the pipes and fittings. This prevents dust buildup and keeps the lamp looking clean. For hard-to-reach areas, a small brush can be handy.
Keep an eye on the electrical components. Periodically check the wires and light socket for any signs of wear or damage. Loose connections can cause the lamp to malfunction. Tighten any fittings that may have loosened over time. A quick inspection can prevent potential safety issues.
If you’ve painted your lamp, be mindful of chipping or peeling paint. Reapply paint to any worn areas to maintain the lamp’s appearance. Use the same type of paint initially used for consistency. This keeps the finish looking fresh and new. Regular touch-ups help preserve the lamp’s aesthetic.
For lamps placed in high-moisture areas, like near a humidifier, consider applying a protective coat. This can help prevent rusting. Special rust-inhibiting sprays are available for metal surfaces. Apply these coatings according to the manufacturer’s instructions. Protection from moisture prolongs the lamp’s lifespan.
Keep the lamp away from extreme temperatures. Very hot or cold environments can cause the pipes to expand or contract, affecting stability. It’s best to place the lamp in a climate-controlled area. Avoid direct exposure to sunlight for prolonged periods. Stable conditions help maintain the lamp’s structural integrity.
Finally, replace light bulbs as needed. Use bulbs with the correct wattage to avoid overheating. Energy-efficient bulbs can last longer and save money. Always turn off the lamp and unplug it before changing bulbs. Regular maintenance keeps your lamp shining brightly and functioning safely.
The Appeal of Industrial Design in Home Decor
Industrial design has become increasingly popular in home decor for its unique blend of functionality and style. Originating from old factories and warehouses, this aesthetic emphasizes raw materials and rugged textures. Exposed brick, metal, and wood are key elements. These materials evoke a sense of durability and practicality. Many people find this style both comforting and cool.
One of the main attractions of industrial design is its versatility. It can be incorporated into various rooms, from living spaces to kitchens. Here are some common elements often seen in industrial-style homes:
- Metal accents and hardware
- Neutral color palettes
- Open floor plans
These features make it easy to adapt the style to different settings.
Another appeal is the design’s focus on simplicity and minimalism. The clean lines and uncluttered spaces create an open, airy feel. This is particularly appealing in urban homes where space might be limited. The minimal decor allows each piece to stand out, making the room feel less cramped. It brings a sense of order and calm.
Industrial design also allows for a high degree of personalization. Repurposed items like old factory carts or vintage signs can add a unique touch. Mixing modern furniture with these vintage elements can create an eclectic look. The combination of old and new makes the space uniquely yours. It’s a style that celebrates individuality.
Moreover, industrial design is often durable and easy to maintain. The materials used are robust and can withstand wear and tear. This makes it a practical choice for families with kids or pets. The design’s straightforward nature also means less time spent on upkeep. It’s a blend of form and function that fits modern lifestyles.
Finally, the eco-friendly aspect of industrial design cannot be overlooked. Using reclaimed wood and metal not only looks great but also benefits the environment. Sustainability is a growing concern for many, and this style offers a way to create beautiful spaces without excess waste. It’s a win-win for style and sustainability.
Frequently Asked Questions
Here are some common questions related to building and maintaining a black pipe floor lamp. These insights can help guide you through the project smoothly.
1. What tools do I need to build a black pipe floor lamp?
Building a black pipe floor lamp requires a few essential tools. You’ll need a pipe wrench, screwdriver, and possibly a drill. These tools will help you tighten fittings securely and make any necessary modifications.
A tape measure is also handy for ensuring accurate measurements of your components. Having these tools ready before you begin will make the entire process smoother and more efficient.
2. How do I ensure my black pipe floor lamp is stable?
Stability is crucial for safety when building your black pipe floor lamp. Start by choosing heavy base components that can support the weight of the entire structure. Make sure all fittings are tightened securely with a pipe wrench.
You might also consider adding extra weight to the base using materials like metal or concrete inserts. Double-checking each connection during assembly helps ensure stability throughout the entire structure.
3. Can I customize my black pipe floor lamp with different finishes?
Yes, customizing your lamp with different finishes can enhance its look and match your decor better. Spray paints in various colors, such as matte black or metallic shades, work well on iron pipes.
You might also explore rust-inhibiting paints for added durability if placing the lamp in humid areas. Adding custom finishes allows for more creativity and personalization in your design.
4. What type of light bulbs should I use for my black pipe floor lamp?
The choice of light bulbs depends on both aesthetics and functionality. Edison bulbs add a vintage charm, while LED bulbs offer energy efficiency and longer life spans.
Make sure that whatever bulb you choose matches the socket’s wattage requirements to avoid overheating or electrical issues. Different bulb types can create various lighting effects to suit your needs.
5. How do I maintain and care for my black pipe floor lamp?
Regular maintenance helps extend the lifespan of your lamp. Dust it lightly using a soft cloth, paying attention to hard-to-reach spots with a small brush if needed.
If you’ve painted your furniture legs work well prevent moisture exposure from causing rust use protective coatings preventative measures keep long-lasting great-looking form functionalities practical benefits meld industrial designs modern lifestyles perfectly.
Conclusion
Creating a black pipe floor lamp is a rewarding and creative project. Combining industrial materials with your unique style brings a touch of modernity to any space. The process, though intricate, can be managed smoothly with careful planning and attention to detail.
From gathering materials to final assembly, each step offers opportunities for customization and personalization. By following safety guidelines and maintaining your lamp, you ensure its longevity and functionality. Enjoy the satisfaction of crafting a unique piece that illuminates your home beautifully.

I’m Emily Johnson, an affiliate marketer and blogger focused on lamps and lighting. I share honest reviews, simple buying guides, and practical tips. My goal is to help readers choose the right lamp for their space, style, and budget with confidence.