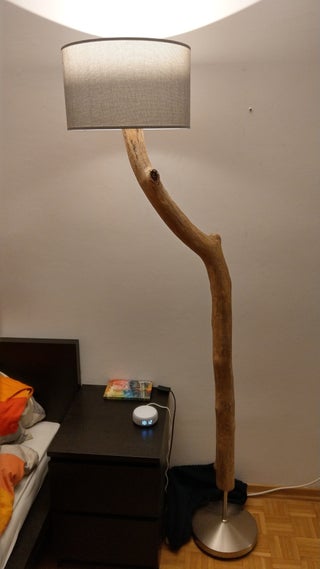
Unveiling a piece of driftwood can feel akin to discovering a hidden treasure, each twist and grain telling a unique story. Imagine transforming this found art into a statement floor lamp—each lamp a testament to nature’s craftsmanship. This fusion of art and functionality adds rustic charm to any interior space.
Born from centuries of natural forces, driftwood’s journey to your living room is remarkable. Historically, these pieces were considered powerfully symbolic, embodying resilience and beauty. According to recent design trends, incorporating natural elements like driftwood can elevate home aesthetics, blending modern innovation with timeless nature.
- Select the perfect piece of driftwood, ensuring it is sturdy and visually appealing.
- Prepare and clean the driftwood by removing debris and soaking in a mild bleach solution.
- Drill a hole for the lamp rod and attach the driftwood to a secure base using screws.
- Install the light fixture, threading the electrical wire through the drilled hole.
- Finish by sanding rough edges, applying a sealant, and choosing an appropriate lampshshade.

How to Make a Driftwood Floor Lamp
Creating a driftwood floor lamp begins with selecting the right piece of driftwood. It’s essential to choose wood that’s sturdy and visually appealing. Cleaning the driftwood thoroughly helps remove any dirt or debris. This step ensures the lamp’s base is secure and safe. Preparing a checklist of materials is also highly recommended.
Once the driftwood is clean, you’ll need to drill a hole for the lamp rod. This rod will hold the light fixture and connect to the lamp base. Make sure the hole is straight, as this will keep the lamp stable. With your drill and appropriate bit, proceed carefully to avoid splitting the wood. You can refer to here is the article for more details on drilling and securing.
After drilling, it’s time to assemble the base. Secure the driftwood to a solid platform using screws. This platform will keep the lamp upright. Many opt for a metal or wooden base, depending on the overall look they want. Finally, attach the light fixture to the rod and thread the electrical cable through.
Finishing touches include choosing a lampshade that complements the driftwood. A neutral color often works best. Adding a protective sealant to the wood can enhance its longevity. Ensure the light works by testing the electrical connections. For more on placing and styling lamps in your living space, refer to this post.
Step 1: Selecting the Perfect Piece of Driftwood
Selecting the perfect piece of driftwood is the foundation for your lamp project. Look for a piece that’s free of major cracks or weaknesses. You want something that will be sturdy enough to support the lamp. According to this expert opinion, the ideal driftwood should be dry and well-weathered. This ensures it won’t warp or shrink over time.
When searching for driftwood, consider visiting beaches, riverbanks, or lakeshores. These locations are treasure troves for unique pieces. Choose driftwood that has interesting shapes and textures. This will add character to your lamp. Feel free to collect several pieces to compare.
It’s also important to think about the size of your driftwood. It should be proportionate to the lamp height you desire. While larger pieces provide a bold look, smaller ones can be just as charming. Keep a measuring tape handy to check dimensions. This will help you avoid pieces that are too big or small.
Clean the driftwood once you’ve made your selection. Remove any bark or debris with a stiff brush. This not only improves its look but also makes it safer to work with. After cleaning, let it dry completely before moving on to the next step. Proper cleaning ensures a smooth start for your project.
Step 2: Preparing and Cleaning the Driftwood
Before you start building your driftwood lamp, it’s crucial to prepare the driftwood properly. Start by removing any loose bark and debris. Use a stiff brush to scrub the surface gently. This step exposes the beautiful texture underneath. Make sure to wear gloves to protect your hands from splinters.
Next, soak the driftwood in a solution of water and mild bleach. This helps to kill any bacteria or insects that might be hiding in the wood. Let the driftwood soak for 24 hours. After soaking, rinse it thoroughly with clean water. Allow it to dry completely in a sunny spot; this may take a few days.
Drying the driftwood ensures it won’t decay or develop mold. You can speed up the drying process using a fan or dehumidifier. Inspect the driftwood regularly during drying to ensure it stays intact. Once dry, it should feel lighter and perhaps even more textured. Applying a wood sealant afterward can add extra protection.
Finally, sand the driftwood to smooth out rough edges and splinters. Use fine-grit sandpaper for a smooth finish. Focus on areas where you’ll be handling or attaching the lamp components. Sanding also enhances the wood’s natural aesthetics. Your driftwood is now ready for the next step in the lamp-making process.
Step 3: Assembling and Securing the Base
Assembling and securing the base of your driftwood lamp is vital for stability. First, choose a sturdy platform, such as a wooden or metal base. The platform should complement the driftwood’s aesthetic. Next, align the driftwood in the middle of the base. This ensures the lamp will stand upright.
Drill pilot holes into the driftwood and the base to prepare for screws. This step prevents the wood from splitting during assembly. Use strong, long screws to attach the driftwood securely. It’s advisable to use washers to distribute the load evenly. Tighten the screws firmly to ensure the driftwood doesn’t wobble.
You can enhance stability by adding weights to the bottom of the base. This is particularly useful for taller lamps. Consider using metal plates or small sandbags for this purpose. Another option is to choose a heavier base material. This makes the lamp less likely to tip over.
Finally, check the lamp’s balance by placing it on a flat surface. Make sure it stands straight and doesn’t lean to one side. If necessary, adjust the driftwood or the base. Use a level to guarantee perfect alignment. Your base is now secure and ready for the next steps.
Before moving on to install the light fixture, make sure all screws and attachments are tight. Double-check for any wobbling or instability. Re-secure any loose parts to maintain the lamp’s durability. For added safety, ensure there are no sharp edges or splinters exposed. This makes the lamp both safe and aesthetically pleasing.
Step 4: Installing the Light Fixture
Installing the light fixture is the next crucial step in crafting your driftwood floor lamp. Begin by threading the electrical wire through the hole you drilled earlier. This ensures the wire is hidden and neatly runs inside the driftwood. Next, attach the light socket to the top of the driftwood. Make sure it is securely fastened.
Connecting the electrical wiring can seem daunting, but it’s straightforward if you follow the instructions. Most light fixtures come with a diagram to assist you. You’ll generally have to connect the positive, negative, and ground wires. Twist the wires together and secure them with wire nuts. Double-check all connections to ensure they’re tight and safe.
Once the wires are connected, cover the exposed areas with electrical tape. This helps to prevent any short circuits. Make sure the light socket is firmly in place. You may want to test the electrical connections before fully assembling the lamp. Plug in the lamp briefly to check if the bulb lights up.
After confirming that the wiring works, finalize your assembly. Insert the light bulb into the socket. If your lamp requires a lampshade, attach it securely to the socket or the base. Adjust the positioning of the driftwood to ensure everything looks balanced. Your lamp should now be functional and aesthetically pleasing.
Finally, ensure that all connections are secure and the lamp is stable. Place it in your preferred location and plug it in. Enjoy the unique ambiance that your driftwood floor lamp brings to your space. For more tips on styling and placement, you might find helpful ideas in other resources.
Step 5: Finishing and Styling the Lamp
Finishing and styling your driftwood lamp involves adding the personal touches that make it unique. Begin by sanding any remaining rough spots to ensure a smooth surface. This not only enhances the look but also makes the lamp safer to handle. Consider applying a clear sealant to protect the driftwood. This will also give the wood a subtle shine.
Choosing the right lampshade is essential for finishing the look. A neutral-colored lampshade often works best to complement the natural texture of the driftwood. However, bold colors or patterns can make a statement. Attach the lampshade securely, making sure it fits the bulb and socket properly. This ensures both safety and aesthetics.
Next, think about where your lamp will be placed. It could be a reading nook, living room, or bedroom. Arrange the lamp in a way that it enhances the space without overwhelming it. For tips on lamp placement, you can refer to other guides. This helps in creating a balanced and inviting atmosphere.
Adding decorative elements can elevate the style of your lamp. You might wrap some twine around the base or hang small ornaments from the driftwood branches. Personal touches make the lamp more special and unique to your home. Use your creativity and have fun with this step.
Finally, make sure to test the lamp in different settings. Adjust the placement and see how it looks under different lighting conditions. Small changes can have a big impact on the overall feel of the space. Enjoy the warmth and charm your driftwood lamp brings to your home.
The Benefits of Using Driftwood in Home Decor
Driftwood offers a unique and natural aesthetic that can enhance any home decor. Each piece is distinct, making every item crafted from driftwood one-of-a-kind. The organic shapes and textures create a rustic yet elegant look. This adds a touch of nature to your living space. Additionally, it often brings warmth and character to the room.
Using driftwood in home decor is also environmentally friendly. Salvaging driftwood means reusing wood that has been naturally weathered by water. This reduces the demand for newly cut wood. Repurposing driftwood minimizes waste, contributing positively to sustainability efforts. It’s an excellent way to incorporate eco-friendly materials into your home.
Versatility is another significant benefit of using driftwood in design projects. It can be used to create a variety of items, from furniture to decorative pieces like lamps and wall art. The neutral tones of driftwood make it compatible with various color schemes and design styles. Whether you prefer modern, coastal, or traditional decor, driftwood fits seamlessly into different settings.
Driftwood also holds symbolic value for many people. It represents resilience and transformation due to its journey over time through water and weather elements. Adding such meaningful pieces can give your home more personal significance.
Finally, incorporating driftwood in your interior design can inspire creativity. Its natural form encourages innovative ideas for unique decorations or functional art pieces. Crafting with driftwood lets you take pride in DIY projects that showcase skill and imagination.
Choosing the Right Light Fixtures for your Driftwood Floor Lamp
Choosing the right light fixtures for your driftwood floor lamp enhances both functionality and aesthetics. First, consider the type of bulb that suits your needs. LED bulbs are energy-efficient and provide ample lighting. On the other hand, Edison bulbs add a vintage charm. The choice of bulb affects the overall look and feel of the lamp.
Lampshades play a critical role in diffusing light and adding style. A neutral-colored lampshade usually complements the rustic texture of driftwood. However, you can opt for bold colors or patterns to make a statement. Ensure the shade fits well with the lamp’s dimensions. The right lampshade can transform the lamp’s appearance dramatically.
Think about the type of light fixture that matches your driftwood piece. A minimalist fixture might highlight the natural beauty of the driftwood. Conversely, an ornate fixture can add a touch of elegance. The fixture’s finish should also complement the wood’s tones. Mixing metals like brass or copper can create a stunning contrast.
Adjustable fixtures can add versatility to your lamp. These allow you to direct light as needed, enhancing the lamp’s functionality. This is particularly useful in reading nooks or workspaces. Adjustable fixtures add practical benefits without compromising style. Make sure to choose quality components for durability.
Finally, consider using smart bulbs or dimmable fixtures. This adds an extra level of control over the lighting environment. Being able to adjust the light’s intensity can set the perfect mood. Smart features let you control the lamp with your phone or voice commands. This modern touch blends convenience with rustic charm.
Maintaining and Cleaning Your Driftwood Floor Lamp
Maintaining and cleaning your driftwood floor lamp ensures it remains a beautiful and functional part of your home decor. First, regularly dust the driftwood with a soft cloth to remove any surface dirt. For deeper cleaning, use a slightly damp cloth, but avoid soaking the driftwood. Excess moisture can deteriorate the wood over time. Ensure the lamp is unplugged before any cleaning begins.
Periodically inspect the lamp for any signs of wear or damage. Check the driftwood for cracks or splinters that may need attention. Tighten any loose screws or fittings to keep the lamp stable. If you notice any deterioration in the wood, consider applying a wood conditioner. This helps to maintain the wood’s texture and prevents drying out.
Maintaining the electrical components is also crucial. Dust the lightbulb and socket area gently to avoid damage. If the bulbs flicker or show signs of wear, replace them promptly. Inspect the electrical cord for any fraying or damage. A well-maintained electrical system ensures safe operation.
When it comes to the lampshade, remove it occasionally for a thorough cleaning. Fabric shades can often be gently vacuumed or hand-washed, depending on the material. Wipe down metal or glass shades with appropriate cleaners. Reattach the shade securely once it’s clean and dry. Keeping the lampshade clean ensures optimal light diffusion.
Lastly, consider rotating the position of your lamp within the room occasionally. This prevents uneven wear on one side and keeps the lighting fresh. By taking these simple steps, you’ll ensure your driftwood floor lamp remains an eye-catching feature for years to come. Regular maintenance enhances both the longevity and beauty of your unique lamp.
Customizing Your Driftwood Floor Lamp for Different Interior Styles
Customizing your driftwood floor lamp allows it to fit seamlessly into various interior styles. For a coastal theme, pair your driftwood lamp with light, airy colors like white, beige, and soft blues. You can add seashell accents or nautical ropes for a complete coastal look. Using materials like linen or burlap for the lampshade enhances this theme. This creates a calming, beach-inspired atmosphere.
If you prefer a modern aesthetic, focus on clean lines and minimalism. Opt for a sleek, metallic lampshade in black or silver. The contrast between the natural driftwood and modern metal can be striking. Use a simple, geometric design for the lamp base. This provides a polished and contemporary feel without overwhelming the space.
For a rustic or farmhouse decor, emphasize the natural elements of the driftwood. Use a distressed or weathered finish on the wood to enhance its rustic charm. Pair it with a warm, earthy-colored lampshade. You might also consider adding iron or bronze fixtures to complete the look. This blends seamlessly with rustic furniture and decor.
Incorporating driftwood into a bohemian setting allows for a lot of creativity. Adorn the lamp with colorful tassels, beads, or fabric to give it a unique, eclectic vibe. Choose a vibrant lampshade to make the lamp a focal point. Mixing different textures and colors can make the driftwood lamp stand out beautifully. This adds a playful and informal touch to your space.
Lastly, if your style is more classic or traditional, select a more refined lampshade and base. Opt for neutral colors like beige, cream, or soft gray. The key is to keep the design elegant and understated. Adding gold or bronze accents can elevate the overall look. This ensures that the lamp fits within a classic decor scheme elegantly.
Frequently Asked Questions
Explore the ins and outs of making and using driftwood floor lamps with these frequently asked questions. We’ll cover essential topics to help you create stunning, functional pieces for your home.
1. What tools do you need to make a driftwood floor lamp?
To make a driftwood floor lamp, you’ll need basic tools like a drill, sandpaper, screws, and a brush. Additionally, materials like lamp rods, light fixtures, and a sturdy base are essential. Having these tools ready makes the process smooth and enjoyable.
A clamp can also be useful for holding the driftwood in place while you work on it. Make sure you have measuring tape to ensure all parts fit well together. These tools and materials will set you on the right path to crafting your unique lamp.
2. Can I use any type of wood for making a driftwood lamp?
The best wood for a driftwood lamp is wood that has been naturally weathered by water. This type of wood is usually stronger and more beautiful due to its texture and appearance. While other woods can work, they may not have the same durability or look.
Driftwood from beaches or lakes often has unique patterns that stand out when made into lamps. Using proper cleaning techniques will further enhance its beauty. Always choose pieces that are free from major cracks or decay for lasting results.
3. How long does it take to complete a driftwood floor lamp project?
The time investment depends on various factors like complexity of design and drying times during preparation stages. Typically, cleaning and preparing the driftwood took about 24 hours; assembly could span an additional day if you’re meticulous in your approach.
If you’re applying sealants or paints once assembled allow additional drying periods too—anything between three days up till week’s completion timeline should ensue satisfactory outcomes but proactive planning always speeds processes accordingly ensuring smoother craft experience overall!
4. Is it safe to wire my own driftwood floor lamp?
If you’ve basic understanding electrical wiring necessary precautions taken it’s generally safe DIY task otherwise recommend consulting licensed electrician assistance specifically involving live current practical safety measures mitigate risks injurious potential fire hazards importantly following compliant standards properly equipped setup undeniably beneficial strategy avoiding costly mistakes mishaps professionally executed!
Most components user-friendly detailed instruction guides simplifying installation suited confident hobbyists tackling projects comfortably successfully achieving end goals happily showing off uniquely customized lighting statement pieces interior designs transformed touched natural elements added lived spaces beautifully nature inspired aesthetics reflecting personality tastes splendidly expressed creative outlets joyous satisfaction derived proud craftsmanship definitely worth undertaking responsibly guided resources adept fields!
5.Do I need to treat the driftwood before turning it into furniture?
Treating ensures longevity dust-free exquisite looks crucial step undertaken upon collection field initially scrubbing brushing eliminate surface debris prep soaking bleach solution eradicate bacteria insects present thoroughly rinsing subsequent drying cycles implementing afterwards guarantee structural soundness preventing shrinking warping eventual aging exposure repeated fluctuating environmental conditions maintained desirable finishes ultimately derived state art furnishing achieved deserving applause!!
Sanding down rough edges splinters enhances safer handling polish surfaces pleasingly appears!! Penetrative sealants applied final stages act protective barriers prolong durability simultaneously able paint stains colors desired varied personalities integrating converting practical artistic masterpieces transcending ordinary realms synonymous extraordinary aesthetic journeys beckon every completed masterpiece assuring satisfaction exceeding expectations fulfilling one’s proud ownership unique prized possession standing testament skills investments undertaken crafting passion epitomized visions realities transformed trusted procedures followed meticulously yielding accomplishments praise deserved recognition eagerly shared enthusiastically friends acquaintances widening circles undoubtedly amazed admired prowess unbounded resulting creativity truly celebrating sheer ingenuity remarkable cherished heirlooms future generations!!!
Conclusion
Creating a driftwood floor lamp is a rewarding project that combines creativity and craftsmanship. This unique piece of decor not only serves as a functional light source but also adds a touch of nature to your home. Each step, from selecting the driftwood to installing the light fixture, brings you closer to a personalized and stylish creation.
Maintaining your driftwood lamp ensures its longevity and continued beauty. Customizing it to fit different interior styles can make it a versatile addition to any room. By following the outlined steps and tips, you can craft a stunning driftwood floor lamp that is both durable and aesthetically pleasing.

I’m Emily Johnson, an affiliate marketer and blogger focused on lamps and lighting. I share honest reviews, simple buying guides, and practical tips. My goal is to help readers choose the right lamp for their space, style, and budget with confidence.