
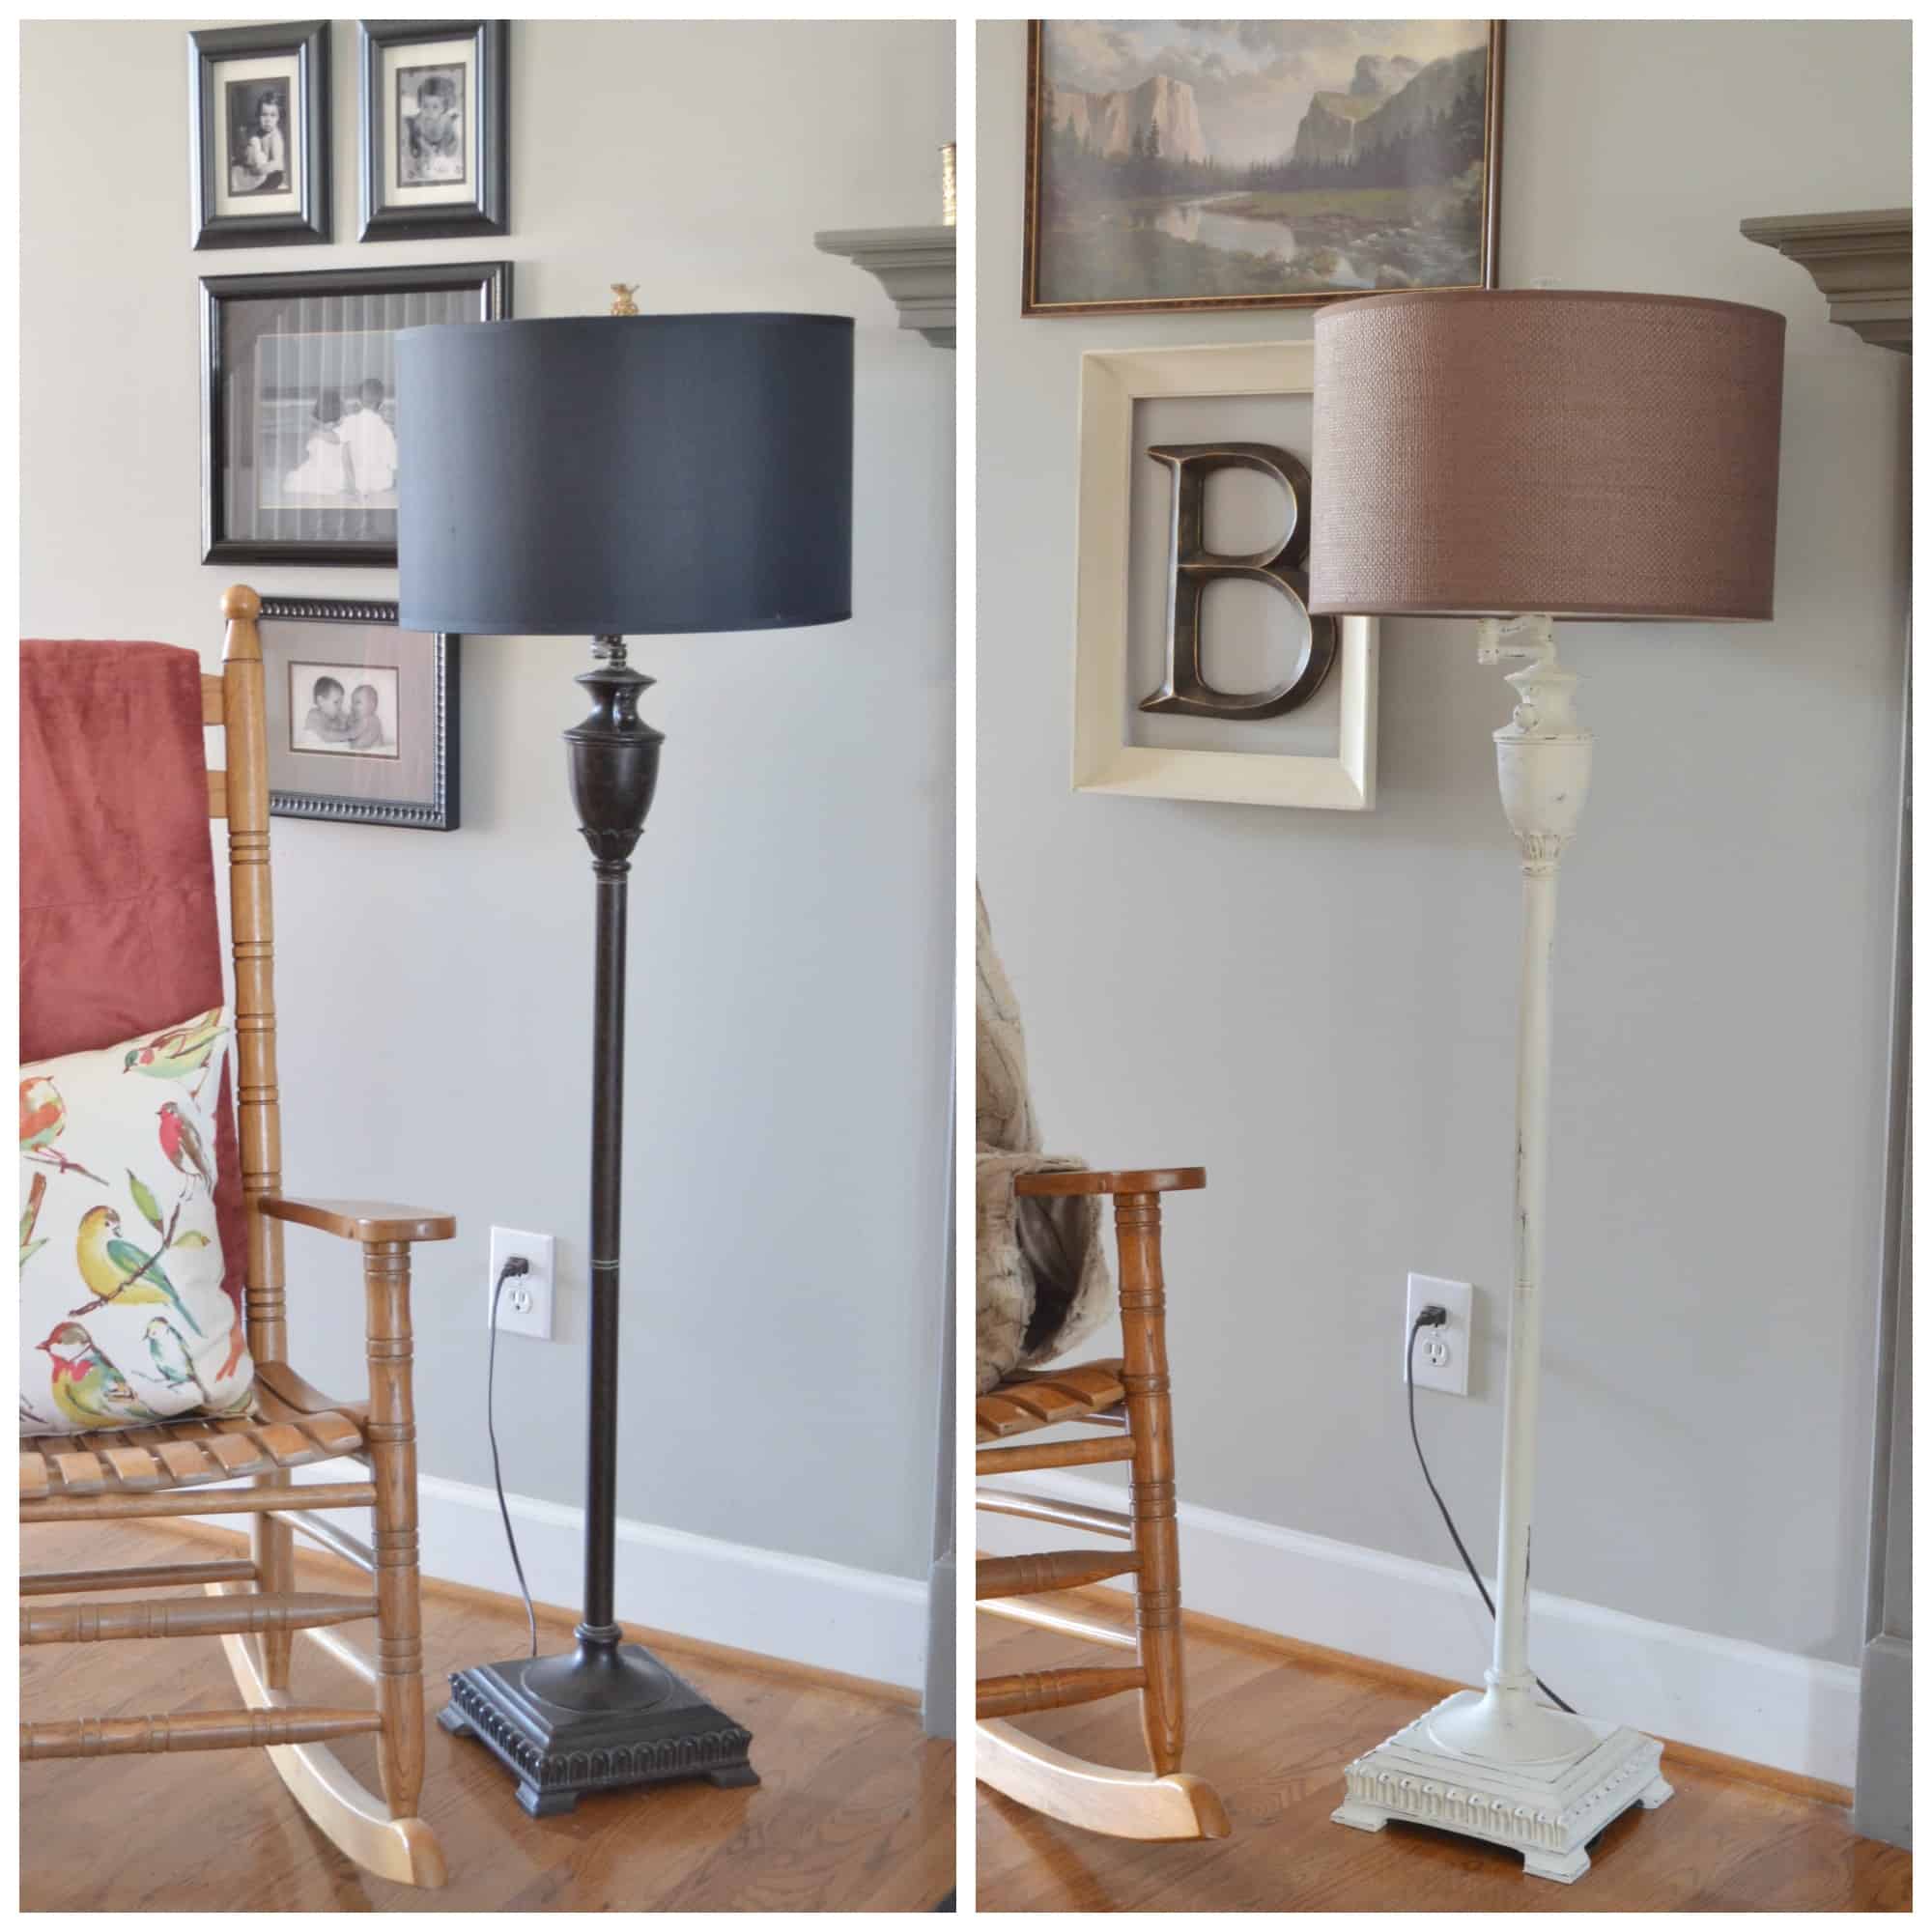
Have you ever considered how a simple coat of paint can completely transform an ordinary metal floor lamp into a striking accent piece? The process may seem daunting, but with the right preparation and technique, even the most rusted and worn-out lamp can be given a new lease on life. It’s all about choosing the right materials and following a few straightforward steps tailored to work with metal surfaces.
Historically, metal lamp refinishing required labor-intensive techniques, but advancements in primer and paint formulas have simplified the task. Statistics show that properly applied paint on metal can increase its lifespan by up to 10 years, making it a cost-effective solution. Start with thorough cleaning and sanding to ensure the paint adheres well, then follow it up with a high-quality primer specifically designed for metal surfaces; this is crucial for a smooth and durable finish.
2. Clean thoroughly with soapy water and let dry.
3. Sand the surface gently to create texture.
4. Apply a metal-specific primer in thin, even coats; let dry.
5. Paint using metal-suitable spray paint in multiple thin layers; allow drying between coats.
6. Reassemble the lamp after complete drying.
How to Paint a Metal Floor Lamp
Painting a metal floor lamp begins with proper preparation. First, disassemble the lamp if possible, removing any lightbulbs and detachable parts. Clean the lamp thoroughly using soapy water and a soft cloth to remove dust and grime. Once cleaned, allow the lamp to dry completely. Sand the surface gently using fine-grit sandpaper to create a texture that helps the paint adhere better.
Next, select a high-quality primer designed specifically for metal surfaces. According to this post, applying primer ensures that your paint job is durable and long-lasting. Spray the primer evenly over the lamp, maintaining a consistent distance to avoid drips. Allow the primer to dry as per the manufacturer’s instructions. This layer forms the foundation for your paint, making it essential for a smooth finish.
With the primer dry, it’s time to apply the paint. Choose a paint type suitable for metal—spray paints are often the best option for an even coat. Spray thin, even layers, starting from the top and working your way down. Let each layer dry before applying the next one. Multiple thin layers provide better coverage and a more polished look compared to one thick layer.
After painting, allow the lamp to dry completely in a dust-free area. Once it’s dry, you can reassemble the lamp and attach any parts you removed earlier. Adding a clear protective sealant at this stage can enhance durability, keeping your lamp looking fresh for longer. For more creative ideas, check out another project on making custom lamps here is the article.
Step 1: Preparation of the Lamp
The first step in preparing a metal floor lamp for painting is disassembly. Remove any lightbulbs, lampshades, and detachable parts. Cleaning is crucial to eliminate dust and grime that could affect the paint adhesion. Use a mixture of soap and water along with a soft cloth for this job. Make sure the lamp is completely dry before moving on.
Once cleaning is done, assess the surface for any rust or old paint. If you find rust, gently remove it using fine-grit sandpaper or a wire brush. Sanding also helps create a slightly rough surface, which allows the primer to stick better. According to this post, it’s important to avoid using coarse sandpaper as it can scratch the metal. After sanding, wipe down the lamp to remove all the dust particles.
Your next step involves protecting areas that shouldn’t be painted. Use painter’s tape to cover sockets, switches, and any other small parts. This will ensure that paint doesn’t accidentally get onto areas it shouldn’t. Lay down newspaper or a drop cloth to catch any paint drips. Preparing your workspace properly can save you from plenty of cleanup later.
A final inspection of the lamp and workspace is crucial before you begin priming. Check if you’ve covered all the necessary areas with tape and have the drop cloth in place. Make sure the lamp is stable and in an easy-to-reach position. This helps avoid any accidents or spills while painting. Proper preparation sets the stage for a successful painting project.
Step 2: Choosing the Right Primer and Paint
Selecting the right primer is crucial for a durable paint job. Primers specifically designed for metal surfaces ensure good adhesion and long-lasting protection against rust. There are many types of primers available, but for a metal floor lamp, an oil-based or epoxy primer works best. These primers create a strong base that helps the paint adhere and prevents peeling. Make sure to read the manufacturer’s instructions for optimal results.
Choosing the right paint is just as important as selecting the right primer. Opt for paints formulated for metal surfaces, as they offer better durability and finish. Spray paints are highly recommended for their ease of use and smooth application. A high-quality enamel or acrylic spray paint can provide a beautiful, even finish. Consider colors that match your décor and are labeled as durable for high-traffic areas.
When shopping for paint, look at additional features such as UV resistance and quick-drying formulas. UV-resistant paints help maintain the vibrancy of the color over time, especially if the lamp is in a sunny spot. Quick-drying options can save time, allowing you to apply multiple coats in one day. Here’s a simple list of what to look for:
- Metal-specific primer (oil-based or epoxy)
- High-quality enamel or acrylic spray paint
- UV resistance
- Quick-drying
- Durability
Before making a purchase, check reviews and recommendations from experts. Visit specialized stores or look up trusted online reviews for product feedback. Sometimes, consulting with a store clerk can also guide you to the best product for your specific needs. The right primer and paint can make all the difference in transforming your metal floor lamp into a stunning accent piece.
Step 3: Applying the Primer
Applying the primer is an essential step in painting your metal floor lamp. Start by shaking the primer can vigorously to mix the contents well. Hold the can about 12 inches away from the lamp to ensure an even coat. Spray in a sweeping motion, moving from side to side. This helps avoid drips and ensures a smooth application.
Make sure to cover every part of the lamp, including any hard-to-reach areas. You may need to reposition the lamp several times to get full coverage. Thin, even layers work best, so avoid applying too much primer in one go. Allow the first layer to dry completely before adding a second coat. This may take about 30 minutes to an hour, depending on the primer used.
After the primer has dried, check for any missed spots or imperfections. If you find any, sand them lightly and apply another thin layer of primer. This ensures a smooth surface for the paint to adhere to. Pay extra attention to joints and crevices where the primer might pool. Properly primed surfaces lead to a more professional and long-lasting paint job.
Ventilation is key when applying primer. Make sure you’re working in a well-ventilated area, preferably outdoors or in a garage with open doors. Use protective gear like masks and gloves to avoid inhaling fumes. This keeps you safe while working. Proper ventilation also speeds up the drying process.
For optimal results, follow the manufacturer’s instructions on the primer can. Each product may have slightly different requirements for drying times and the number of coats needed. Always read and follow these guidelines closely. It ensures that the primer will perform as expected and provides the best base for your paint.
Step 4: Painting the Metal Floor Lamp
Once the primer is completely dry, it’s time to start painting your metal floor lamp. Shake the paint can thoroughly to mix the contents well. Hold the can about 12 inches away from the surface of the lamp. Spray in a continuous, sweeping motion from side to side. Ensure even coverage without creating any drips or pools of paint.
Applying multiple thin coats is better than a single thick one. Thin layers dry faster and reduce the risk of runs and drips. Wait for each coat to dry before applying the next one. Typically, you should wait about 30 minutes between coats. This will help you achieve a smooth and professional-looking finish.
Pay extra attention to details and hard-to-reach areas where you might need to maneuver the can differently. Consistency is crucial to achieve an even color and texture. If needed, tilt or reposition the lamp to get an even application. This way, no spot is missed, and the entire lamp looks uniform.
Work in a well-ventilated area to avoid inhaling fumes, and wear protective gear such as gloves and masks. Proper ventilation helps the paint dry faster and keeps the environment safer. Ensure that the workspace is free of dust and debris that could stick to the wet paint. This will ensure a cleaner and longer-lasting finish.
After applying the final coat, allow the paint to cure fully. This curing process can take anywhere from 24 to 48 hours depending on the type of paint used. Avoid touching or moving the lamp during this time to prevent any smudges or marks. Once fully cured, your lamp will have a fresh, new look and be ready to reassemble.
Step 5: Drying and Final Touches
After applying the last coat of paint, it’s critical to allow the lamp to dry properly. Place it in a clean, dust-free area where it won’t be disturbed. Usually, drying takes about 24 to 48 hours, depending on the paint type and environmental conditions. Avoid touching or moving the lamp during this period to prevent any smudges or fingerprints. Patience during this stage ensures a flawless finish.
Once the lamp is fully dry, it’s time to reassemble any parts you removed earlier, like the lampshade or lightbulbs. Double-check that all components are securely fitted and functioning correctly. This is also the perfect time to clean up any small paint splatters or imperfections with a soft cloth. Sometimes, a final very light sanding with fine-grit sandpaper can smooth out any minor rough spots. Just be cautious not to damage the new paint layer.
Consider adding a protective clear coat to enhance the durability of the paint. Clear coats are available in gloss, satin, and matte finishes, allowing you to choose the one that best complements your décor. Apply the clear coat in the same manner as the paint, using thin, even layers and allowing each to dry completely. A protective layer can significantly prolong the lifespan of your paint job, keeping the lamp looking fresh and new.
Finishing touches can also involve updating other aspects of the lamp, such as replacing old electrical cords or adding new lampshades. Small details like these can make a big difference in the overall appearance and functionality of the lamp. Aligning these upgrades with the fresh paintwork can result in a cohesive and polished look. These final tweaks turn a simple paint job into a complete makeover.
Here are the steps for final touches:
- Reassemble removed parts
- Clean minor paint splatters
- Apply a protective clear coat
- Update electrical cords and lampshades
Benefits of Painting a Metal Floor Lamp
Painting a metal floor lamp offers both aesthetic and practical benefits. One of the key advantages is the ability to customize its appearance to match your home décor. Whether you want a sleek modern look or a vibrant pop of color, painting offers endless possibilities. This customization allows you to breathe new life into an old or outdated lamp. It’s an affordable way to upgrade your living space without buying new furniture.
Another significant benefit is protection against rust and corrosion. Over time, metal surfaces can degrade due to exposure to moisture and air. A good coat of primer and paint forms a protective barrier that minimizes this damage. This not only extends the lifespan of your lamp but also maintains its structural integrity. According to experts, regular maintenance like repainting can add years to the life of metal objects.
Painting your lamp can also boost its resale value. A well-maintained, freshly painted lamp is more appealing to potential buyers if you ever decide to sell it. It shows that the item has been cared for and can function as both a decorative piece and a functional element in any room. This increase in appeal can make your items sell faster and at a higher price.
A final benefit is the sense of accomplishment that comes from completing a DIY project. Taking on such tasks allows you to exercise creativity, learn new skills, and enhance your home with personal touches. The experience gained through these projects can be applied to future endeavors around the house. Plus, it’s always rewarding to see tangible results from your hard work.
Additional benefits include:
- Cost-effective home improvement
- Enhanced room ambiance
- Environmentally friendly (reuse instead of purchase)
- Opportunity for creative expression
Tips for Maintaining a Painted Metal Floor Lamp
Proper maintenance of a painted metal floor lamp ensures its longevity and keeps it looking fresh. One key tip is to regularly dust the lamp using a soft, dry cloth. This prevents the accumulation of dirt and grime that can dull the paint. For detailed areas, use a soft-bristled brush to remove dust. Avoid using water directly, as it can lead to rust over time.
If the lamp gets stained or dirty, use a mild soap solution and a damp cloth to clean it gently. Avoid abrasive cleaners or harsh chemicals, as these can damage the paint. Once cleaned, wipe the lamp with a dry cloth to remove any moisture. This approach ensures that the paint remains vibrant and intact over the years. Always test a small, inconspicuous area first to ensure the cleaner doesn’t react with the paint.
Applying a clear protective sealant can help keep the paint in top condition. This sealant creates an additional layer of protection against scratches and chips. It’s particularly useful if your lamp is in a high-traffic area or frequently handled. Reapply the protective coating every year or as needed. Check the manufacturer’s instructions for the best results.
Regular inspections can help you spot any issues early on. Look for any signs of peeling or chipping paint and address them promptly. Sand the affected area lightly and apply touch-up paint to keep it looking uniform. This proactive approach prevents minor issues from becoming major problems. It also helps maintain the lamp’s aesthetic appeal.
Here are some quick maintenance tips:
- Regular dusting with a soft cloth
- Gentle cleaning with a mild soap solution
- Applying a clear protective sealant
- Conducting regular inspections
- Using touch-up paint for minor chips
Common Mistakes to Avoid When Painting a Metal Floor Lamp
One common mistake is skipping the primer. Primer prepares the metal surface to receive paint, enhancing adhesion and durability. Without it, the paint may peel or chip easily. Always start with a high-quality primer made for metal surfaces. This step can’t be ignored if you want a lasting finish.
Another mistake is not properly cleaning and sanding the lamp before painting. Dirt, grime, and rust can prevent the paint from sticking well. Sand the surface lightly to create texture, and clean thoroughly to remove any contaminants. This ensures that the paint adheres smoothly. Neglecting this preparation can result in an uneven or blotchy finish.
Using the wrong type of paint is also a frequent error. Not all paints are suitable for metal surfaces. Choose paints specifically formulated for metal to ensure they adhere well and resist rust. Spray paints are often the best choice for even application. Inappropriate paint can flake off and ruin your hard work.
Applying thick layers of paint in one go is another pitfall. Thick coats take longer to dry and are prone to dripping and running. Instead, apply several thin, even coats, allowing each to dry before the next. This method gives a smoother, more professional finish. Rushing through this step can lead to a messy outcome.
Here are key mistakes to avoid:
- Skipping the primer
- Neglecting proper cleaning and sanding
- Using the wrong type of paint
- Applying thick layers of paint
Lastly, not allowing enough drying time between coats can compromise the final result. Always follow the paint manufacturer’s guidelines for drying times. Patience is crucial in achieving a flawless result. Cutting corners in this process can lead to a subpar finish that won’t stand the test of time.
Frequently Asked Questions
Painting a metal floor lamp can seem daunting, but it’s manageable with proper knowledge. Here are some commonly asked questions to guide you through the process.
1. What types of paint work best on metal floor lamps?
The best paints for metal floor lamps are spray paints designed for metal surfaces. These provide even coverage and are easy to apply. Enamel and acrylic spray paints are both excellent choices, offering durability and a sleek finish.
Oil-based paints can also be used if you’re looking for robust protection. They resist rust effectively but may take longer to dry compared to spray options. Priming is crucial regardless of your paint choice to ensure adhesion and longevity.
2. How do I avoid drips while painting?
Avoiding drips starts with applying thin, even coats of paint rather than one thick layer. Hold the spray can about 12 inches from the surface and move it continuously while spraying.
This technique helps prevent paint from pooling in any area, reducing the risk of drips. Allow each coat to dry fully before applying the next one; usually, 30 minutes between layers is sufficient.
3. Is it necessary to use a primer before painting?
Yes, using a primer is essential when painting a metal floor lamp. Primer ensures that the paint sticks well to the metal surface and provides an even base color.
A high-quality primer also helps in protecting the lamp from rust and corrosion over time. Skip this step, and you’ll likely face issues like peeling or chipping later on.
4. Can I use regular sandpaper for sanding my lamp?
You should use fine-grit sandpaper when sanding a metal floor lamp to avoid scratching the surface too deeply. Fine-grit paper smooths minor imperfections without damaging the material.
This preparation step makes sure that the primer adheres better by creating slight roughness on an otherwise slick surface. Avoid coarse sandpaper as it can create gouges that are hard to cover up with paint.
5. How long should I wait between coats of paint?
The drying time between coats largely depends on environmental factors like humidity and temperature, as well as the type of paint used.This post, generally recommends waiting at least 30 minutes between thin coats for optimal results.
Conclusion
Painting a metal floor lamp is a rewarding DIY project that can completely transform its appearance. With the right preparation, primer, and paint, you ensure a durable and professional-looking finish. Remember to follow each step carefully for the best results.
By avoiding common mistakes and taking extra care during each stage, you can extend the life of your lamp while enhancing its aesthetic appeal. Whether you’re refreshing an old lamp or customizing a new one, this project allows for endless creativity and personal expression. Happy painting!

I’m Emily Johnson, an affiliate marketer and blogger focused on lamps and lighting. I share honest reviews, simple buying guides, and practical tips. My goal is to help readers choose the right lamp for their space, style, and budget with confidence.