Did you know that antique floor lamps can often be rejuvenated to their former glory with a carefully executed rewiring process? This transformation not only preserves the lamp’s timeless aesthetics but also significantly enhances its safety and functionality. Undertaking this project requires a balance of technical skill and an understanding of the lamp’s historical craftsmanship.
The process of rewiring an antique floor lamp begins with a thorough assessment of the existing wiring, which is typically outdated and prone to hazards. Experts recommend using modern, high-quality wiring components while respecting the original design elements. This attention to detail ensures the lamp not only operates safely but also retains its authentic charm, merging old-world elegance with contemporary reliability.
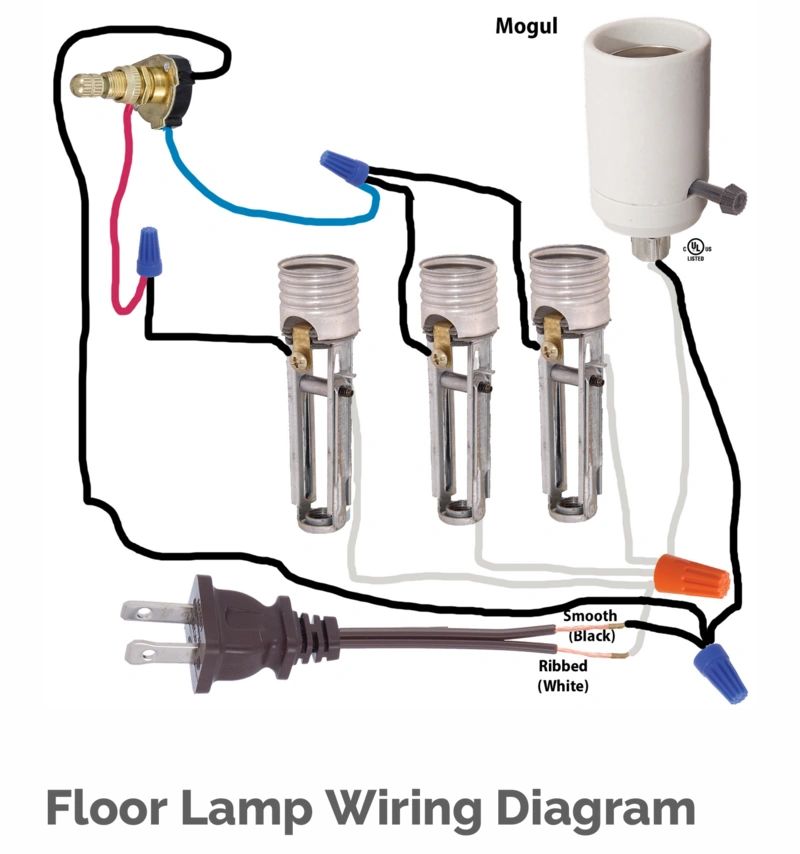
- Unplug the lamp and assess existing wiring for hazards.
- Gather necessary tools: wire cutters, new wiring, socket, and electrical tape.
- Disassemble the lamp carefully, documenting each step with photos.
- Replace old wiring by threading new wires through the body and connecting to the socket.
- Reassemble the lamp following your documentation and test it for functionality.

How to Rewire an Antique Floor Lamp
Rewiring an antique floor lamp can breathe new life into a timeless piece. The first step involves carefully assessing the existing wiring. This ensures that you understand its current state and identify any hazards. According to this post, outdated wiring can be a serious fire risk. Taking this precaution can save time and prevent accidents.
Next, gather all the necessary tools and materials, such as wire cutters, new wiring, and a replacement socket. Having everything on hand makes the process smoother. Disassemble the lamp with caution to avoid damaging its delicate parts. This step-by-step approach helps in keeping track of small components. Reassembling will be easier if you take photos during disassembly.
Proceed by replacing the old wiring with the new ones. Thread the new wire through the lamp’s body, ensuring it’s securely in place. Attach the wire to the new socket and screw it into place. Make sure to follow your lamp’s original wiring layout as much as possible. This ensures that the lamp retains its authentic charm.
Finally, reassemble the lamp by following the photos you took earlier. Test the lamp to make sure it works correctly before putting everything back together completely. According to here is the article, conducting a thorough test ensures everything is in working order and safe to use. Enjoy your beautifully restored antique floor lamp that now combines classic beauty with modern safety standards.
Step 1: Assessing the Existing Wiring
Before starting the rewiring process, carefully assess the existing wiring in your antique floor lamp. Look for any signs of wear and tear, such as frayed wires or broken insulation. These issues can be hazardous and need to be addressed immediately. According to this post, relying on expert opinion can help identify the correct wire type needed for replacement. Understanding the current state of the wiring is crucial for a safe rewiring project.
While assessing, take note of the connections and the wiring layout. This includes how the wires are threaded through the lamp’s body and connected to the socket and plug. Documenting this layout with photos or sketches can serve as a reference. By doing this, you ensure that you can replicate the original setup. This step helps in maintaining the lamp’s historical accuracy.
Check if the existing wiring meets modern electrical standards. Often, antique lamps have outdated wires that are not safe to use anymore. Using new, high-quality wiring is recommended for safety. Look for any signs of previous repairs that may need attention. These could indicate areas of concern that require extra care during rewiring.
If you’re unsure about certain aspects of the wiring, seeking professional advice is beneficial. An expert can provide guidance and ensure you use the correct materials and techniques. According to this resource, consulting experienced individuals can offer practical tips and safety measures. This proactive approach helps in avoiding potential issues during the rewiring process.
Step 2: Gathering Essential Tools and Materials
Before you start rewiring an antique floor lamp, it’s important to gather all the necessary tools and materials. Having the right supplies on hand ensures a smooth workflow with minimal disruptions. The basic tools required include wire cutters, a screwdriver set, and pliers. You’ll also need new wiring, a replacement socket, and electrical tape. Make sure you have everything ready before you begin to avoid unnecessary delays.
Here’s a list of essential tools and materials you need:
- Wire cutters
- Screwdriver set
- Pliers
- Replacement socket
- New wiring
- Electrical tape
- Multimeter
Having these tools and materials ensures that you can handle any obstacle that comes up during the rewiring process. Gathering them beforehand saves time and effort.
Select high-quality wiring that meets modern electrical standards. This is particularly important for safety and longevity. Old, worn-out wires pose significant fire risks. Therefore, investing in good quality wiring is essential. Sites like online hardware stores or local shops often have the necessary materials.
In addition to tools, consider preparing a clean workspace. This helps in organizing small parts and tools effectively. A clutter-free area minimizes the chances of losing important components. These preparations contribute to a smoother and safer rewiring process. Taking these steps ensures your project outcome is both aesthetically pleasing and electrically sound.
Step 3: Disassembling the Antique Lamp
Disassembling an antique floor lamp requires patience and attention to detail. Begin by unplugging the lamp to ensure it’s safe to work on. Carefully remove the lampshade, setting it aside in a safe place. Next, unscrew the socket housing to reveal the inner wiring. Keep all screws and small parts in a container to avoid losing them.
As you take apart the lamp, document each step with photos. This will help you reassemble it correctly later. Pay close attention to the way the wires are threaded through the lamp’s body. Marking these points can save time during reassembly. A smooth disassembly sets the stage for a successful rewiring process.
Remove the old wiring from the socket and threaded pole. Pull the wires gently to avoid damaging the lamp’s structure. If the wires are stuck, use pliers for extra grip. Ensure you capture the original wiring layout. This helps in maintaining the lamp’s authenticity while upgrading its safety.
Some parts of the lamp may require a bit more effort to disassemble. For stubborn sections, use the right tools to avoid damaging the antique elements. Take care not to force any parts as this could lead to breakage. Gentle tapping or a few drops of lubricant can help. Once fully disassembled, clean the parts to prepare for the rewiring.
It’s essential to work in a well-lit area. Good lighting ensures you can see all the small details and connections clearly. This helps prevent mistakes that could jeopardize the project. Organizing the disassembled parts can make the reassembly quicker and smoother. A well-planned disassembly makes the overall process more efficient and enjoyable.
Step 4: Replacing the Old Wiring
Replacing the old wiring in your antique floor lamp is a crucial step to ensure safety and functionality. Start by laying out the new wiring alongside the old wires you removed. This gives you a clear idea of the length you’ll need. Cut the new wire to match this length, allowing a bit more for any adjustments. Double-check that you are using high-quality, modern wires.
Thread the new wiring through the lamp’s body carefully. This might require a bit of patience, especially if the lamp has tight or intricate passages. Use a wire coat hanger to guide the new wire if necessary. Ensure the wire is not crimped or damaged during this process. Smooth threading maintains the wire’s integrity.
Once the wiring is in place, connect it to the new socket. Strip the ends of the wire to expose the copper strands. Attach these to the corresponding terminals on the socket. Make sure the connections are tight and secure to avoid short circuits. A reliable connection is vital for the lamp’s safe operation.
Using electrical tape, wrap the connections to keep them insulated. This prevents any accidental contacts that could cause a short circuit. Double-check all connections to confirm they are secure. This extra step provides an added layer of safety. Proper insulation ensures the longevity of the lamp.
Here’s a quick checklist to follow:
- Measure and cut new wiring
- Thread the wire through the lamp
- Connect wire to the socket
- Secure connections with electrical tape
- Double-check all connections
These steps ensure that your antique floor lamp is safely rewired and ready to use.
Step 5: Reassembling the Lamp
Reassembling the lamp is the final step in the rewiring process. Start by referring to the photos or sketches you took during disassembly. These visual aids will help guide you in piecing the lamp back together correctly. Begin by reattaching the socket and securing it in place. Make sure the new wiring is neatly threaded and free of kinks.
Next, reattach the lamp’s body components in the reverse order you disassembled them. Be cautious not to overtighten any screws, as this could damage the antique materials. Use a gentle hand and follow the original layout as closely as possible. This preserves the lamp’s authentic look while ensuring it functions properly. Attention to detail in this step is vital.
After the lamp is reassembled, it’s time to test it. Plug the lamp into an outlet and switch it on. If it lights up, congratulations—you’ve successfully rewired and reassembled your antique floor lamp! If not, double-check all connections to ensure they are secure. Troubleshoot any issues with patience and care.
Here are the final steps to verify your work:
- Double-check all screws and connections
- Ensure the wiring is neat and secure
- Test the lamp in a safe environment
Following these steps ensures your lamp is safe to use and retains its charm. Celebrating your success in restoring a beautiful antique piece can be incredibly rewarding.
Safety Precautions to Consider When Rewiring an Antique Floor Lamp
Safety should always be your top priority when rewiring an antique floor lamp. Begin by unplugging the lamp before starting any work to prevent electrical shocks. Wear protective gloves and safety goggles to safeguard yourself from potential hazards. These precautions are essential for a safe working environment. Always make sure you’re aware of your surroundings while working.
Check that the new wiring you use meets modern electrical standards. Outdated or low-quality wires can pose significant risks, including fire hazards. Use a multimeter to test the continuity of the new wires. This ensures they are in good condition and safe for use. High-quality materials minimize the risk of future problems.
If you encounter any frayed or damaged wires during disassembly, discard them immediately. Damaged wiring is unsafe and should never be reused. Ensure all connections are securely fastened and insulated with electrical tape. Inspect these connections thoroughly before proceeding with reassembly. Proper insulation helps prevent short circuits and electric shocks.
Here’s a safety checklist:
- Unplug the lamp before starting
- Wear protective gloves and goggles
- Use high-quality wiring
- Test new wires with a multimeter
- Discard damaged wires
Following this checklist helps create a safer workspace and ensures your project is as risk-free as possible.
If you’re unsure about any part of the process, consult an expert or refer to reliable guides online. Seeking professional advice can help you avoid common mistakes that could compromise safety. Online forums and instructional videos often offer valuable insights into proper techniques and precautions. Prioritizing safety makes your rewiring project both successful and enjoyable.
The Importance of Quality Wire in Antique Lamp Rewiring
High-quality wire is essential when rewiring an antique floor lamp. Using substandard wires can result in electrical malfunctions or even fire hazards. Modern wires offer superior insulation and durability, enhancing the lamp’s safety and lifespan. By prioritizing quality, you decrease the risk of future issues. This choice is crucial for maintaining both functionality and security.
One of the main benefits of using quality wire is its improved electrical conductivity. This ensures that power flows smoothly and efficiently through the lamp. Reliable wires reduce the chances of short circuits and overheating. Enhanced conductivity also contributes to the overall performance of the lamp. This means a brighter and more consistent light output.
Here are the advantages of using quality wires:
- Better insulation
- Improved electrical conductivity
- Increased safety
- Enhanced durability
- Longer lifespan
Each of these factors contributes to a safer and more reliable antique floor lamp.
Additionally, high-quality wires are generally easier to work with. They offer more flexibility, which can be beneficial in threading through intricate lamp designs. This makes the rewiring process smoother and less stressful. Good quality materials make a big difference in both the ease of installation and the final outcome. Investing in quality wire is a smart decision for any rewiring project.
Choosing the right wire ensures that your antique lamp not only looks great but also operates safely. It’s worth taking the time to research and select the best materials available. Proper rewiring protects your valuable antique investment. Ensuring your project stands the test of time is rewarding both aesthetically and functionally. Always prioritize quality to achieve the best results.
How to Maintain the Authenticity of The Lamp While Rewiring
Maintaining the authenticity of an antique floor lamp while rewiring it is crucial. Start by documenting the lamp’s original state with detailed photos. These images will guide you in keeping true to its design. Carefully note the wiring layout and connections. This careful attention helps preserve the lamp’s original essence.
Use materials that match the lamp’s historical period as closely as possible. While modern wiring is necessary for safety, other components can reflect the antique style. Choose fabric-covered or braided wires if they match the original design. This blend of old and new maintains the lamp’s aesthetic while ensuring it is safe to use. Pay attention to these details to keep the lamp looking authentic.
When replacing parts, opt for vintage-style sockets and plugs. These components enhance the lamp’s classic look. Avoid using plastic parts if the original lamp featured metal components. Staying true to the original materials keeps the lamp’s integrity intact. It’s these small touches that make a significant difference in authenticity.
Here’s a list of how to maintain authenticity:
- Document the original state with photos
- Use fabric-covered or braided wires
- Choose vintage-style sockets and plugs
- Avoid plastic parts if the original had metal
Following these tips helps preserve the lamp’s genuine charm.
Finally, handle all parts with care to avoid damage. Even minor scratches or dents can reduce the lamp’s value. By being gentle and patient, you ensure that the lamp remains as close to its original state as possible. The goal is to blend modern safety with historical accuracy. Maintaining this balance honors the lamp’s heritage while making it functional for today’s use.
Professional Services vs. DIY: Rewiring Antique Floor Lamp
When it comes to rewiring an antique floor lamp, you have two main options: professional services or DIY. Each choice has its pros and cons, depending on your skills and budget. Hiring a professional ensures the job is done correctly and safely. Professionals have the right tools and experience to handle delicate antique pieces. However, this option can be more expensive.
Choosing DIY allows for a personal touch and can be more budget-friendly. If you have some electrical knowledge and enjoy hands-on projects, this could be a rewarding experience. DIY rewiring also provides an opportunity to learn new skills. However, there’s a risk of making errors that could compromise the lamp’s safety. Weighing these factors helps in deciding the best approach.
Here’s a quick comparison:
| Factor | Professional Services | DIY |
|---|---|---|
| Cost | Higher | Lower |
| Skill Level Required | Minimal | Moderate to High |
| Quality Assurance | Professional-grade | Variable |
| Time Investment | Low | High |
This table highlights the key differences to help you choose wisely.
If you opt for professional services, ensure you choose a reputable technician. Look for specialists in antique lamps to maintain the lamp’s integrity. Reading reviews and asking for recommendations can guide you to a reliable expert. This reduces the risk of damage and ensures quality work. Professionals often offer a warranty for their services.
Conversely, if you decide on a DIY approach, gather all necessary tools and materials before starting. Follow detailed guides and take safety precautions seriously. Online forums and instructional videos can be invaluable resources. Patience and attention to detail are your best allies. Whether you choose professional services or DIY, prioritizing safety and quality assures a successful project.
Frequently Asked Questions
Rewiring an antique floor lamp involves careful steps and attention to detail. Below are some frequently asked questions to help guide you through the process.
1. Why is it important to document the disassembly process?
Documenting the disassembly process ensures that you can reassemble the lamp correctly. Take photos and notes at each step to capture how components fit together.
This documentation helps you maintain the lamp’s authenticity during reassembly. It also minimizes errors, saving time and preventing potential damage.
2. What type of wire should I use for rewiring an antique lamp?
For rewiring an antique lamp, use high-quality, modern wiring that meets electrical standards. Fabric-covered or braided wires can match the vintage look while ensuring safety.
Modern wires offer better insulation, reducing risks like short circuits or fires. This combination of old aesthetics and modern technology enhances both appearance and safety.
3. What tools are essential for rewiring a floor lamp?
You will need wire cutters, a screwdriver set, pliers, electrical tape, and a multimeter. These basic tools help you safely remove old wiring and install new wires effectively.
A container for small parts is also useful to keep everything organized during disassembly. This preparation streamlines your workflow and ensures all parts are easily accessible when needed.
4? Is it advisable to seek professional help for this task?
If unsure about your skills or safety practices, seeking professional help is recommended. Professionals have experience in handling delicate antiques without causing damage.
This option may be costlier but ensures high-quality work tailored to preserving your lamp’s integrity. Consultation with experts adds peace of mind while restoring valuable pieces.
5? How do I ensure my rewired antique lamp meets safety standards?
Use modern, high-quality wiring that complies with current electrical codes. Always double-check connections and insulate them properly using electrical tape.
Avoid overcrowded sockets and loose fittings that could cause short circuits or overheating. Testing the lamp with a multimeter verifies its safe operation before regular use in your home.
Conclusion
Rewiring an antique floor lamp is a rewarding yet meticulous task. It combines modern safety standards with historical charm. By following the right steps, you can breathe new life into a treasured piece.
Whether opting for DIY or professional help, prioritizing quality and safety ensures long-lasting results. Detailed documentation and the right tools are crucial for a successful project. Embrace the process and enjoy the rejuvenation of your antique lamp.

I’m Emily Johnson, an affiliate marketer and blogger focused on lamps and lighting. I share honest reviews, simple buying guides, and practical tips. My goal is to help readers choose the right lamp for their space, style, and budget with confidence.