To make a log floor lamp, first, gather a sturdy log and drill a hole for the lamp kit. Then, insert the lamp kit and wire it up, adding a lampshade and bulb to finish.
If you want to add a touch of rustic charm to your home decor, making a log floor lamp can be a great DIY project. Not only will it bring warmth and natural beauty to your space, but it’s also a fun and creative way to repurpose an old log.
Plus, with a few simple tools and materials, you can easily create a unique and personalized lighting fixture that will become a focal point in any room. We will provide you with a step-by-step guide on how to make your own log floor lamp, from selecting the right log to wiring up the lamp kit. So, let’s get started and bring a cozy, natural glow into your home!

Source: wixmp.com
How to Make a Log Floor Lamp?
Are you looking to add a unique touch to your home decor? A log floor lamp can be a stunning addition that brings a rustic charm to any room. In this step-by-step guide, we will walk you through the process of creating your very own log floor lamp. From gathering the materials to assembling the lamp, we’ve got you covered. So let’s get started on this exciting DIY project!
Materials Needed
Before you begin, make sure you have all the necessary materials for this project. Here’s a list of what you will need:
- A log – Look for a sturdy log that is at least 4-5 feet tall and has a diameter of around 6-8 inches.
- Lamp kit – Purchase a lamp kit that includes the socket, cord, switch, and plug.
- Drill – You’ll need a drill with a spade bit that is the same size as the diameter of the lamp socket.
- Wood glue – Choose a strong wood glue that can securely bond the lamp socket to the log.
- Wire stripper – This tool will be needed to strip the insulation off the lamp cord.
- Electrical tape – Use electrical tape to secure the connections and provide insulation.
- Light bulb – Select a light bulb that fits the socket and complements the overall aesthetic of the lamp.
Once you have gathered all the materials, you’re ready to move on to the next step.
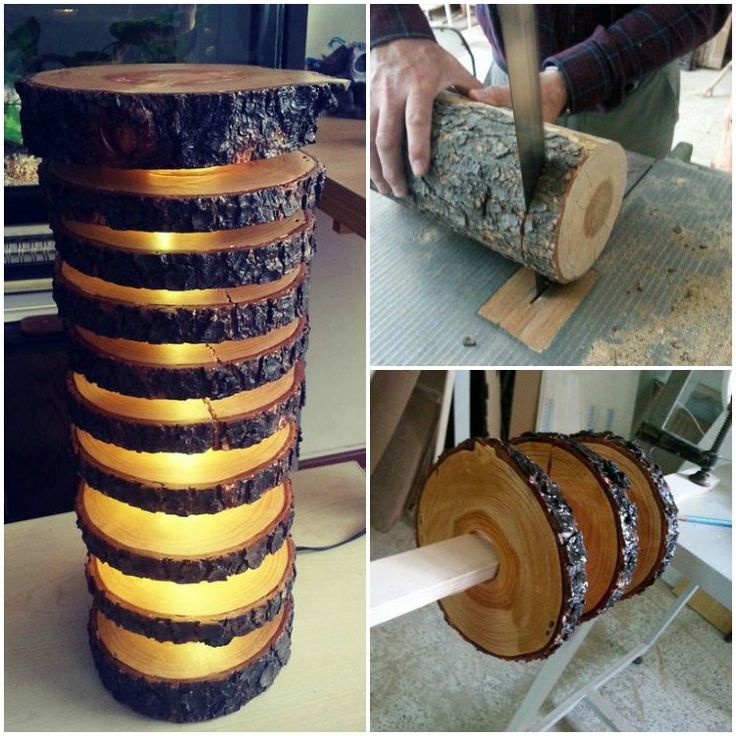
Step 1: Prepare the Log
Start by preparing the log for the lamp. Remove any loose bark or debris from the surface, and sand it down to create a smooth finish. You can use sandpaper or a power sander for this step. Pay attention to any rough edges or splinters and make sure to sand them away.
Next, determine the height at which you want the lamp socket to be placed on the log. Mark this spot with a pencil or tape measure. This will be where you drill the hole for the socket.
Step 2: Drill the Hole
Using a drill with a spade bit that matches the diameter of the lamp socket, carefully drill a hole into the marked spot on the log. Make sure to drill straight and keep the hole centered. You may need to go slowly and apply gentle pressure to avoid splintering the wood.
Once the hole is drilled, remove any wood chips or debris from the inside. You can use a brush or compressed air to clean it out thoroughly.
Step 3: Install the Lamp Kit
Now it’s time to install the lamp kit. Follow the instructions provided with the kit to assemble the socket, cord, switch, and plug. Make sure to thread the cord through the hole in the log from the bottom up.
Apply wood glue around the edges of the hole and insert the lamp socket into it. Press it firmly to ensure a secure bond. Allow the glue to dry completely before moving on to the next step.
Step 4: Connect the Wiring
Using a wire stripper, carefully strip the insulation off the ends of the lamp cord. Follow the instructions provided with the lamp kit to connect the wires to the socket. Use electrical tape to secure the connections and provide insulation.
Double-check all the connections to ensure they are secure and properly insulated. Once you are satisfied, insert the light bulb into the socket.
Step 5: Finishing Touches
Finally, it’s time to add the finishing touches to your log floor lamp. Give the entire lamp a quick inspection to make sure everything is secure and functioning properly. If desired, you can apply a coat of wood finish or varnish to protect the log and enhance its natural beauty.
Once the finish has dried, find the perfect spot in your home to showcase your handmade log floor lamp. Plug it into an outlet, switch it on, and enjoy the warm and inviting glow it brings to your space.
That’s it! You have successfully created your own log floor lamp. We hope you found this guide helpful and that you enjoy the process of making and using your unique piece of home decor.

Credit: www.amazon.com
Frequently Asked Questions For How To Make A Log Floor Lamp
What Type Of Logs Are Suitable For A Floor Lamp?
Hardwoods such as oak, walnut, or cherry are suitable for making a log floor lamp due to their durability and attractive grain patterns. Make sure the log is dry and free from cracks for a better result.
How do I prepare the log for the lamp?
Before turning a log into a lamp, it’s important to prepare it properly. Start by selecting a log that is wide enough to provide stability for the lamp. Remove any branches and ensure the base of the log is flat. You may need to trim or sand the log’s bottom to create a level surface.
Next, clean the log to remove dirt, dust, and debris. Sand the log with coarse sandpaper to remove any rough areas. Follow up with finer sandpaper to achieve a smooth finish. Wipe the log clean after sanding to remove any sawdust. Once the log is clean and smooth, you’re ready to assemble the lamp components.
Can I use any type of log for a floor lamp?
Not all logs are suitable for a floor lamp. It’s best to choose hardwood logs that are sturdy and durable, such as oak, maple, or birch. These types of wood are less prone to splitting or warping, ensuring the lamp remains stable and safe.
Avoid using softwood logs like pine or cedar, as they may not provide the necessary stability. Additionally, make sure the log is properly dried and seasoned, as fresh or green logs can shrink or crack over time. By selecting the right type of log, you’ll ensure your floor lamp stands strong and lasts for years.
Can I customize the log floor lamp to match my home decor?
Absolutely! Making a log floor lamp allows for a lot of customization. You can apply different wood stains or finishes to match the color scheme of your home decor. Additionally, you can choose a lampshade that complements your style, whether it’s rustic, modern, or eclectic.
Consider adding personal touches like carving designs or initials into the log or incorporating other decorative elements. Your log floor lamp can be a unique and personalized addition to your home that reflects your personal style and creativity.
Source: rawpixel.com
Conclusion
In conclusion, making a log floor lamp is a creative and rewarding DIY project that can add a unique touch to any space. By following the step-by-step instructions provided in this guide, you can transform a simple log into a stunning and functional piece of decor. Not only will you have a one-of-a-kind floor lamp, but you will also have the satisfaction of knowing that you created it with your own hands.
Furthermore, making a log floor lamp allows you to showcase your creativity and personalize your home. Whether you choose to leave the log in its natural state, paint it in a bold color, or add decorative elements, the possibilities are endless. This project not only provides you with a functional lighting solution but also serves as a conversation starter and a testament to your DIY skills.
So why not unleash your inner artist and embark on this exciting journey of creating your very own log floor lamp?

I’m Emily Johnson, an affiliate marketer and blogger focused on lamps and lighting. I share honest reviews, simple buying guides, and practical tips. My goal is to help readers choose the right lamp for their space, style, and budget with confidence.