To make a driftwood table lamp, start with a base that’s approximately 9 inches long and 3 inches wide. Drill a 3/4 inch hole in the center of the base and the driftwood pieces.
Attach the lamp rod to the base using a washer and nut. To invisibly secure the branches together, consider using wood glue or adhesive designed for driftwood.

Credit: diydriftwood.com
How to Make a Driftwood Table Lamp?
Creating a driftwood table lamp is a delightful project that allows you to bring a piece of the seaside into your home. This DIY endeavor involves selecting, preparing, and assembling driftwood around a lamp structure to create a unique and natural lighting feature. Here‘s a concise guide based on various sources:
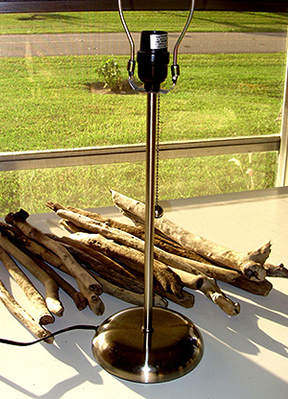
Preparing The Base
Learn how to make a stunning driftwood table lamp by starting with a nine-inch long and three-inch wide base. Drill a three-quarter inch hole in the center of the base and each piece of driftwood. Secure the lamp rod to the base using a washer and nut.
Choosing The Right Driftwood
When it comes to making a driftwood table lamp, it’s important to start with the right kind of driftwood. Look for pieces that have interesting shapes, textures, and colors. The size of the driftwood will depend on the desired height and width of your lamp base. Select pieces that are sturdy and will be able to support the weight of the lampshade.
Preparing And Sanding The Driftwood
Before you can create the lamp base, it’s important to prepare and sand the driftwood properly. Start by cleaning the driftwood to remove any dirt or debris. You can use a soft brush and gentle soap to clean the surface. Once the driftwood is clean, allow it to dry completely to prevent any warping or moisture-related issues.
Next, sand the driftwood to smooth out any rough edges or surfaces. This will not only ensure a more polished look but also create a surface that is easier to work with. Use sandpaper or a sanding block to gently sand the driftwood until it feels smooth to the touch. Be sure to sand all sides and angles of the driftwood for a uniform finish.
When sanding, it’s important to wear protective gloves and a dust mask to avoid inhaling any wood particles. Additionally, be mindful of any unique shapes or natural curves of the driftwood that you want to preserve. Take your time and sand gradually, checking the smoothness of the surface regularly.
Creating The Lamp Base
Once the driftwood is prepared and sanded, it’s time to create the lamp base. Start by determining the desired height of your lamp and cut the driftwood pieces accordingly. You may need to use a saw or other cutting tools depending on the thickness and hardness of the driftwood.
Next, arrange the cut pieces of driftwood to create the lamp base. This can be done by stacking or layering the driftwood in a way that creates a stable and visually appealing structure. You can experiment with different arrangements until you find the one that you like. Once you are satisfied with the arrangement, use wood glue to secure the pieces together.
After the wood glue has dried, reinforce the lamp base by attaching a lamp rod. Drill a three-quarter inch hole into the center of the base, as well as through the center of each piece of driftwood. Then, fix the lamp rod to the base by securing it with a washer and nut.
Finally, give the lamp base a finishing touch by applying a protective coat of varnish or wood stain. This will not only enhance the natural beauty of the driftwood but also protect it from wear and tear. Let the varnish or stain dry according to the manufacturer’s instructions before proceeding to the next step.
With the lamp base complete, you are now ready to move on to wiring and adding the lampshade to create a stunning driftwood table lamp that will add a touch of rustic charm to any room.

Credit: acraftymix.com
Electrical Wiring
When it comes to making your own driftwood table lamp, it’s important to pay attention to the electrical wiring. This step ensures that your lamp functions safely and effectively. In this section, we will go over the process of selecting the lamp kit and bulb, attaching the lamp kit, and properly wiring and testing the lamp.
Selecting The Lamp Kit And Bulb
Before you begin wiring your driftwood lamp, you’ll need to select a lamp kit and bulb that are compatible with your design. Lamp kits usually include the socket, wire, and switch needed to connect the lamp to a power source. When choosing a bulb, consider the wattage and style that best suits your aesthetic preferences.
Attaching The Lamp Kit
Once you have your lamp kit and bulb ready, it’s time to attach the lamp kit to your driftwood base. Start by drilling a three-quarter inch hole into the center of the base. Then, drill the same width hole through the center of each piece of driftwood that you plan to use for your lamp. This will allow the wire to pass through and connect the socket to the bulb.
After drilling the necessary holes, fix the lamp rod to the base by securing it with a washer and nut. This will ensure that the lamp remains stable and secure.
Wiring And Testing The Lamp
Now that the lamp kit is securely attached, it’s time to wire and test the lamp. Begin by connecting the socket to the wire provided in the lamp kit. Follow the instructions included with the kit to ensure proper wiring.
Once the wiring is complete, it’s important to test the lamp before finalizing the assembly. Plug in the lamp and turn on the switch to check if it lights up properly. If everything is functioning as expected, you can proceed with the finishing touches such as adding a lampshade or additional decorative elements.
By following these steps, you can create a beautiful and functional driftwood table lamp. Remember to always prioritize safety when working with electrical components, and consult an electrician if you have any doubts or concerns.
Finishing Touches
Learn how to make a stunning driftwood table lamp in just a few simple steps. Start with a base, drill holes in the driftwood pieces, and secure them to the base. It’s a DIY project that will add a unique touch to your home decor.
Staining Or Polishing The Driftwood
One of the final steps in making your driftwood table lamp is to give the driftwood a finishing touch by staining or polishing it. This will enhance the natural beauty of the wood and protect it from damage. There are two options for finishing the driftwood: staining or polishing.
Staining the Driftwood
To stain the driftwood, you can follow these simple steps:
- Choose a wood stain color that complements your decor.
- Apply the stain evenly to the driftwood using a brush or cloth.
- Allow the stain to penetrate the wood for the recommended amount of time.
- Wipe off any excess stain with a cloth.
- Let the driftwood dry completely before proceeding to the next step.
Polishing the Driftwood
If you prefer a more natural look for your driftwood, you can polish it instead of staining. Here’s how:
- Start by sanding the driftwood to remove any rough edges or splinters.
- Apply a coat of wood polish or wax to the driftwood using a brush or cloth.
- Allow the polish to dry for the recommended amount of time.
- Buff the driftwood with a soft cloth to bring out its natural shine.
Remember, whether you choose to stain or polish the driftwood, it’s important to work in a well-ventilated area and follow the manufacturer’s instructions for the stain or polish you’re using. This will ensure the best results and a beautiful finish for your driftwood table lamp.
Adding A Lampshade
Once you’ve finished staining or polishing the driftwood, the next step is to add a lampshade to your driftwood table lamp. The lampshade not only adds a decorative element but also diffuses the light for a softer glow. Here’s how you can add a lampshade to your driftwood table lamp:
- Choose a lampshade that complements the style and size of your driftwood.
- Place the lampshade on top of the lamp socket, aligning the wire frame with the socket’s harp.
- Screw on the decorative finial to secure the lampshade in place.
- Adjust the lampshade’s position if needed to ensure it is straight and evenly balanced.
Remember to choose a lampshade that allows for the desired amount of light to pass through while still providing enough coverage for a cozy ambiance. Experiment with different styles and sizes to find the perfect fit for your driftwood table lamp.
Installing The Lamp
The final step in completing your driftwood table lamp is to install the lamp itself. This involves connecting the electrical components and ensuring the lamp is safe to use. Here’s a step-by-step guide to help you install the lamp:
- Place the lamp cord through the drilled hole in the driftwood base.
- Thread the cord through the lamp rod, making sure it is securely attached.
- Connect the wires from the lamp socket to the lamp cord by twisting them together and securing them with wire nuts.
- Screw in the light bulb into the lamp socket and secure the socket cap.
- Finally, plug in the lamp cord into a power outlet to test the lamp. Make sure everything is working properly before positioning the lamp in its final location.
Remember, if you’re not confident in your electrical skills, it’s best to consult a professional or follow a detailed guide to ensure the lamp is safely installed. Safety should always be a priority when working with electrical components.
With the finishing touches complete, your driftwood table lamp is now ready to be displayed and admired. Enjoy the warm and natural glow it brings to your space, and take pride in the fact that you made it with your own hands.

Credit: www.pinterest.com
Frequently Asked Questions Of How To Make A Driftwood Table Lamp
How To Make A Driftwood Lamp?
To make a driftwood lamp:
1. Start with a base that’s 9 inches long and 3 inches wide.
2. Drill a 3/4 inch hole in the center of the base and each piece of driftwood.
3. Attach the lamp rod to the base using a washer and nut.
4. Secure the branches together invisibly to avoid showing the joins.
5. Add a lamp shade and enjoy your driftwood lamp!
How Do You Make A Table Lamp Out Of A Log?
To make a table lamp out of a log, start by drilling a three-quarter-inch hole in the center of the log base. Then drill the same width hole through the center of each piece of driftwood. Fix the lamp rod to the base using a washer and nut.
How To Make A Side Table Lamp At Home?
To make a side table lamp at home, start by drilling a three-quarter inch hole in the center of a base that’s about nine inches long and three inches wide. Drill the same size hole through the center of each piece of driftwood.
Attach the lamp rod to the base using a washer and nut.
What Is Needed To Make A Table Lamp?
To make a table lamp, you will need a base, a lamp rod, driftwood pieces, a washer, a nut, a socket, wire, a switch kit, and an LED bulb. Start by drilling a hole in the center of the base and each driftwood piece.
Attach the lamp rod to the base with a washer and nut. Then, connect the socket, wire, and switch kit, and finally, screw in the LED bulb.
Conclusion
Create a stunning driftwood table lamp with these simple steps. Start by selecting a base and drilling a hole into the center. Then, drill holes through each piece of driftwood. Secure the lamp rod to the base and assemble the driftwood pieces.
Finally, attach the lampshade for the finishing touch. With this DIY project, you can bring a touch of nature into your home decor. Get creative and enjoy the process of making your own unique driftwood table lamp.

I’m Emily Johnson, an affiliate marketer and blogger focused on lamps and lighting. I share honest reviews, simple buying guides, and practical tips. My goal is to help readers choose the right lamp for their space, style, and budget with confidence.