
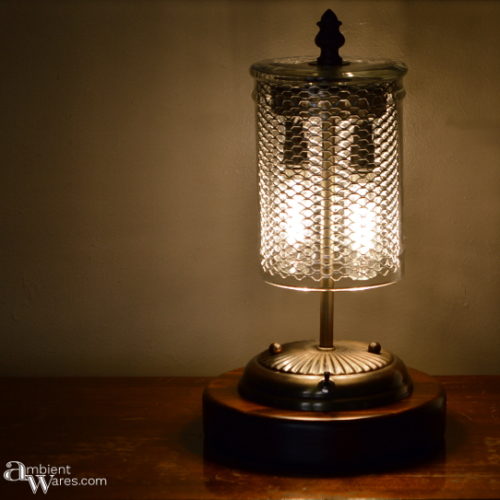
Have you ever wondered how a pendant light, often found dangling elegantly from a ceiling, could transform into a chic table lamp with just a few adjustments? This surprising transformation not only reinvents the purpose of the light fixture but also adds a unique touch to your space. The versatility of pendant lights has been largely untapped, presenting a creative opportunity for interior design enthusiasts and experts alike.
Converting a pendant light into a table lamp involves a straightforward process, typically starting with dismantling the pendant’s suspension system. Historically, pendant lights were exclusive to overhead lighting, but recent design trends emphasize their adaptability. A well-crafted pendant light can be repurposed into a table lamp, providing a cost-effective solution while retaining aesthetic appeal.
- Gather necessary tools: pliers, screwdriver set, lamp kit, and a stable base.
- Dismantle the pendant light’s suspension system by removing its canopy and disconnecting wires.
- Modify the pendant for tabletop use by attaching it securely to a chosen base.
- Assemble the lamp by connecting electrical components and installing the lampshade.
How to Turn a Pendant Light into a Table Lamp
Turning a pendant light into a table lamp starts with gathering the necessary tools. You will need pliers, a screwdriver, and a lamp kit. Begin by carefully dismantling the pendant light. Remove the suspension system that allows it to hang from the ceiling. Ensure you keep all small parts together to avoid losing any crucial components.
Once you’ve dismantled the pendant, you’ll need to modify it for tabletop use. This step involves finding a stable base to support the light. You can use an old lamp base or make one from wood or metal. Attach the base securely to the pendant light. Double-check to make sure it stands upright and secure before proceeding to the next step.
Next, you’ll want to install the new lamp kit. Follow the instructions that come with your lamp kit. Typically, this involves connecting the wiring from the pendant light to the lamp kit components. Make sure all connections are secure to prevent any electrical issues. Test the wiring by plugging in the lamp to see if it works.
Finally, choose a suitable lampshade to complete the transformation. The lampshade should match the style and size of the new table lamp. Secure the shade onto the light fixture. Once everything is in place, turn on your new table lamp and enjoy its unique look. You’ve now successfully converted a pendant light into a table lamp.
Step 1: Gathering Required Tools and Equipment
To begin transforming a pendant light into a table lamp, gathering the right tools is crucial. You’ll need a pair of pliers for gripping and twisting wires. A screwdriver set will help with any screws that need to be removed or tightened. Additionally, a lamp kit containing all necessary electrical components is needed. Each of these tools plays an essential role in the process.
For a smoother experience, it’s also helpful to have a workbench or a flat surface to lay out your items. This setup will keep your tools organized and within reach. Organization prevents loss of small parts and speeds up the workflow. Consider having a lamp base ready, which you can purchase or repurpose from another lamp. This helps ensure the lamp stands steadily once completed.
Here is a list of necessary items:
- Pliers
- Screwdriver Set
- Lamp Kit
- Lamp Base
- Work surface
Being well-prepared can make the transformation process much more efficient and enjoyable.
Having all these tools and equipment prepared beforehand saves you from interruptions mid-project. It ensures that once you start, you can see the project through to completion without unnecessary delays. Remember, the right tools not only make the task easier but also ensure safety. Always check each tool for any damage before use. Safety should always come first when working with electrical components.
Step 2: Dismantling the Pendant Light’s Suspension System
The next step involves carefully dismantling the pendant light’s suspension system. Begin by unscrewing the canopy that covers the electrical connections at the ceiling. Use a screwdriver to remove any screws, ensuring you don’t lose them. Once the screws are out, pull the canopy down to expose the wires. Make sure to note or take a photo of the wire connections for reference.
After exposing the wires, disconnect them safely. Twist the wire connectors counterclockwise to release the wires. Gently pull the wires apart, avoiding any force that may damage them. Labeling each wire with tape can help you remember where each one goes. This makes reassembling much easier later on.
Next, focus on detaching the pendant light from its hanging rod. Some pendant lights might have a screw or latch mechanism that holds the light to the rod. Loosen or unscrew this part to free the light fixture. Lay all small parts and screws on a cloth to keep them organized. This will help you keep track of everything as you move forward.
Here’s a simple checklist for dismantling the suspension system:
- Unscrew the canopy
- Disconnect the wires
- Detach the light from the rod
- Organize small parts and screws
By following these steps, you ensure a smooth transition to the next phase of your project.
Step 3: Modifying the Pendant for Tabletop Use
With the pendant light dismantled, the next step is to modify it for tabletop use. Start by finding or crafting a sturdy base for the lamp. This base will provide the necessary stability so the lamp doesn’t tip over. Common materials for bases include wood and metal. Ensure it’s heavy enough to support the weight of the light fixture.
Once the base is ready, you’ll need to fit the pendant light onto it. Mark the center of the base where the pendant will be attached. Drill a hole if required to accommodate the pendant’s electrical wiring. Feed the wires through the hole, making sure they are accessible for the next step. Securing the pendant to the base tightly is crucial to avoid wobbling.
If the pendant light has a chain or rod for hanging, remove these parts. They are unnecessary for a table lamp and may interfere with the final look. Use screws or bolts to fix the light firmly to the base. A stable attachment ensures the lamp stands solid and safe on a table. Tighten all screws to guarantee they hold the parts together securely.
Here’s a quick list of modifications to make:
- Choose or craft a stable base
- Drill a hole for wiring
- Feed wires through the hole
- Remove any hanging parts
- Secure the light to the base with screws
Completing these steps sets the stage for wiring and finishing touches.
Finally, make sure the new base complements the pendant light aesthetically. It should match the design and color scheme, creating a unified look. Check stability by placing the lamp on a flat surface and giving it a gentle push. If everything is secure and stable, you’re ready to move on to the wiring process. This modification is crucial for both functionality and safety.
Step 4: Assembling the Lamp
Now it’s time to assemble your lamp, bringing all the pieces together. Begin by securing the light fixture to the base firmly. Ensure that all screws or bolts are tightened properly. This step is crucial for the stability of the finished lamp. Once the fixture is mounted, double-check its stability.
Next, connect the electrical components using the lamp kit. Follow the wiring diagram provided with the kit. Typically, this involves connecting the pendant wires to the lamp socket and switch. Ensure the wire connections are tight and secure using wire nuts. It’s important to avoid any loose wires which could cause electrical hazards.
Here’s a checklist to simplify the process:
- Mount the light fixture securely
- Connect pendant wires to lamp kit components
- Secure connections with wire nuts
- Attach the lamp socket
- Install the switch
Once all connections are done, tuck any excess wire neatly to prevent clutter.
With the wiring completed, it’s time to attach the lampshade. Choose a shade that suits your new table lamp’s design and creates the desired lighting effect. Secure the lampshade to the socket, ensuring it sits evenly. This final touch brings together the lamp’s functional and aesthetic elements. Flip the switch to test your new table lamp and enjoy its warm glow.
Lastly, place the lamp on a table and double-check its stability once more. Make sure it stands firm and does not wobble. Look for any loose screws or parts, and tighten them if necessary. Safety is key, so ensure everything is secure before regular use. This completes the process of assembling your unique table lamp.
The Benefits of Reusing Pendant Lights as Table Lamps
Transforming pendant lights into table lamps offers several benefits, starting with cost savings. Instead of purchasing a new lamp, you can repurpose existing pendant lights. This not only saves money but also adds a unique touch to your home. Repurposing fixtures is an economical way to refresh your decor. It’s a smart use of resources you already have.
Additionally, reusing pendant lights helps reduce waste. Rather than discarding old fixtures, you can give them a new life. This eco-friendly approach promotes sustainability. Reducing waste benefits the environment and encourages mindful consumption. It’s a small but impactful step towards greener living.
Another benefit is the opportunity for customization. When you convert a pendant light into a table lamp, you can tailor it to your style. Choose a base, lampshade, and other elements to match your decor. This customization ensures your lamp is truly unique. It becomes a special piece that reflects your personal taste.
Finally, this project can be a fun and rewarding DIY activity. Engaging in creative projects fosters a sense of accomplishment. You learn new skills and discover the joy of crafting something with your hands. The process can also be a bonding experience if done with family or friends. Plus, you end up with a functional and stylish new lamp for your home.
Considerations When Transforming a Pendant Light into a Table Lamp
Before transforming a pendant light into a table lamp, evaluate the fixture’s condition. Ensure it’s still functional and safe to use. Check for any damage or wear, especially in the wiring. If there’s significant damage, it might be safer to replace parts or seek professional help. Safety should always be your top priority.
The design of the pendant light also plays a crucial role. Consider whether its size and style will work well as a table lamp. Some pendant lights might be too bulky or awkwardly shaped for tabletop use. The aesthetics should blend with your room’s decor seamlessly. Matching the style ensures that the new lamp looks intentional rather than improvised.
Another consideration is the type of base you will use for stability. The base must be heavy enough to support the weight of the pendant light. A sturdy base prevents tipping over and accidents. You could repurpose an old lamp base or purchase a custom one that matches your design vision. Proper bases ensure both safety and visual appeal.
Here’s what to consider:
- Pendant light’s condition
- Aesthetics and compatibility
- Base stability
- Wiring and electrical safety
Balancing these factors helps create a successful project outcome.
Lastly, think about the electrical components needed for the transformation. Make sure you have compatible wires, sockets, and switches before starting. This ensures that all parts fit together without needing modifications halfway through your project. Having everything on hand avoids delays and makes assembly more straightforward. Preparation is key to efficiency and success.
Common Mistakes to Avoid When Turning a Pendant Light into a Table Lamp
When converting a pendant light into a table lamp, one common mistake is not checking the wiring. Faulty or worn-out wires can pose safety risks. Always inspect the wiring for any signs of damage before starting. If you’re uncertain, consider replacing the wires or consulting a professional. Safe wiring ensures the lamp functions correctly and safely.
Another error many people make is ignoring the importance of a stable base. A light, unstable base can cause the lamp to tip over easily. Choose a base that’s heavy enough to support the lamp’s weight. Skipping this step could lead to accidents or damages. Always prioritize stability to avoid any mishaps.
Here are some pitfalls to avoid:
- Not checking wiring quality
- Using an unstable base
- Forgetting to match design aesthetics
- Improperly connecting electrical components
Avoiding these mistakes helps make the conversion process smoother and safer.
Another common mistake is improper electrical connections. Make sure all connections are secure and correctly installed. Loose connections can cause the lamp to malfunction or even create electrical hazards. Always double-check your work and test the lamp before regular use. Proper connections ensure the lamp works efficiently and safely.
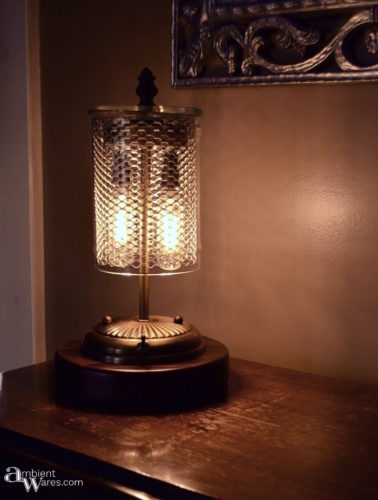
Finally, neglecting the overall aesthetic can be a mistake. Make sure the new table lamp complements the room it will be placed in. Mismatched designs can make the lamp look out of place. Pay attention to color, size, and style when selecting the base and lampshade. A coherent design will make your DIY project a stylish addition to your home.
How to Choose the Appropriate Lampshade for a Repurposed Pendant Light
Selecting the right lampshade for your repurposed pendant light is key to the overall look. First, consider the size of the shade. It should be proportionate to the base of the lamp. An oversized shade can make the lamp look awkward, while a tiny shade might seem out of balance. Measure the base to find a complementary size.
Next, think about the shape of the lampshade. Common shapes include drum, cone, and bell. The style of your pendant light plays a big role in this choice. For a modern look, a drum shade works well. A cone or bell shape might suit a more traditional setting. Matching shapes help unify the lamp’s design.
Here are some elements to consider:
- Size of the lampshade
- Shape of the lampshade
- Material and color
- Light diffusion
Focusing on these factors aids in choosing the perfect lampshade.
Material and color are also important aspects. Fabrics like linen and cotton offer a soft look, while metal or glass can provide a sleek, modern appearance. The color should coordinate with your room’s decor. Light colors generally brighten a space, while darker shades create a cozy atmosphere. Choose a material and color that aligns with your style goals.
Finally, consider how the lampshade affects light diffusion. Some shades diffuse light evenly, while others direct it up or down. Think about your lighting needs. Do you need a bright reading light or a softer ambient glow? The type of light diffusion will influence the overall ambiance of your room. Choose wisely to meet both functional and aesthetic needs.
Frequently Asked Questions
This section answers common queries about converting pendant lights into table lamps. Each answer provides useful insights and tips for a smoother project experience.
1. What tools do I need to convert a pendant light into a table lamp?
To convert a pendant light into a table lamp, you’ll need basic tools like pliers, screwdrivers, and possibly a drill. Additionally, you will require a lamp kit that includes electrical components, such as wires, sockets, and switches.
You might also need materials for the base of the lamp to ensure stability. These could range from wood or metal bases to repurposed items from other lamps. All these supplies are essential for both safety and functionality.
2. Can any pendant light be turned into a table lamp?
Not all pendant lights are suitable for conversion into table lamps. Factors such as size, weight, and design of the pendant light should align with what you envision as a table lamp.
Pendant lights that are too large or heavy may require more intricate modifications or sturdier bases to ensure safety and stability when used as a table lamp.
3. How can I ensure my converted table lamp is stable?
The key to stability in your converted table lamp is selecting or creating an appropriate base. It should be heavy enough to support the weight of the entire fixture without tipping over easily.
Additionally, all screws and bolts must be tightly fastened during assembly to prevent any wobbling. Testing the stability on different surfaces before regular use can help avoid accidents.
4. What type of lampshade works best for repurposed pendant lights?
The best type of lampshade depends on the style and shape of your repurposed pendant light. Drum shades generally work well with modern designs while bell or cone shapes suit traditional styles better.
You should also consider material and color; fabric shades offer soft lighting while metal shades provide focused illumination. Make sure it complements both the overall design and room decor.
5. Are there safety concerns when converting a pendant light to a table lamp?
Yes, there are several safety concerns when converting electrical fixtures like pendant lights into another form such as a table lamp. Always ensure wiring is in good condition and connections are secure using wire nuts or similar devices designed for that purpose.
If you’re unsure about any step involving electricity, it’s always better to consult professionals rather than risking fire hazards due to improper assembly or faulty components used during DIY projects involving electrical systems at home!
Conclusion
Transforming a pendant light into a table lamp not only refreshes your space but also combines creativity with functionality. This project is cost-effective and eco-friendly, promoting sustainability by reusing existing materials. The process is straightforward, making it accessible even for DIY enthusiasts with basic skills.
By following the steps outlined and considering the essential tips and common mistakes, you can ensure a safe and aesthetically pleasing outcome. This unique repurposing project allows you to customize your lighting while adding a touch of personal flair. So go ahead and give your old pendant light a new lease on life.

I’m Emily Johnson, an affiliate marketer and blogger focused on lamps and lighting. I share honest reviews, simple buying guides, and practical tips. My goal is to help readers choose the right lamp for their space, style, and budget with confidence.