Crafting your own tripod floor lamp combines aesthetics with functionality, filling any room with a personalized touch. You’d be surprised how simple materials like a camera tripod, an elegant lampshade, and a bit of DIY effort can transform your space. This project not only saves money but also imbues your home decor with a unique charm.
The concept of homemade tripod lamps isn’t new; it surged in popularity during the mid-century modern movement. With more people looking for customized and sustainable home decor solutions, constructing a tripod floor lamp from scratch offers a perfect blend of simplicity and creativity. Statistics show a significant rise in DIY lighting projects, reflecting a trend towards personalized and eco-friendly home choices.
- Gather necessary materials: a camera tripod, light bulb socket, electrical wire, lampshade, and tools.
- Prepare the tripod by removing attachments and ensuring stability.
- Assemble the lamp by attaching the socket to the tripod and running the wire.
- Fix the lampshade securely on the socket.
- Add final touches such as securing all components and testing functionality.

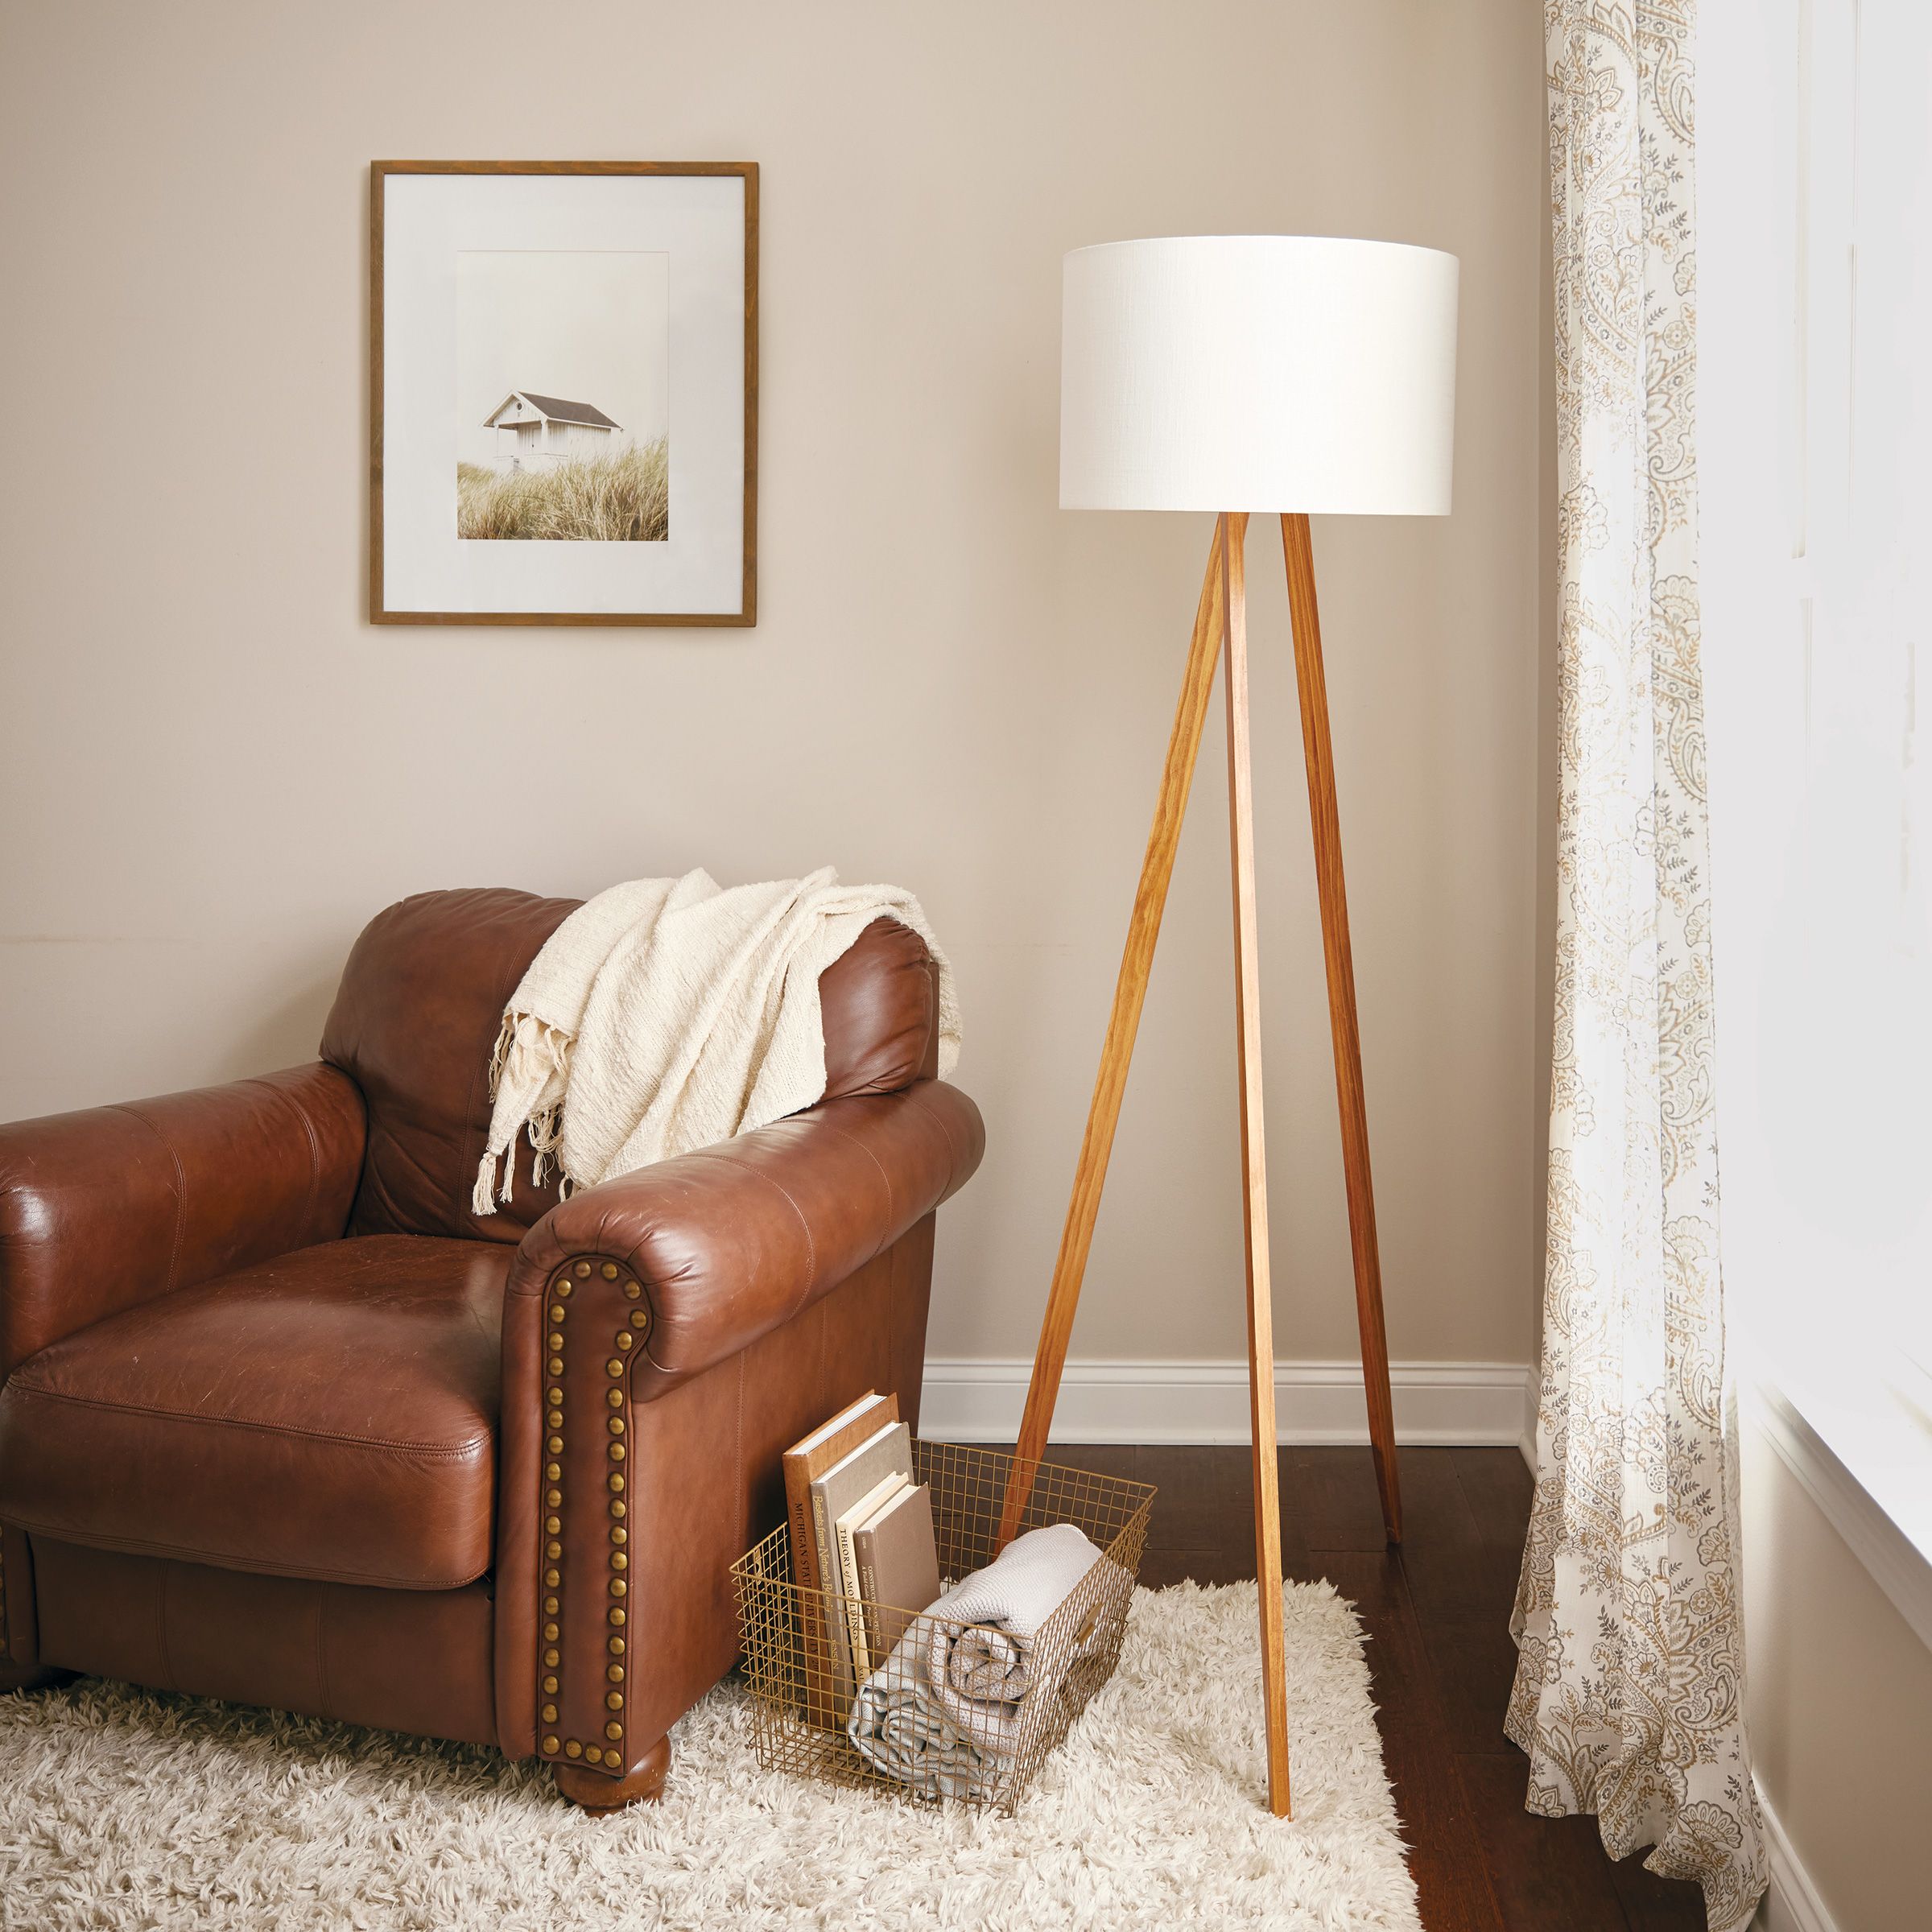
How to Make a Tripod Floor Lamp
Making a tripod floor lamp starts with gathering your supplies. You need a camera tripod, a light bulb socket, wire, and a lampshade. These items are easy to find online or at your local hardware store. Once you have everything, you’ll also need some tools like a screwdriver and pliers to assemble the lamp. Getting the right materials is essential for a successful project.
The initial step involves preparing the tripod. Remove any attachments that might be in the way and make sure the height is adjustable. According to this post, crafting a lamp from scratch involves steps that ensure stability and functionality. You may need to add some weight at the tripod’s base to keep it steady. It’s crucial to ensure the tripod remains balanced once the lamp is attached.
Next, focus on assembling the lamp components. Attach the light bulb socket to the tripod’s mounting plate. Run the electrical wire from the socket down the length of the tripod’s legs. Secure everything tightly using zip ties or clips to keep the wires neatly in place. This keeps your setup both safe and visually appealing.
The last step is fixing the lampshade and adding final touches. Choose a lampshade that complements your room’s decor. Attach it securely to ensure it doesn’t wobble or fall. For customization ideas, here is the article detailing different styles to match your aesthetic. Now, your DIY tripod floor lamp is ready to brighten up your space.
Step 1: Gathering the Necessary Materials
Before starting your project, you need to gather all the essential materials. This process begins with obtaining a sturdy camera tripod, which serves as the base of your lamp. Additionally, you’ll need a light bulb socket, electrical wire, and a plug. Many of these items can be found at your local hardware store or online. Having the right tools at hand is crucial for a smooth assembly process.
Besides the main components, consider some smaller items for finishing touches. These include zip ties to secure the wires and clips to keep everything organized. Depending on your preference, you might also want to add a dimmer switch. According to this resource, a dimmer switch can greatly enhance the functionality of your lamp. Safety is always important, so don’t forget electrical tape and wire connectors.
When it comes to choosing the lampshade, think about the style and color that best fits your space. A minimalist shade can give a modern look, while a more ornate one can add a vintage touch. Make sure the shade is compatible with the size and height of the tripod. Shopping for lampshades can be fun and allows you to personalize your DIY project. A good tip is to select a shade that directs light both upwards and downwards.
You can create a list to ensure you have all materials before you begin assembling. This makes the process more organized and prevents last-minute trips to the store. The list might include:
- Camera tripod
- Light bulb socket
- Electrical wire and plug
- Lampshade
- Zip ties and clips
- Dimmer switch
- Electrical tape
- Wire connectors
Having everything in one place will make the assembly process quick and straightforward.
Step 2: Preparing the Tripod
Preparing the tripod is a crucial step in making your floor lamp. Begin by removing any attachments or accessories that are already on the tripod. Ensure the tripod legs are adjustable so you can later position the lamp at the desired height. Clean the tripod to remove dust or residue, ensuring a polished final product. These preparations make the next steps easier to handle.
Next, you need to consider the stability of your tripod. Sometimes, adding extra weight at the base is necessary to keep it steady. You can use items like sandbags or weighted discs to add that stability. Adjust the tripod legs to make sure they stand evenly on the floor. Stability is key to prevent the lamp from tipping over.
After ensuring stability, it’s time to prepare the mounting for the light bulb socket. Most tripods have a plate at the top where a camera would normally go. This is where you’ll attach the light bulb socket. If needed, drill holes or use adhesive to secure it tightly. The socket must remain firmly in place as you proceed further.
Completing this step involves checking all screws and connections. Make sure everything is tightened and secure before moving on. A shaky base can cause problems down the line, making this check essential. The list of tasks for this step would include:
- Remove existing attachments
- Clean the tripod
- Add weight for stability
- Adjust tripod legs
- Secure the light bulb socket
- Check all screws and connections
Completing these tasks ensures your tripod is ready for the next phases.
Step 3: Assembling the Lamp
Assembling the lamp begins with connecting the light bulb socket to the tripod’s mounting plate. Secure the socket tightly to ensure it doesn’t wobble. Often, you may need to use screws or strong adhesive to keep it in place. Double-check to make sure the socket is firmly attached. Stability at this point sets the foundation for the rest of the assembly.
Next, you must run the electrical wire from the socket down the length of the tripod’s legs. Carefully thread the wire through any available gaps or around the legs, securing it with zip ties or clips. This keeps the wire neat and prevents it from dangling. Avoiding loose wires is crucial for both safety and appearance. Properly secured wires give a clean and professional look.
Once the wire is in place, it’s time to connect it to the plug. Strip the ends of the wire to expose the metal cores, then attach them to the appropriate terminals on the plug. Ensure the connections are tight to prevent any electrical issues. Follow any instructions provided with the plug for wiring correctly. Properly connected wires ensure the lamp functions safely.
Testing the electrical connections is the next crucial step. Plug in the lamp to see if it lights up. If the bulb doesn’t turn on, double-check your wiring and connections. Sometimes a loose connection can cause issues. Ensuring the lamp works correctly now saves trouble later.
After confirming everything functions as expected, take a moment to inspect your work. Make sure there are no exposed wires or unstable parts. Pay attention to the overall alignment of the bulb and socket. Final adjustments might be necessary for a perfect setup. This final inspection guarantees a polished and safe product.
Tasks to complete in this step include:
- Secure the light bulb socket
- Run electrical wire down the tripod
- Attach wire to the plug
- Test electrical connections
- Inspect for exposed wires and stability
Following these tasks ensures a smooth and effective assembly of your DIY tripod floor lamp.
Step 4: Fixing the Lampshade
Fixing the lampshade is the final step in creating your tripod floor lamp. Start by selecting a lampshade that matches your overall design and style. The size of the lampshade should be proportionate to the height and width of the tripod. A mismatched lampshade can throw off the balance and aesthetics of the lamp. Ensure the lampshade has a fitting that corresponds to your light bulb socket.
Begin attaching the lampshade by aligning its fitting with the socket. Gently place the lampshade onto the socket, ensuring it sits snugly without wobbling. If necessary, use the screws provided with the lampshade to secure it in place. This helps prevent any accidental tipping. A well-secured lampshade ensures the lamp is both safe and visually appealing.
Make sure the lampshade is level and properly aligned. Sometimes you may need to adjust the positioning slightly to get it just right. Look at the lamp from different angles to ensure it looks balanced. This attention to detail makes the difference between a handmade item and a professional-looking piece. It only takes a few minutes but adds significant value to your lamp.
At this point, turn on the lamp to check how the light disperses through the shade. This allows you to see if any adjustments are needed. If the light seems uneven, you might need to shift the shade or change its position. Testing the light ensures it meets your expectations. It’s always a good idea to take a step back and admire your work, making final tweaks as necessary.
A quick checklist for this step includes:
- Selecting an appropriate lampshade
- Aligning and attaching the lampshade
- Securing the lampshade with screws
- Ensuring the lampshade is level
- Testing the light output
Following these tasks makes sure your DIY tripod floor lamp is ready to use and looks stunning in any room.
Step 5: Final Touches
Now that your tripod floor lamp is almost complete, it’s time to add the final touches. Start by ensuring all components are securely fastened and that there are no loose screws or wires. Double-check the stability of the tripod and make sure the lampshade is fitted perfectly. If needed, make any last-minute adjustments. This attention to detail ensures durability and safety.
You might also want to personalize your lamp to make it uniquely yours. Consider adding some decorative elements to the tripod legs, such as paint or decals. Adding a fabric cover to the lampshade can also change its look and match your room’s decor. Small, creative touches allow the lamp to reflect your style. Personalized details make your DIY project stand out.
Next, organize the electrical wires neatly. Use zip ties or clips to bundle any excess wire, keeping them out of sight. This not only improves the appearance but also adds a layer of safety. Hidden wires prevent tripping hazards and give a cleaner look. Neat wiring is a professional touch that enhances the overall presentation.
Lastly, take a moment to test the lamp in its intended space. Turn it on and observe how the light spreads across the room. Make sure it’s positioned to provide the best lighting. Sometimes minor adjustments in the lamp’s angle or position can make a big difference. Experimenting with its placement helps achieve the perfect ambiance.
Here’s a checklist for this final step:
- Secure all components
- Add decorative elements
- Organize and hide wires
- Test the lamp in its space
- Make final adjustments
Completing these tasks ensures your DIY tripod floor lamp is not only functional but also a stylish addition to any room.
Safety Precautions to Consider
When working on any DIY project, safety should always be a top priority. Begin by using the right tools for each task and ensuring they are in good condition. Faulty tools can lead to accidents, so checking them beforehand is crucial. Wear protective gear like gloves and safety glasses when handling electrical parts. These simple steps can prevent minor injuries.
Electrical work requires special caution. Always make sure the lamp is unplugged before you start working with wires or sockets. Incorrect wiring can lead to short circuits or even fires. Use insulated tools to handle electrical components safely. Double-check all connections to ensure they are secure and properly insulated.
Keep your workspace organized and free of clutter. A messy area can cause trips and falls, leading to potential injuries. Try to keep all components and tools within easy reach but well-organized. Clean up spills immediately to avoid slipping hazards. Maintaining a tidy workspace enhances both efficiency and safety.
Make sure the assembled lamp is stable and secure before plugging it in for the first time. Test the tripod’s stability by gently pushing it from different angles to see if it wobbles or tips over. Add extra weight at the base if necessary for added stability. Testing ensures that your lamp won’t fall over easily, minimizing the risk of injury.
A quick list of important safety precautions includes:
- Use proper tools
- Wear protective gear
- Unplug during electrical work
- Check wiring connections
- Keep workspace organized
- Ensure tripod stability
Following these precautions makes your DIY project safer for everyone involved.
Troubleshooting Common Issues in Making a Tripod Floor Lamp
While creating a tripod floor lamp can be a fun project, you might encounter some common issues. One frequent problem is an unstable tripod. If your lamp wobbles or tips over easily, consider adding extra weight to the base. Adjust the tripod legs to ensure they are evenly spaced and secure. An unstable lamp is a safety hazard and can damage the components.
Another common issue is faulty wiring, which can prevent your lamp from turning on. Check all electrical connections to ensure they are tight and properly insulated. Make sure the wire connections at the socket and plug are secure. If everything is connected correctly and the lamp still doesn’t work, you might need to test the electrical components separately. Faulty wiring can not only prevent the lamp from working but also pose serious safety risks.
If the lampshade doesn’t sit correctly or wobbles, it may not be properly aligned. Double-check the fittings on both the shade and the socket. Tighten any loose screws and ensure the shade is centered. Sometimes, using a different type of fitting can solve the problem. A well-secured lampshade enhances both the function and appearance of your lamp.
Sometimes the light may flicker or not shine as brightly as expected. This issue could be due to a poor connection at the bulb socket. Remove the bulb and inspect the socket contacts for any corrosion or debris. Clean the contacts with a small brush and reinsert the bulb. Flickering lights can be annoying and may indicate deeper electrical issues if not addressed.
A quick troubleshooting checklist includes:
- Stabilize the tripod
- Check and secure wiring
- Align and secure the lampshade
- Inspect and clean the bulb socket
Addressing these common issues ensures your DIY tripod floor lamp is both functional and safe.
Customizing Your Tripod Floor Lamp
Once you’ve assembled your tripod floor lamp, adding custom touches can make it truly unique. Start by painting the tripod legs in a color that complements your room’s decor. You can use spray paint for an even coat or hand paint for a more artistic look. Choosing the right color can make your lamp a focal point in the room. Don’t be afraid to experiment with bold or metallic colors.
Decorative elements like decals or stencils can also add a personal touch. Apply these to the tripod legs or lampshade for an added layer of design. Patterns, quotes, or even small images can transform a plain lamp into a work of art. Custom decals are easy to find online or make at home. Just ensure they adhere well to your lamp’s material.
Another way to customize is by adding different types of bulbs to achieve various lighting effects. For a warm, cozy atmosphere, opt for an Edison bulb. If you prefer bright, white light, LED bulbs are a great choice. You could even add smart bulbs for adjustable color and brightness. Different bulbs can change the entire mood of your room with minimal effort.
Think about updating the lampshade to better fit your style. Fabric-covered shades offer a touch of elegance, while metal or glass can give a modern look. You can even make your own lampshade for a truly personalized touch. Consider patterns and textures that will complement the tripod and the overall room design. A stylish lampshade can be a quick and easy way to refresh the look of your lamp.
Here’s a list of customization ideas:
- Paint the tripod legs
- Add decals or stencils
- Choose unique light bulbs
- Update or make a new lampshade
Customizing your lamp allows you to express your creativity and make your space more inviting.
The Benefits of DIY Tripod Floor Lamp
Creating a DIY tripod floor lamp offers numerous benefits, starting with cost savings. Purchasing a stylish floor lamp from a store can be expensive. By making your own, you can achieve a unique design at a fraction of the cost. You can often find affordable materials and reuse things you already have. Customizing your lamp allows you to save money while still getting a quality product.
Another benefit is the opportunity to learn new skills. This project involves basic electrical work, craftsmanship, and design. These skills can be useful for other DIY projects around the house. The sense of accomplishment you get from creating something with your hands is truly rewarding. Plus, you get to showcase your skills through a functional piece of decor.
Personalization is another significant advantage. DIY projects allow for a high degree of customization, ensuring the final product perfectly suits your taste and home. You can choose everything, from the type of tripod to the color and style of the lampshade. This level of customization is rarely found in store-bought items. Making a lamp tailored to your preferences adds a personal touch to your living space.
There’s also an environmental benefit to DIY projects. By making your own lamp, you can use sustainable or recycled materials. This reduces waste and lessens the demand for mass-produced items, which often have a larger carbon footprint. Constructing a lamp from recycled materials promotes a more eco-friendly lifestyle. It’s a way to combine creativity with environmental responsibility.
Key benefits include:
- Cost savings
- Learning new skills
- Highly customizable
- Environmentally friendly
These advantages make DIY tripod floor lamps a popular choice for many homeowners.
Frequently Asked Questions
Below are some common questions and answers about creating a tripod floor lamp. These FAQs provide useful information for anyone interested in this DIY project.
1. What materials do I need to make a tripod floor lamp?
To make a tripod floor lamp, you’ll need a camera tripod, light bulb socket, electrical wire, and a lampshade. Additional materials include zip ties, clips, electrical tape, and possibly a dimmer switch.
You can find most of these items at local hardware stores or online retailers. Having all materials ready will ensure the assembly process goes smoothly.
2. How can I ensure my DIY tripod floor lamp is stable?
If your lamp wobbles or tips over easily, adding extra weight at the base can help. You can use sandbags or weighted discs to stabilize the tripod legs.
Additionally, make sure the legs are evenly spaced and securely locked in place. Proper stability is crucial for both safety and functionality.
3. Is it safe to do the electrical work myself?
Yes, but it’s important to follow safety precautions when working with electricity. Always unplug the lamp before handling wires or sockets.
Use insulated tools and double-check all connections to prevent short circuits or fires. If you’re unsure about any step, consider consulting an expert.
4. Can I customize my tripod floor lamp?
Absolutely! You can paint the tripod legs in any color you like or add decorative decals. Choosing unique lampshades or special bulbs adds further customization options.
You can even install smart bulbs for adjustable lighting effects. Personalizing your lamp allows it to match your home decor perfectly.
5. How do I troubleshoot if my lamp isn’t working properly?
If your lamp doesn’t turn on, check all electrical connections first to ensure they are tight and correctly wired. Test each component separately if needed.
If the lampshade wobbles or light flickers, adjust fittings and clean socket contacts as necessary. Addressing these common issues ensures your DIY project succeeds.
Conclusion
Making a tripod floor lamp is a rewarding project that combines creativity with functionality. By following the steps provided, you can create a custom piece that enhances your living space. The process not only saves money but also offers a sense of personal achievement.
Whether you’re a DIY enthusiast or a beginner, the skills gained from this project are valuable. From electrical work to artistic design, each step offers learning opportunities. Enjoy the process and the unique charm your DIY lamp brings to your home.

I’m Emily Johnson, an affiliate marketer and blogger focused on lamps and lighting. I share honest reviews, simple buying guides, and practical tips. My goal is to help readers choose the right lamp for their space, style, and budget with confidence.