Have you ever considered that the simplest and most personal pieces of your home decor can be handcrafted with a little creativity and skill? Creating a floor lamp at home is not only a fascinating project but also a testament to the ingenuity and individualism that one can infuse into their living space. Your unique design can seamlessly blend with your home ambiance, offering both function and aesthetic pleasure.
Historically, lighting has evolved from basic functional lanterns to sophisticated design elements, and the DIY trend has amplified this evolution. According to a recent survey, 74% of decor enthusiasts feel a greater sense of accomplishment and connection to their space through DIY projects. Crafting a floor lamp at home involves understanding basic electrical work, selecting suitable materials, and applying creative design, resulting in a personalized lighting solution that resonates with your style.
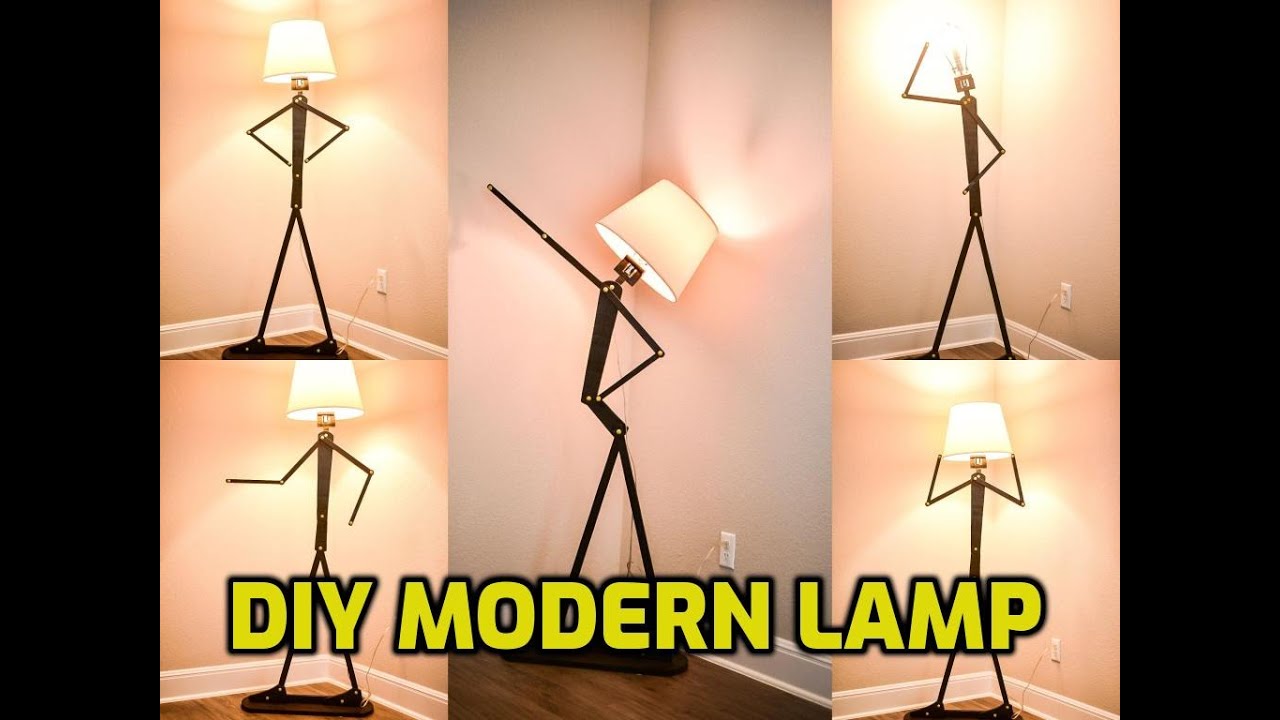
- Gather necessary materials including a lamp kit, hollow rod, base, and tools.
- Sketch your design and decide on the lamp’s height and style.
- Attach the hollow rod to the base securely and thread the electrical wiring through it.
- Install the light socket and connect it to the wiring.
- Screw in a suitable light bulb and attach the lampshade.
- Perform final safety checks to ensure stability and proper electrical connections.

How to Make Floor Lamp at Home
Creating a floor lamp at home is a rewarding DIY project. You’ll need some basic materials like a lamp kit, a hollow rod, and a sturdy base. The first step involves gathering all these necessary items. Make sure you choose a design that complements your room’s decor. According to the article, selecting the right lamp size is crucial for achieving a balanced look.
Once you have your materials, start by designing the layout of your lamp. This involves sketching out your vision and deciding on the height and style. For example, you might want a modern, sleek design or something more rustic. Measure everything carefully to ensure the proportions are correct. The design phase is essential for a successful build.
Next, begin assembling the lamp by attaching the hollow rod to the base securely. You’ll need some tools like a screwdriver and possibly a drill. Carefully thread the electrical wiring through the rod and attach it to the lamp socket. Safety is important, so follow the instructions provided in your lamp kit. Read here for more tips on placing lamps in your living room.
After assembling, it’s time to install the light source. Choose a bulb that fits your lamp socket and provides the desired brightness. Screw it in and attach the lamp shade to diffuse the light evenly. Inspect your work to ensure everything is tightly secured. According to this post, the final touches and safety checks are crucial steps to complete the lamp-making process.
Step 1: Gathering All the Necessary Materials
Before starting your floor lamp project, gather all the essential materials. You will need a lamp kit, which includes sockets, cords, and other electrical components. Make sure to have a sturdy base for the lamp to stand on. You can choose wood, metal, or even a decorative stone. It’s crucial to verify the compatibility of these materials with your design.
You will also need a hollow rod to house the electrical wiring. The length of this rod should match your intended lamp height. Visit your local hardware store to get other small items like screws, nuts, and bolts. These will help secure various parts of the lamp. Don’t forget the necessary tools such as a screwdriver and pliers.
Besides these basic items, you may want extra decorative elements. For instance, you could add a stylish lampshade or colorful paint. It’s important to align these decorative choices with your overall home decor. This makes your DIY project unique and personalized. According to this post, using RGB lights can also add a modern touch.
To make the process easier, create a checklist. This will ensure you don’t miss any critical components. Organize the materials before you start assembling your lamp. Being prepared will streamline the creation process and make it enjoyable. It’s always better to have everything at hand from the beginning.
Step 2: Designing the Layout of the Lamp
Before you start assembling, it’s crucial to design the layout of your lamp. Sketching out your design can help you visualize what the final product will look like. Decide on the lamp’s height, style, and general look. Should it be tall and thin or short and wide? These are important considerations.
When deciding on the proportions, think about where the lamp will be placed. Will it stand next to a couch, or be a focal point in the room? Measure the space to ensure your design fits well. This planning step avoids future adjustments and ensures a smooth build process. Aligning the design with existing decor makes the lamp blend seamlessly.
To make your lamp unique, you may want to add some decorative elements. This could be a colorful lampshade, patterned fabric, or even a painted base. Matching these elements with your room’s color scheme adds cohesion to your space. You could even incorporate recycled materials for an eco-friendly touch. A little creativity goes a long way.
Don’t forget functional aspects like stability and ease of use. Ensure the base is sturdy to avoid tipping. The lamp switch should be easy to reach. Create a balance between aesthetic appeal and functionality. Designing a practical yet beautiful lamp will add both style and convenient lighting to your home.
Step 3: Assembling the Lamp
Now that you have your design, it’s time to start assembling the lamp. Begin by attaching the hollow rod to the base. Make sure the base is secure so the lamp will be stable. Use screws and a screwdriver to fasten it tightly. Double-check to make sure it’s aligned correctly.
Next, feed the electrical wiring through the hollow rod. This step ensures that the lamp can actually light up. Thread the wire carefully to avoid any twists or tangles. Attach the wire to the socket, following the instructions provided in the lamp kit. Proper wiring is essential for safety and functionality.
Once the wiring is in place, secure the lamp socket at the top of the rod. Use pliers if needed to make sure everything is tight. Double-check the connections to ensure there are no loose parts. A firm socket ensures the bulb stays in place. This adds both safety and durability to your lamp.
Now, attach the lampshade to the socket. Depending on your design, this might involve a clamp or screws. Make sure the shade is centered and level. This ensures that the light will distribute evenly. It also adds to the overall aesthetic of your floor lamp.
Finally, insert a light bulb into the socket. Choose a bulb that fits well and provides the brightness you desire. Screw it in securely but don’t overtighten. Flip the switch to test if the lamp works. If everything is done correctly, your lamp should light up beautifully.
If you encounter any issues during assembly, refer to expert opinions or online resources. According to this expert opinion, focusing on each step with careful attention to detail ensures successful project completion. Happy crafting!
Step 4: Installing the Light Source
Once your lamp structure is assembled, it’s time to install the light source. Start by choosing a suitable light bulb. Consider the wattage and bulb type based on the ambiance you want to create. Some people prefer LED bulbs for their efficiency and long lifespan. Make sure your chosen bulb fits the socket correctly.
Carefully screw in the light bulb into the socket. Do this step gently to avoid breaking the bulb or damaging the socket. Once it’s secure, check to ensure the bulb sits firmly. Flick the switch to test if the bulb lights up. If it doesn’t, make sure the electrical connections are correct.
Next, consider the light distribution. Position the lampshade so that it diffuses light evenly. This makes the lighting softer and eliminates harsh glare. Adjust the shade if necessary to achieve an even spread of light. A well-placed shade enhances both functionality and aesthetics.
Install any additional components like dimmers or remote controls if your design includes these features. Dimmers allow you to adjust the brightness according to your mood or needs. Remote controls add convenience, especially for tall floor lamps. Follow the manufacturer’s instructions for these installations to ensure they function well.
If you want a modern touch, consider integrating smart bulbs. These bulbs can be controlled via smartphone apps and often come with color-changing options. Smart bulbs offer versatile lighting solutions for different occasions. Reading reviews can help you pick the best options available.
Proper installation of the light source ensures the safety and efficiency of your lamp. Always prioritize secure fittings and connections to avoid electrical issues. Double-check all components to make sure they work as intended. Enjoy the new addition to your home— a handmade lamp that matches your personal style!
Step 5: Final Touches and Safety Precautions
With the light source installed, it’s time to add the finishing touches to your lamp. This step is all about aesthetics and ensuring your lamp looks polished. You might want to paint the base or add decorative elements. Choose colors and textures that match your room’s decor. A little creativity can transform your lamp into a statement piece.
Once you’re happy with the appearance, it’s crucial to perform a safety check. Inspect all the connections to ensure everything is secure. Check the stability of the base to avoid any tipping hazards. Make sure the electrical wiring is properly insulated. These precautions help prevent accidents and ensure your lamp is safe to use.
Additionally, consider using flame-retardant materials for the lampshade. This adds an extra layer of safety, especially if you’re using high-wattage bulbs. Make sure the bulb does not touch the shade directly. Keeping a small gap can prevent overheating. Following these safety tips ensures your lamp is both beautiful and safe.
If your lamp includes a dimmer switch, test its functionality. Experiment by adjusting the brightness to make sure it works smoothly. Dimmers not only save energy but also extend the life of your bulbs. Proper testing ensures everything is working correctly. Enjoy the flexibility that dimmers offer in setting the mood of your room.
Finally, make sure to place your lamp in a safe and convenient location. Avoid high-traffic areas where it might get knocked over. Consider placing it near an outlet to keep the cord organized. Following these placement tips ensures the lamp is both functional and safe.
By paying attention to these final touches and safety precautions, you can enjoy your handmade floor lamp with peace of mind. Taking the time to ensure everything is perfect will result in a long-lasting and beautiful addition to your home.
The Advantages of Making a Homemade Floor Lamp
One of the biggest advantages of making a homemade floor lamp is the ability to customize it. You can choose the materials, design, and color that match your home decor. This personalization lets you create something unique. Off-the-shelf lamps often lack this level of individuality. A custom lamp adds character to your living space.
Creating your own lamp can also be more cost-effective than buying one. Store-bought lamps can be expensive, especially designer ones. With DIY projects, you can save money by using affordable materials or even repurposing items you already have at home. It’s a budget-friendly way to achieve a stylish look. Financial savings make this project appealing to many.
A homemade floor lamp is not just about aesthetics and cost; it’s also about learning new skills. The process teaches valuable hands-on techniques like basic electrical work, woodworking, and painting. These are skills that can be applied to other home improvement projects in the future. Building something yourself provides a deep sense of accomplishment.
Sustainability is another important factor to consider when making your own floor lamp. By choosing eco-friendly materials and reusing existing items, you reduce waste and contribute positively to the environment. This approach aligns with sustainable living practices. It’s an environmentally conscious choice that pays off in multiple ways.
Understanding the Importance of the Right Lighting in Your Home
Lighting plays a crucial role in creating the right atmosphere in your home. A well-lit room can make a space feel warm and inviting, while poor lighting can make it feel gloomy and uncomfortable. Different rooms have different lighting needs. For instance, a living room might need ambient lighting, while a study requires task lighting. Matching the lighting to the room’s function enhances its usability.
The type of lighting you choose can also affect your mood and productivity. Natural light is known to improve mood and energy levels. In areas where natural light is scarce, using bright, cool-toned bulbs can help mimic sunlight. On the other hand, warm lighting is ideal for relaxation. Understanding these differences allows you to create a balanced lighting plan.
Layered lighting techniques can add depth and dimension to any room. This involves using a combination of ambient, task, and accent lighting. Ambient lighting provides overall illumination, task lighting focuses on specific activities, and accent lighting highlights architectural features or artwork. This layered approach not only enhances functionality but also adds aesthetic appeal.
Investing in adjustable lighting solutions like dimmers can offer flexibility. Dimmers let you control the brightness to suit different activities and moods. For example, you can dim the lights for a cozy movie night or brighten them for reading. This adaptability makes your home more versatile and comfortable for various occasions.
Smart lighting systems are becoming increasingly popular for their convenience. These systems allow you to control your lighting through smartphone apps or voice commands. You can program lights to turn on or off at specific times or adjust them remotely when you’re not home. Incorporating smart lighting can modernize your home while providing practical benefits.
Tips for Maintaining a Handmade Floor Lamp
Maintaining a handmade floor lamp ensures its longevity and keeps it looking great. Regular dusting is essential to prevent the buildup of dirt and grime. Use a soft cloth or feather duster for this task. Make sure to clean both the base and the lampshade. If the lampshade is fabric, a vacuum with a brush attachment works well.
Inspect the electrical components periodically to ensure safety. Check the wiring for any signs of wear or damage. If you notice any frayed wires, it’s best to replace them immediately. This helps prevent potential fire hazards. Ensure the socket and switch are functioning correctly as well.
Replacing the light bulb as needed keeps your lamp bright and efficient. Over time, bulbs can dim or burn out. Follow the manufacturer’s recommendations for the correct wattage. Using the wrong bulb can damage the lamp or pose a safety risk. Always let the bulb cool down before handling it.
If your lamp base is made of wood or metal, use appropriate cleaners to maintain its finish. Wood polish can help keep wooden bases shiny and free from scratches. For metal bases, a damp cloth should suffice. Avoid using harsh chemicals that can damage the surface.
Consider adding a surge protector to safeguard your lamp against electrical spikes. This is especially important if you have invested a lot of time and effort into creating your lamp. Surge protectors can help preserve the integrity of the electrical components. A little precaution goes a long way in protecting your handmade creation.
Lastly, if you move your lamp, make sure to handle it with care. Secure all parts to avoid loosening any components. Proper handling prevents accidents and prolongs the life of your lamp. Enjoy the beauty and functionality of your handmade floor lamp for years to come!
How to Personalize Your Floor Lamp to Suit Your Home Decor
Customizing a floor lamp allows you to integrate it seamlessly with your home’s decor. Start by choosing a color scheme that matches or complements the room. You can paint the lamp base using hues from your existing palette. This creates a cohesive look. Don’t be afraid to try bold colors for a striking effect.
Adding decorative elements can enhance your lamp’s uniqueness. Consider wrapping the lamp rod with fabric or rope for a textured look. You can also attach small ornaments or charms that reflect your personality. Utilizing recycled materials like old jewelry or vintage beads is another option. These accents make your lamp a true reflection of your style.
Select a lampshade that suits the overall theme of your room. Options include fabric shades, glass, or even metal. You can buy a plain shade and decorate it yourself. Add stencils, paint, or even decoupage to personalize it. The lampshade can serve as both a functional and artistic component.
If you’re tech-savvy, consider integrating smart lighting. Smart bulbs can change colors and intensity based on your preferences. They can be controlled via apps or voice commands. This adds both convenience and a modern touch to your lamp. It’s a simple upgrade that significantly enhances functionality.
Changing the lamp base can also dramatically alter its appearance. You can use materials like wood, metal, or stone. Experiment with different shapes and sizes to see what fits best in your space. A custom base not only adds stability but also complements your decor style.
Finally, make sure your personalized lamp fits into the room’s layout. Place it where it can serve as both a source of light and a design element. Align it with furniture and other decor pieces for a harmonious look. Personalizing your lamp makes it a unique addition to your home.
Frequently Asked Questions
Making a floor lamp at home can be an exciting and rewarding project. Below are some common questions and their answers to guide you through the process.
1. What tools do I need to make a floor lamp?
You will need basic tools like a screwdriver, pliers, and possibly a drill. These tools help you secure the base, attach the rod, and ensure all components fit perfectly. Having these tools on hand makes the assembly process much smoother.
Additionally, you might need wire cutters and strippers for electrical work. It’s also useful to have a measuring tape to ensure accurate measurements. Proper tools are essential for both safety and efficiency when building your lamp.
2. Can I use recycled materials for my floor lamp?
Yes, using recycled materials is both eco-friendly and budget-friendly. Items like old pipes or wood scraps can serve as excellent bases or rods for your lamp. This not only helps in reducing waste but also adds a unique touch to your creation.
You can even repurpose decorations like beads or fabric for added flair. Creative recycling allows you to make something special while being environmentally conscious. Always ensure these materials are safe and functional before integrating them into your design.
3. How do I choose the right light bulb for my floor lamp?
The type of light bulb depends on the ambiance you want to create. LED bulbs are energy-efficient and long-lasting, making them an excellent choice for most settings. Consider the wattage based on how bright you want the light to be.
Smart bulbs offer additional benefits such as adjustable brightness and color options via apps or voice commands. Always check the socket compatibility with your chosen bulb type. The right bulb enhances both the function and aesthetic of your lamp.
4. What are some safety tips when building a homemade floor lamp?
Always follow manufacturer instructions when assembling electrical components. Make sure all wiring is properly insulated to prevent shorts or fires.
Secure all parts tightly using screws or clamps to maintain stability.
Regularly inspect the lamp for any wear or damage.
Following these precautions ensures that your homemade floor lamp is both safe
and functional
Be cautious with high-wattage bulbs
Follow
precautions lightenuping
“”
##Examples of stuff below:
“Please” until final
Achieve Your goal
Conclusion
Creating a floor lamp at home is not only a fulfilling project but also an excellent way to showcase your creativity. From gathering materials and sketching designs to assembling and adding final touches, every step offers a learning opportunity. The process brings both aesthetic and functional benefits to your living space.
By following the suggested steps and incorporating personal touches, your homemade lamp can become a unique centerpiece. Remember to prioritize safety, use appropriate tools, and enjoy the creativity involved. Your new floor lamp will stand as a testament to your skill and personal style, elevating your home decor effortlessly.

I’m Emily Johnson, an affiliate marketer and blogger focused on lamps and lighting. I share honest reviews, simple buying guides, and practical tips. My goal is to help readers choose the right lamp for their space, style, and budget with confidence.