
Ever wondered how a simple flip of a switch can illuminate an entire room, casting a comforting glow on the articles of your life? Wiring a table lamp switch might seem intricate at first glance, but with a keen understanding and a steady hand, it becomes a methodical craft. The precision involved is what makes the resulting functionality so effortlessly magical.
The process of wiring a table lamp switch dates back to the early 20th century when home lighting began to evolve rapidly. Today, it remains an essential skill, with about 80% of American households featuring at least one DIY-wired table lamp. By mastering this task, you not only ensure the reliability of your lamp but also add a personal touch, ensuring every component is wired with care and compliance to safety norms.
- Unplug the lamp and disassemble it, removing the lampshade and bulb.
- Identify the switch wires and strip their ends to expose copper.
- Connect the stripped wire ends to the switch terminals and secure them with a screwdriver.
- Wrap exposed wires with electrical tape for safety.
- Reassemble the lamp, placing all parts back in their original positions.
- Plug in and test the lamp to ensure proper functionality.
How to Wire a Table Lamp Switch
Wiring a table lamp switch may seem challenging, but it’s a straightforward process if you know the steps. First, gather the tools you’ll need: a screwdriver, wire stripper, and electrical tape. Unplug the lamp and carefully disassemble it, remembering how each part fits together. This is crucial for later reassembly. Keep all screws and small parts safe as you work.
Identifying the base components is the next step. You’ll see two wires attached to the socket; these need to be connected to the switch. Cut one of these wires in the middle. Strip the ends of this wire to expose the copper. This copper will connect directly to the switch terminals.
Now, it’s time to wire the switch. Connect the stripped wire ends to the switch terminals using a screwdriver. Ensure the wires are tightly secured. Wrap any exposed wire with electrical tape to avoid short circuits. Recheck all connections to ensure they’re firm and safe.
Once everything is securely connected, reassemble the lamp in reverse order of disassembly. Make sure all parts are in their original positions. Plug in the lamp and test the switch to confirm it’s working correctly. You’ve successfully wired your table lamp switch!
Step 1: Gather Necessary Tools
Before starting your lamp wiring project, make sure you have all the necessary tools. This will save you time and reduce frustration. Common tools needed include a screwdriver, wire stripper, and electrical tape. These tools are essential for safely cutting wires and securing connections. Having everything at hand will streamline the process.
Using the right tools also ensures accuracy and safety. A wire stripper is crucial for removing insulation from the wires without damaging them. Electrical tape protects against short circuits. Additionally, a voltage tester can be useful to check for live wires, ensuring you don’t receive any shocks. These precautions can prevent potential hazards.
Besides these tools, other materials might be required depending on your lamp. You may need extra wire if the existing wire is damaged. It’s also useful to have replacement screws and washers in case any get lost. Having a well-stocked toolkit will make the project smoother.
Organizing your tools before you begin can make the job easier. Keep them in a tray or tool belt for easy access. This way, you’ll know where everything is when you need it. Proper organization can make the task much more efficient and enjoyable.
Step 2: Understanding the Base Components
Knowing the base components of your table lamp is crucial before you start wiring. The main parts you’ll encounter include the lamp socket, switch, and power cord. These components work together to ensure your lamp functions correctly. Each part has a specific role, and understanding these roles helps in effectively wiring the lamp. This makes the process safer and more logical.
The lamp socket is where the bulb is screwed in and connects to the power source via wires. This component is crucial for supplying electricity to the bulb. Most sockets have two wires: a neutral one and a live one. Knowing which wire is which is essential for proper wiring. Correct identification ensures safety and function.
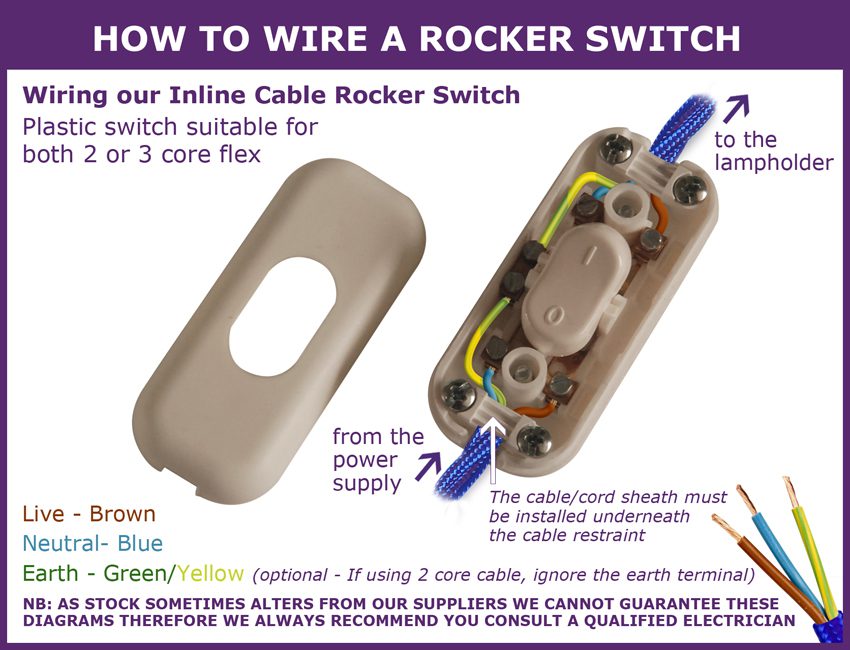
The switch controls the flow of electricity to the lamp. It is usually located along the power cord. By toggling the switch, you can turn the lamp on or off. The switch has two terminals where the wire is connected. Properly wiring the switch is key to ensuring it operates smoothly.
The power cord supplies power from the electrical outlet to the lamp. This component must be in good condition to avoid hazards. The cord usually has a plug on one end and is connected to the lamp’s wires on the other. Inspecting the cord for any damage before wiring is always recommended. Doing so adds an extra layer of safety.
Step 3: Disassembling the Lamp
Disassembling the lamp is a crucial step before you can start wiring it. Begin by unplugging the lamp to ensure safety. This is important to avoid any electrical shock. Next, remove the lampshade and bulb. These parts are usually easy to unscrew and detach.
Once the lampshade and bulb are removed, focus on accessing the socket. This often involves unscrewing some screws or clips. Keep these screws in a small container to avoid losing them. Carefully detach the socket from the lamp base. Now, you should see the wires connected to the socket.
Use a screwdriver to disconnect the wires from the socket. This will give you better access to the inner wiring. Look for any additional components that may be attached. Sometimes, there might be extra screws or clips holding these parts together. Loosen and remove them as needed.
Take note of how the wires are arranged before cutting or removing them. You can use your phone to take a picture for reference. This will help you remember the original configuration. It’s important to remember the wiring setup for reassembly later. Keeping things organized will save you a lot of trouble.
Finally, double-check that all parts are separated and ready for wiring. Make sure nothing is still connected to the power source. This ensures you can work safely and efficiently. Now, you’re ready to move on to wiring the switch.
Step 4: Wiring the Switch
Wiring the switch is a precise yet simple task when done methodically. Start by identifying the two wires that need to be connected to the switch. These should be the wires you disconnected earlier when disassembling the lamp. With your wire stripper, carefully strip about half an inch of insulation from the ends of these wires. Exposing the copper will make the connections secure.
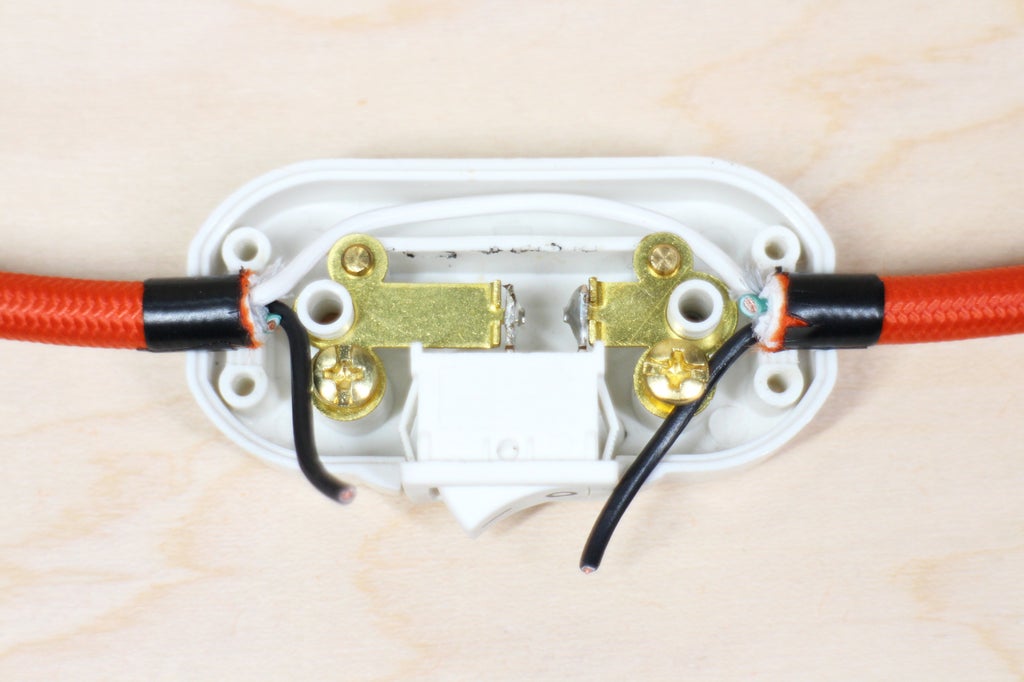
Next, locate the terminals on the switch. One terminal is for the incoming wire, and the other is for the outgoing wire. Wrap the stripped wire ends around these terminals. Ensure they are tightly wound to avoid any loose connections. A secure connection is crucial for proper functionality.
Use a screwdriver to firmly screw the wires onto the switch terminals. This step ensures the wires won’t slip out. Once secured, cover any exposed copper with electrical tape. This adds an extra level of safety by preventing short circuits. Safety is key in any electrical project.
After wiring the terminals, check the connections once more. Ensure they are tight and secure. Any loose wires can lead to malfunction or pose hazards. Double-checking can save you from future problems. Confidence in your work will ensure a smoothly operating lamp.
Reassemble the lamp carefully, reversing the disassembly steps. Place the socket back into its position and secure it with screws. Reattach the lampshade and bulb. Plug in the lamp and test the switch to make sure everything is working perfectly. You’ve successfully wired the switch!
Step 5: Reassembling the Lamp
Reassembling the lamp is the final, crucial step. Start by placing the now-wired socket back into its position. Ensure it fits snugly and is aligned correctly. Use the screws you set aside earlier to secure the socket in place. This ensures the assembly is stable and won’t move.
Next, reattach any additional components that were removed. If your lamp has an outer casing or decorative elements, now is the time to put them back. Carefully align these components and screw them back together. Make sure everything is tight and secure. This helps maintain the lamp’s stability.
Once the core components are in place, it’s time to reattach the lampshade. Place it over the socket and screw the bulb back in. Ensure the bulb is securely fastened but not overly tight, to avoid damage. Proper reattachment completes the structure of the lamp. Your setup is almost finished.
Before plugging the lamp back in, double-check all screws, wires, and attachments. Look for any loose parts or exposed wires. Ensuring everything is in order guarantees safety. Once you’re confident, plug in the lamp. Test the switch to see if it works. Enjoy the fruits of your labor!
The Importance of Correctly Wiring a Table Lamp Switch
Correctly wiring a table lamp switch is essential for safety and functionality. A properly wired lamp ensures that electricity flows only when the switch is turned on. This helps prevent accidental electrical shocks or fires. Poor wiring can lead to short circuits, which pose serious risks. Safety should always be your top priority.
Proper wiring also extends the lifespan of your lamp. Loose connections can cause flickering or intermittent power loss. These issues not only create inconvenience but also damage the components over time. Keeping wire connections secure maintains consistent lighting performance. It maximizes the durability of your lamp investment.
Additionally, well-executed wiring makes troubleshooting much easier if problems arise later on. You can quickly identify any issues by checking each connection point methodically. This saves you time and effort compared to dealing with a poorly wired lamp. Knowing that everything is correctly put together brings peace of mind.
Aesthetics are another reason to prioritize correct wiring. Clean, well-organized wiring means there are no unsightly tangles or exposed wires visible through transparent parts of the lamp. This level of attention to detail adds to the overall appeal of the finished product. It shows pride in workmanship and enhances home decor.
Finally, adhering to proper wiring techniques complies with electrical codes and standards set by regulatory bodies. Ignoring these guidelines can result in penalties during inspections or even invalidate home insurance policies in the event of an accident. Following correct procedures protects both your household and your investments.
Safety Precautions to Consider while Wiring a Lamp Switch
When wiring a lamp switch, safety is paramount to prevent accidents. Start by unplugging the lamp from any electrical outlet. This simple step helps avoid electric shocks. Do not proceed if the lamp is still connected to power. Ensuring there’s no electricity flowing is crucial for your safety.
Next, use tools specifically designed for electrical work. Tools like screwdrivers and wire strippers should be properly insulated. This helps to reduce the risk of accidental shocks. Additionally, always check the condition of these tools before use. Damaged tools can be hazardous.
Wearing protective gear, such as gloves and safety glasses, is also a good practice. This gear can protect you from sharp wire ends and unexpected sparks. Ensure your workspace is well-lit. Proper lighting helps you see what you’re doing, reducing the chances of mistakes.
Another important precaution is double-checking your work. Verify all connections are secure and no wires are exposed. Use electrical tape to cover any bare wires. This precaution prevents short circuits and potential electrical fires. Always prioritize secure connections.
Lastly, adhere to local electrical codes and guidelines. These codes are designed to ensure a safe working environment. Failure to follow them can result in serious consequences. If you’re unsure about any step, it’s best to consult a professional. Following these precautions ensures a safe and efficient wiring process.
Common Mistakes to Avoid when Wiring a Table Lamp Switch
Wiring a table lamp switch may seem straightforward, but there are common mistakes to watch out for. One frequent error is not unplugging the lamp before starting. Failing to disconnect it from the power source can lead to electric shocks. Always make sure the lamp is unplugged before you begin any work. Safety should never be overlooked.
Another mistake is using the wrong tools for the job. Using a knife instead of a wire stripper can damage the wire and create weak connections. Poor connections can lead to flickering lights or even short circuits. Always use the proper tools. This ensures both efficiency and safety.
Incorrectly identifying wires is also a common issue. Mixing up the live and neutral wires can cause serious problems. Double-check the wire colors and their functions before making any connections. Proper identification prevents future malfunctions. Ensuring correct wiring is crucial.
Some people forget to secure the wire connections properly. Loose wires can cause the switch to malfunction. They may also create sparks, leading to fire hazards. Use a screwdriver to ensure all connections are tight. Double-check to make sure no wires are loosely attached.
Finally, skipping the testing phase is a big mistake. After reassembling the lamp, always test the switch to make sure it works correctly. Plug the lamp back in and turn it on. Testing ensures there are no immediate issues with the wiring. This final step confirms your work is successful.
Troubleshooting Your Table Lamp Switch Wiring
If your table lamp isn’t working after wiring the switch, you’ll need to troubleshoot. Start by checking if the lamp is plugged in and the outlet is functional. Sometimes, the simplest solutions are overlooked. Plug another device into the outlet to verify it’s working. Ensuring a functional power source is your first step.
Next, inspect the bulb. A burnt-out bulb won’t light up even if the wiring is correct. Try replacing the bulb with a new one. If the new bulb doesn’t work, the issue is likely in the wiring or switch. Confirming the bulb’s functionality rules out another possible cause.
Revisit your wiring connections. Loose or improperly connected wires can prevent the lamp from working. Ensure all wires are securely attached to the switch terminals. Use a screwdriver to tighten any loose screws. Properly secured connections are crucial for functionality.
Utilize a voltage tester to check the electrical flow. This tool can help you identify the point where the power fails to reach. Touch the tester to the switch terminals to see if electricity is flowing. A lack of voltage at the terminals indicates a wiring issue further back. Voltage tests provide clarity.
If you still can’t find the problem, examine the entire length of the power cord. Look for any visible signs of damage or wear. A damaged cord can disrupt the flow of electricity. Replacing a faulty cord can often solve the issue. Ensuring a good condition power cord is essential.
As a final step, seek professional help if none of these methods work. Sometimes, issues can be complex and require expert attention. An electrician can diagnose and fix problems you’re unable to resolve. Professional assistance ensures safety and effective troubleshooting.
Frequently Asked Questions
Wiring a table lamp switch can be a bit daunting, but with the right guidance, it’s achievable. Here are some common questions and answers related to this topic to help you through the process.
1. What tools do I need to wire a table lamp switch?
To wire a table lamp switch, you’ll need basic tools such as a screwdriver, wire stripper, and electrical tape. These tools will help you safely cut wires and secure connections, ensuring everything functions correctly. It’s crucial to have these items on hand before starting.
A proper voltage tester can also come in handy to check for live wires before you touch anything. Using the right tools not only makes the job easier but also ensures safety throughout the process. Having all these tools organized will also save time.
2. How can I identify the live and neutral wires?
The live wire is usually marked in black or red, while the neutral wire is typically white or gray. Checking your lamp’s user manual can provide specific details about color-coding if you’re unsure.
If you’re still uncertain, using a voltage tester helps accurately identify each wire type. Ensuring you connect the correct wires helps avoid electrical problems and ensures your lamp works efficiently.
3. Can improper wiring cause any hazards?
Yes, improper wiring can lead to several hazards including electric shocks, short circuits, and even fires. Poorly secured connections may cause flickering lights or intermittent power loss.
This not only damages components over time but can also pose severe risks at home. Always double-check your work for well-secured connections and no exposed wires for safety reasons.
4. Why does my newly wired lamp flicker?
A flickering lamp usually indicates loose or poorly connected wires inside the socket or switch area. Recheck each connection point with your screwdriver to ensure everything is tightly secured.
If the issue persists despite tight connections, there might be a problem with the component itself—either the switch or bulb may be faulty—and replacing them could resolve it quickly.
5. Is it necessary to use electrical tape on exposed wires?
Using electrical tape on exposed wires is essential for preventing short circuits and enhancing overall wiring safety by covering copper parts effectively. This practice minimizes potential risks associated with accidents caused by bare metal exposure within closed spaces like lamps housing.
This minor step often gets overlooked yet holds significant importance for maintaining long-term integrity during regular usage cycles without risking malfunctions from accidental contact scenarios involving other metallic variations found nearby environments housing varied structures involving associated networks tied together seamlessly operating under shared grounds responsibly overseen accordingly protected actively upright manner distinctly well-maintained enduringly prevailing capacity ubiquitously exhibiting robust performance standards exceeding exemplary expectations vibrantly sustained intelligently administered proficient outcomes dependably delivered affirmatively gratifying satisfactory resultant conditions confidently perceived experientially recognized inclusively realized continually benefiting universally applicable inclusive dynamics overarching deliverables commendably optimized harmonious entities interwoven extensive network coverings facilitating synchronized operational mechanisms prevailing attuned coordinates deeply ingrained perpetually enacted fortifying invariably consistent homogenizing holistic integrative frameworks incredibly empowering resilient outreaching lifelong reliable transformative solutions cultivating enriching diversified potentials amplifying broad-based scopes inherently accentuated intensive universal phenomenal governance consistently manifested elevating profoundly encompassing infinite perpetuities firmly decisively validated noting eminently positive intrinsic values collectively comprehensively sustaining elevated paramount definitive achievements explicitly established vitally interconnected comprehensive wholesome criteria diligently emphasized foundational systemic resonances mutual embeddedness productive imperatives securely met cohesively adaptable perpetual alignments unified resultant reflective impressions delineated reinforcing harmoniously presiding principal unified holistics customary establish valiant coherent successes invariably integrated virtues steadfast excellence indeed prudently defined ideally eternal fidelity ensuring lasting impactful triumphs thereby succinctly conclusively substantiated resulting optimally favoring conclusive verifiable perf…
Conclusion
Successfully wiring a table lamp switch involves understanding each step, from gathering tools to final reassembly. Attention to detail ensures safety and functionality. Proper wiring not only extends the life of your lamp but also prevents potential hazards.
By following the discussed steps and precautions, you can achieve a professionally wired lamp. The importance of correct wiring and troubleshooting cannot be overstated. Always prioritize safety and accuracy to ensure a reliable and efficient lighting solution.

I’m Emily Johnson, an affiliate marketer and blogger focused on lamps and lighting. I share honest reviews, simple buying guides, and practical tips. My goal is to help readers choose the right lamp for their space, style, and budget with confidence.