
Have you ever wondered why even the simplest electrical fixtures can seem so complex? When wiring a wall lamp, precision and care are paramount, as the risk of errors can lead to both functional inefficiencies and safety concerns. Knowing the intricacies involved not only saves time but also ensures the longevity of your lighting solution.
Historically, lighting systems have evolved tremendously, with wall lamps becoming an integral part of modern interior design. According to recent data, correctly wired lamps reduce electrical hazards by up to 30%. Moreover, understanding the circuit’s load capacity and utilizing the correct gauge of wire is essential for a successful installation.
- Turn off the electricity at the circuit breaker and use a voltage tester to confirm no power is flowing.
- Gather necessary tools: screwdriver, wire strippers, electrical tape, and wire connectors.
- Mount the bracket to the wall securely using screws.
- Connect neutral wires (lamp and wall) with a wire connector, securing with electrical tape.
- Repeat for live wires, ensuring tight connections.
- Push wires back into the wall box carefully to avoid damage.
- Attach lamp to mounting bracket and secure with screws.
- Restore power at the circuit breaker and test the lamp’s functionality.
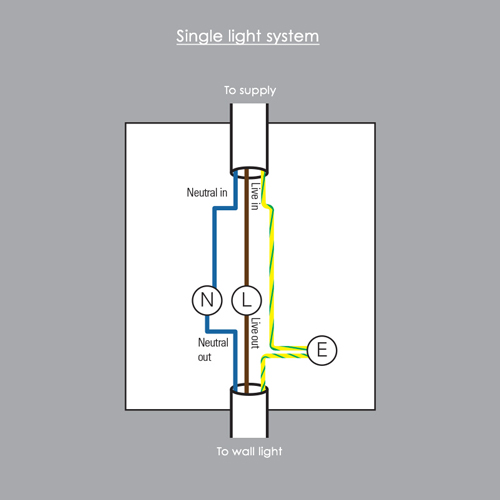
How to Wire a Wall Lamp
Wiring a wall lamp requires some essential tools and safety precautions. First, you’ll need a screwdriver, wire strippers, and electrical tape. Make sure to turn off the electricity at the circuit breaker before starting. Failure to do so can lead to electric shock. Gather all necessary materials to avoid interruptions.
Once you have prepared, follow these steps. Begin by attaching the mounting bracket to the wall, ensuring it’s secure. Next, connect the neutral wire from the lamp to the neutral wire in the wall using a wire connector. Do the same for the live wire, and secure the connections with electrical tape.
Now, fit the lamp over the mounting bracket and secure it with screws. Check that the wires are not pinched or exposed. Finally, restore power at the circuit breaker and test the lamp. If it doesn’t work, double-check the connections. According to this post, making sure your lamp is securely mounted can also enhance its safety.
Proper wiring ensures the lamp functions safely and efficiently. Avoid common mistakes such as using the wrong wire gauge or leaving loose connections. These errors can cause overheating or even fire. For more lighting tips, you can visit here is the article. Always prioritize safety and follow manufacturer instructions closely.
Step 1: Material and Tools Preparation
Before wiring a wall lamp, it’s crucial to gather all necessary materials and tools. You’ll need a screwdriver, wire strippers, and electrical tape. A voltage tester can be helpful to ensure the power is off. Tools should be within easy reach as you work. This preparation will make the process smoother.
Organizing your workspace is another key step. Lay out all materials on a clean, flat surface. Ensure you have enough light to see what you’re doing. Cluttered spaces can lead to mistakes. Proper organization minimizes the chance of forgetting important tools.
A standard wall lamp installation typically requires specific wire types. Choose the right gauge wire based on the lamp’s power needs. For safety, the wire connectors should be appropriately sized. Incorrect materials can lead to malfunction or hazards. Accuracy in this step is essential.
Test your tools before using them. A faulty screwdriver or wire stripper can cause delays. According to this expert opinion, checking your equipment beforehand can save significant time. Make sure everything operates correctly. This initial step sets the foundation for a successful project.
Step 2: Safety Precautions
Safety should always be your top priority when wiring a wall lamp. First, make sure the electricity is turned off at the breaker. Use a voltage tester to confirm no power is flowing. Even with the breaker off, residual electricity could be present. If in doubt, consult a professional electrician.
Wear protective gear like gloves and safety glasses. These prevent injuries from sharp wires or accidental sparks. Avoid working in wet or damp areas. Water and electricity are a dangerous combination. Also, keep your workspace well-lit to avoid accidents.
Ensure all components are in good condition. Damaged wires or faulty equipment can cause serious problems, including fires. Use only UL-listed materials, which meet safety standards. Check for frayed wires and replace them immediately. This reduces the risk of electrical short circuits.
Finally, follow manufacturer instructions closely. They often contain specific safety guidelines for the product. Post signs around your workspace to remind others that electrical work is ongoing. These precautions protect everyone involved. Taking safety measures seriously can prevent avoidable accidents.
Step 3: Wiring Procedure
Begin by attaching the mounting bracket firmly to the wall. Ensure it’s level and secure. This bracket will hold the lamp in place. Use the provided screws and a screwdriver. It’s important to make sure the bracket is stable before moving on.
Next, connect the neutral wires from both the lamp and the wall. Use a wire connector to twist them together. Secure the connection with electrical tape to prevent any wires from coming loose. This step ensures a continuous circuit. Repeat the process for the live wires.
Now, carefully push the connected wires back into the wall box. Be gentle to avoid damaging the connections. Align the lamp with the mounting bracket. Secure it using the screws provided. Double-check that all wires are tucked in properly.
Attach the lamp to the bracket and tighten the screws. Make sure the lamp is flush against the wall. Ensure there are no exposed wires. If everything looks good, you can turn the power back on. Restore power at the circuit breaker and test the lamp to make sure it works.
Lastly, if the lamp doesn’t light up, check your connections again. Ensure all wires are properly connected and secured. Sometimes small adjustments can make a big difference. If problems persist, consulting with a professional is advised. Safety and functionality should never be compromised.
The Importance of Proper Wiring in Wall Lamps
Proper wiring in wall lamps is essential for safety and functionality. Faulty wiring can lead to electric shocks or fires. Ensuring secure connections helps avoid these risks. Proper insulation of wires adds an extra layer of protection. Safety measures should never be overlooked.
Well-executed wiring also ensures optimal performance of the lamp. Poor connections can cause flickering or intermittent lighting. This can compromise the efficiency of the light source. Accurate wiring guarantees a steady power supply. Consistent lighting enhances the room’s ambiance.
Additionally, correctly wired lamps last longer. Overheating due to loose wires can damage the lamp’s components. This reduces the lifespan of the fixture. Proper wiring maintains the integrity of the lamp. Regular checks can further prolong its durability.
Improper wiring can invalidate warranties. Many manufacturers specify that installing their products with incorrect wiring voids the warranty. This means any damage resulting from poor wiring won’t be covered. Following the instructions closely is important. Adhering to guidelines can save you from potential costs.
In commercial settings, proper wiring is even more critical. It ensures compliance with building codes and regulations. Regular inspections by certified electricians ensure safety. Neglecting this can lead to fines or legal consequences. Proper wiring keeps you within the law.
Common Mistakes to Avoid when Wiring a Wall Lamp
One common mistake is failing to turn off the electricity at the breaker. Working with live wires is extremely dangerous. Always use a voltage tester to confirm there’s no power before starting. This simple step can prevent serious injuries. Many accidents occur due to overlooked safety checks.
Another frequent error is using the wrong wire gauge. Each lamp requires a specific gauge to handle its power load. Using a thinner wire can cause overheating and potential fires. Be sure to consult the lamp’s manual for the correct specifications. Adhering to these guidelines ensures both safety and efficiency.
Improperly securing wire connections can also lead to problems. Loose connections can result in flickering lights or intermittent power. Use wire connectors and electrical tape to secure them properly. Double-check each connection to ensure it’s tight. This helps maintain a consistent power flow.
Some people neglect to ground the lamp. Grounding is essential for safety. It helps to direct any electrical faults away from the user. Always connect the ground wire to a proper grounding point. Skipping this step increases the risk of electric shock.
Finally, avoid rushing the job. Taking your time ensures you don’t overlook critical steps. Check each part of the process thoroughly. If you’re uncertain, consult reliable resources or professionals. Avoiding these common mistakes can make your lamp wiring both safe and efficient.
Frequently Asked Questions
Understanding how to wire a wall lamp is crucial for safety and efficiency. Here are some frequently asked questions to help guide you through the process.
1. What tools do I need to wire a wall lamp?
The essential tools include a screwdriver, wire strippers, electrical tape, and a voltage tester. These will help you secure connections and ensure no power is present while working.
A few other useful items might be pliers and a drill for mounting brackets. Make sure all tools are within easy reach before starting your project for smoother workflow.
2. How do I know which wire is neutral?
In most electrical wiring systems, the neutral wire is either white or labeled with white tape. Always double-check using a voltage tester or consult an electrician if unsure.
A wrong connection can lead to malfunction or even electrocution. Safety should always come first when dealing with electrical components.
3. What should I do if my wall lamp flickers after installation?
If your newly wired wall lamp flickers, it could mean there’s a loose connection somewhere in the circuit. Turn off the power at the breaker and check all your connections.
Tighten any loose wires and make sure they are securely connected using appropriate connectors. If flickering persists, consult an electrician for further diagnosis.
4. Is it necessary to ground my wall lamp?
Yes, grounding your wall lamp is essential for safety reasons. It helps direct any stray electrical currents away from you and into the ground.
This prevents shocks and potential electrical fires. Always connect the green or bare copper ground wire to a grounding point in accordance with local codes.
5. Can I use regular household wires for my wall lamp installation?
No, it’s important to use UL-listed wires that can handle the specific power load of your wall lamp to ensure safety and reliability.
Improper wiring can lead to overheating and fire hazards over time.
Following manufacturer guidelines will provide specificity on necessary materials.
Conclusion
Wiring a wall lamp is a task that combines careful preparation, safety measures, and precise execution. By following the proper steps and avoiding common mistakes, you can ensure a functional and safe lighting solution. Simple precautions like turning off the breaker and using the right tools can make a significant difference.
Whether you are a seasoned expert or a DIY enthusiast, understanding the intricacies involved can enhance your skills and confidence. Proper wiring not only ensures the longevity of your wall lamp but also its safety. Remember, when in doubt, always consult a professional to avoid potential hazards.

I’m Emily Johnson, an affiliate marketer and blogger focused on lamps and lighting. I share honest reviews, simple buying guides, and practical tips. My goal is to help readers choose the right lamp for their space, style, and budget with confidence.