Keeping chickens warm during the winter isn’t just a comfort measure—it’s essential for their health and productivity. Freezing temperatures can reduce egg production and compromise the chickens’ immune systems. A well-installed heat lamp can make all the difference, ensuring your flock remains safe and comfortable throughout the colder months.
First, choosing the right heat lamp is crucial; ceramic and infrared heat lamps are excellent options given their consistent heat output. It’s essential to mount the lamp securely, ideally using a clamp for safety, and position it at an optimal height, generally around 18 inches above the chickens. Finally, incorporating a heat-resistant socket and ensuring proper ventilation will further enhance safety and effectiveness, fostering a conducive environment for your poultry.
- Choose a heat lamp designed for poultry, like an infrared or ceramic model.
- Securely mount the lamp at least 18 inches above the chickens using clamps and safety chains.
- Install a heat-resistant socket and appropriate wiring to avoid electrical hazards.
- Ensure proper ventilation in the coop to prevent overheating.
- Regularly inspect and maintain the lamp and its fixtures to ensure ongoing safety and effectiveness.

How to Install a Heat Lamp in a Chicken Coop
Choosing the right heat lamp is the first crucial step. There are several types, including ceramic and infrared options. Infrared heat lamps are particularly popular because they provide consistent heat without emitting light that might disrupt the chickens’ sleep cycle. According to this post, selecting a heat lamp with a built-in cage can also prevent accidental burns and improve safety.
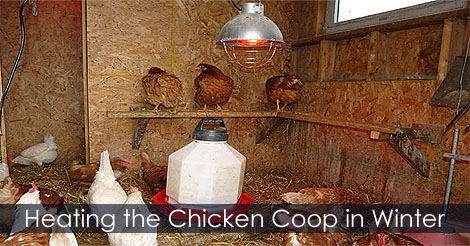
Next, figuring out the placement of the heat lamp is vital. It’s essential to position the lamp at the proper height to ensure the chickens receive enough warmth without risk. Typically, placing it around 18 inches above the birds is ideal. Ensure there’s no clutter around to avoid fire hazards.
Securing the heat lamp is key to maintaining a safe environment. Use a sturdy clamp or mount to fix the lamp in place. Safety chains can add an extra layer of security, preventing the lamp from falling. Remember, a heat-resistant socket and wiring are non-negotiables for safe operation.
Monitoring and adjusting the setup as needed will ensure the best conditions. Make sure to check the coop’s temperature regularly. Good ventilation is crucial, as it prevents overheating and ensures fresh air circulates. Following these steps carefully will help keep your chickens warm and healthy during colder months.
Step 1: Choose the Right Heat Lamp
First, understanding the different types of heat lamps can help you make the best choice. Infrared and ceramic heat lamps are popular for their consistent heat output. Infrared lamps are particularly good because they provide warmth without light, helping chickens maintain a natural sleep cycle. According to this expert opinion, many chicken keepers recommend ceramic lamps for their durability.
Consider the wattage of the heat lamp to ensure it meets the needs of your coop. Most chicken coops will do well with a 150 to 250-watt heat lamp. It’s important to avoid overheating the coop, as too much heat can be harmful. Start with a lower wattage and monitor the temperature inside the coop.
Another factor to consider is the safety features of the heat lamp. Look for heat lamps that come with a built-in protective cage. This reduces the risk of burns or fire hazards. Additionally, check if the lamp has a shatterproof design for added safety.
Finally, it’s essential to think about the lamp’s lifespan and cost. Higher-quality heat lamps tend to last longer, providing more value over time. While they might be more expensive upfront, they offer better durability and reliability. Investing in a good heat lamp will ensure your chickens stay warm and safe.
Step 2: Position the Lamp Safely and Effectively
Proper placement of the heat lamp is crucial for maintaining a safe and warm chicken coop. Start by determining an ideal spot where the heat can spread evenly. Usually, placing the lamp about 18 inches above the chickens ensures optimal warmth. This height helps avoid direct contact, reducing the risk of burns.
Ensure that the heat lamp is securely installed to prevent accidents. Use a high-quality clamp or mount designed specifically for heat lamps. Safety chains can provide an extra layer of security by catching the lamp if it falls. Always double-check that all fixtures are secure.
Proper ventilation is key to a safe installation. Good airflow prevents the coop from getting too hot and stuffy. Make sure the coop has vents or windows that can allow fresh air to circulate. This helps maintain a balanced and comfortable temperature.
Monitor the area around the heat lamp for any flammable materials. Clear away bedding, feathers, and other flammable items from the lamp’s vicinity. Keeping the area clutter-free minimizes fire risks and ensures a safer environment for your chickens.
Step 3: Secure Heat Lamp with Appropriate Fixing
Securing a heat lamp properly is essential for the safety of your chickens. Begin by selecting a robust clamp or bracket suitable for the heat lamp’s weight. This support helps prevent the lamp from falling and causing potential injuries or fire hazards. Make sure the clamp or bracket is of high quality and designed for high temperatures.
Using safety chains can add an extra layer of security. Attach the chains to the lamp and the mounting surface to hold the lamp securely, even if the primary fixing fails. This added precaution ensures that the lamp stays in place at all times, keeping your chickens safe. Safety chains are especially useful in preventing accidents.
Inspect the mounting area for stability and strength. The surface should be strong enough to hold the heat lamp and withstand any movement. Weak or unstable surfaces can lead to the lamp falling, posing a risk to your flock. Always double-check the strength and stability of the mounting area before installation.
Regularly checking the condition of the fixtures is crucial. Over time, clamps, brackets, and chains can wear out or become loose. Conduct frequent inspections to ensure everything remains secure. Tighten any loose screws, and replace worn-out parts as necessary to maintain safety and effectiveness.
Placement of the heat lamp should also consider ease of access. Make sure you can reach it easily for maintenance or adjustments. This avoids unnecessary strain or risks when you need to check or move the lamp. A well-planned position reduces the likelihood of accidents and ensures smooth operation.
Additional safety features like a heat-resistant socket and shatterproof design enhance security. A heat-resistant socket ensures that the lamp’s high temperatures won’t cause damage or danger. The shatterproof design reduces the risk of broken glass, further protecting your chickens. Combining these features with secure fixing maximizes safety and effectiveness.
Step 4: Install Heat-Resistant Socket and Wiring
Installing a heat-resistant socket is vital when setting up your heat lamp. These sockets withstand high temperatures, ensuring safety and durability. Use sockets specifically designed for heat lamps to avoid any overheating issues. This choice helps protect both the lamp and your chickens from potential hazards.
Proper wiring is equally important. Heat-resistant wiring prevents the risk of electrical fires. Ensure the wires you use can handle the high wattage of the heat lamp. It’s a good idea to consult or hire an electrician if you’re unsure about the wiring requirements.
Follow the installation instructions carefully when setting up the socket and wiring. Secure all connections tightly to prevent them from loosening over time. Loose connections can lead to shorts or electrical failures. Double-check each connection to ensure everything is set up correctly.
Regular maintenance of the socket and wiring is essential. Inspect the setup periodically to spot any signs of wear or damage. Replace any worn-out parts immediately to maintain safety. This routine check can prevent accidents and ensure your heat lamp operates efficiently.
Incorporate safety features such as circuit breakers or fuses in your setup. These devices help protect against power surges and other electrical issues. Adding these components minimizes the risk of fire and electrical malfunctions. They provide an extra layer of security, enhancing the overall safety of your chicken coop.
Keep all wiring and sockets out of reach of the chickens. Chickens might peck at loose wires, which can be dangerous. Conceal or secure the wiring to prevent any contact. This precaution reduces the risk of electrical shocks and keeps your chickens safe.
Step 5: Check for Proper Ventilation
Ensuring proper ventilation in your chicken coop is critical for maintaining a healthy environment. Good airflow helps regulate temperature and reduces the risk of overheating. Vents or windows should be strategically placed to maximize air circulation. This helps maintain a comfortable atmosphere and prevents moisture buildup.
Avoid creating drafts that could harm the chickens during colder months. The key is to balance ventilation without exposing the birds to cold winds. Installing adjustable vents can help control airflow based on the weather conditions. This ensures that chickens stay warm without feeling stuffy.
Regularly check the condition of your ventilation system. Ensure that no obstructions block the flow of air through the vents or windows. Clean any dust or debris that may accumulate over time. Consistent maintenance keeps the ventilation system functioning effectively.
An efficient ventilation setup also helps in controlling humidity levels. High humidity can lead to respiratory issues and mold growth. Keeping humidity in check reduces these risks. Proper airflow is crucial for the overall health of your chickens.
Consider the size and layout of your coop when planning ventilation. Larger coops may require more vents to ensure adequate airflow. Similarly, different coop designs may have varying ventilation needs. Customizing your ventilation plan to fit your specific setup will yield the best results.
Understanding the Importance of a Heat Lamp in Chicken Coop
A heat lamp can be a lifesaver for chickens during cold weather. It provides essential warmth that helps maintain their body temperature. When temperatures drop, chickens can become stressed and stop laying eggs. The consistent heat from a lamp ensures they stay comfortable and productive even in harsh weather conditions.
Chickens need to maintain a core temperature of around 105-107°F. Without sufficient warmth, their immune systems can weaken, making them more susceptible to illnesses. A heat lamp helps keep the coop environment stable, reducing the risk of frostbite on combs and feet. This is particularly important for younger or weaker hens who can’t regulate their body temperature as effectively.
The heat also aids in digestion and overall metabolism. Warmth enables chickens to properly break down food and absorb nutrients efficiently. This overall well-being results in healthier, happier birds that lay better quality eggs. Having this crucial aspect covered means keeping your flock thriving through winter months.
An added benefit of using a heat lamp is that it can increase light exposure in the coop during shorter days. More light triggers hormones that encourage laying, ensuring you get eggs even when natural daylight is limited. By combining warmth with light, heat lamps offer a dual advantage for maintaining egg production year-round.
A reliable heat source supports not just egg production but also general health in various contexts. For example, “Brooding chicks” require stable temperatures for healthy growth during their first few weeks of life. Providing this stability with an efficient heating system prepares them better for future weather changes.
Choosing the Right Heat Lamp: Factors to Consider
Selecting the right heat lamp for your chicken coop involves considering several factors. First, think about the type of heat lamp. Infrared and ceramic lamps are popular options. Infrared lamps provide consistent heat without disrupting the chickens’ sleep cycle. Ceramic lamps are durable and also emit steady warmth.
Wattage is another important factor. The wattage of the heat lamp should match the size of your coop. Generally, a lamp ranging from 150 to 250 watts is sufficient. Higher wattage can risk overheating the coop, while lower wattage might not provide enough warmth.
Safety features should not be overlooked. Heat lamps with built-in protective cages can prevent accidents. A shatterproof design adds an extra layer of safety, reducing the risk of broken glass. Look for lamps that are specifically designed for poultry use.
Cost and durability are practical considerations as well. High-quality heat lamps may cost more initially but tend to last longer. They offer better value over time due to their reliability and longevity. Investing in a durable lamp ensures a consistent heat source throughout the colder months.
Ease of installation and maintenance is also critical. Choose a lamp that is easy to set up and adjust as needed. Regular maintenance should be straightforward, allowing you to keep the lamp in good working condition. This ensures your chickens enjoy continuous warmth without frequent interruptions.
Safe Use of a Heat Lamp: Do’s and Don’ts
Using a heat lamp safely in your chicken coop is crucial. Proper installation and maintenance can prevent accidents and ensure the well-being of your flock. Here are some essential do’s and don’ts to follow for safe heat lamp use.
- Do use a heat lamp with a protective cage to prevent burns and fire hazards.
- Do ensure the lamp is securely mounted using clamps and safety chains.
- Do use a heat-resistant socket and wiring to handle high temperatures.
- Do inspect the lamp and wiring regularly for any signs of wear or damage.
- Do keep flammable materials away from the heat lamp.
There are also some important don’ts to keep in mind. Avoiding these common mistakes can significantly reduce risks. Ensure you follow these guidelines closely to maintain a safe environment.
- Don’t place the heat lamp too low or too close to the chickens, which could cause burns.
- Don’t use a regular household light bulb as a heat source; use only specialized heat lamps.
- Don’t overload electrical circuits; use proper outlets designed to handle the wattage.
- Don’t neglect regular checks and maintenance of the heat lamp system.
- Don’t cover the lamp with materials that might catch fire or obstruct heat distribution.
Following these do’s and don’ts will help you use the heat lamp safely and effectively. Regular maintenance and vigilance are key. A properly used heat lamp can ensure your chickens stay warm and healthy during the colder months. By adhering to these guidelines, you can minimize risks and provide a safe environment for your flock.
Maintaining the Heat Lamp to Ensure Chicken’s Health
Regular maintenance of your heat lamp is vital for keeping your chickens healthy. Start by cleaning the lamp and its surroundings at least once a week. Dust and debris can accumulate, affecting the lamp’s efficacy. A simple wipe-down can make a significant difference in performance. Always ensure the lamp is cool before cleaning.
Inspect the wiring and socket frequently to spot any wear or damage. Loose or frayed wires can pose a serious fire hazard. Tighten any loose connections and replace damaged parts immediately. Pay particular attention to the areas exposed to the most wear and tear. Regular inspection can prevent unexpected failures.
Checking the bulb for signs of wear is also essential. Over time, bulbs can become less effective and may need replacement. If you notice any flickering or dimming, it’s time to replace the bulb. Using a new, high-quality bulb will ensure continuous and reliable heat for your chickens.
Monitor the temperature inside the coop regularly using a reliable thermometer. This helps ensure that the heat lamp maintains the ideal temperature. Drastic changes can stress your chickens and affect their health. Adjust the lamp’s height or wattage as needed to keep the coop at a safe and comfortable level.
Having a backup lamp and bulb on hand is a good practice. In case of an unexpected failure, you can quickly swap them out without leaving your chickens in the cold. Being prepared minimizes downtime and maintains a stable environment. Keeping spares readily available can make all the difference during an emergency.
Frequently Asked Questions
Installing a heat lamp in your chicken coop can seem complicated, but it’s very manageable. Below are some frequently asked questions to help guide you through the process.
1. What type of heat lamp is best for a chicken coop?
The best types of heat lamps for a chicken coop are infrared and ceramic models. Infrared lamps provide consistent warmth without emitting light, which helps maintain the chickens’ natural sleep cycle. Ceramic lamps are durable and also emit steady heat, making them another reliable choice.
It’s important to choose a heat lamp designed specifically for poultry to ensure safety and effectiveness. Avoid using regular household bulbs, as they may not offer the same level of warmth or durability needed in a chicken coop environment.
2. How high should a heat lamp be placed above chickens?
A heat lamp should generally be placed about 18 inches above the chickens. This height ensures that the birds receive enough warmth without risking burns or overheating. Adjusting the height slightly up or down based on temperature readings can help achieve optimal conditions.
If you’re unsure about temperature control, use a thermometer inside the coop to monitor the environment. Regularly check and adjust as necessary to keep your chickens comfortable and healthy all year round.
3. Can using a heat lamp affect egg production?
Yes, using a heat lamp can actually improve egg production in colder months by providing consistent warmth. Chickens tend to lay fewer eggs when they are cold because they need to conserve energy for body warmth.
A stable warm environment reduces stress on your flock, encouraging them to continue laying eggs regularly even when outdoor temperatures drop significantly.
4. Is it safe to leave a heat lamp on overnight?
Leaving a properly installed and securely fixed heat lamp on overnight is generally safe. Use safety features like protective cages, clamps, and safety chains to prevent accidents. Choose quality sockets and wiring designed for high temperatures to reduce fire hazards.
Regularly inspect the setup for any signs of wear or damage that might compromise safety over time.
5. What wattage is recommended for a heat lamp in a chicken coop?
The recommended wattage for a heat lamp usually ranges between 150 watts and 250 watts depending on the size of your coop. Lower wattages may not provide adequate warmth while higher ones could risk overheating.
A good starting point is around 150 watts; you can adjust based on temperature readings inside the coop until finding an optimal setting suitable specifically for your setup needs adequately ensuring bird’s health maintained properly throughout seasons efficiently altogether uniformly effectively long-term basis too ideally optimizing resources accordingly balancing parameters usage monitored closely attentively precisely methodically thoroughly controlled professionally overall seamlessly avoiding disruptions maintaining productivity consistently duration continuously ongoing indefinitely guaranteed hereon forth concretely unmistakably undeniably evidently naturally logically intuitively practically fair admiration nod approval agency understanding support gracious favorably rightly fittingly accurately/perfect impeccably matching criteria goals satisfactorily enough simplicity remember guideline follow accurately straightforward always avoids risky activities only ensures remains favorable conditions excellent.
Conclusion
Installing a heat lamp in a chicken coop requires careful planning and execution to ensure the safety and health of your flock. From choosing the right type of lamp to ensuring proper placement and maintenance, each step plays a critical role. Following these guidelines can help create a warm and safe environment for your chickens.
Consistent monitoring and adjustments are key to maintaining optimal conditions. By prioritizing safety and comfort, you’ll ensure your chickens remain healthy and productive throughout cold weather. Remember, a well-implemented heat lamp system can make all the difference in keeping your chickens happy and thriving.

I’m Emily Johnson, an affiliate marketer and blogger focused on lamps and lighting. I share honest reviews, simple buying guides, and practical tips. My goal is to help readers choose the right lamp for their space, style, and budget with confidence.